Travels for Taste

Tales of travel and food with a touch of spice

  • Home
  • About
    • In the Press, Published Work and Interviews
    • PR and Disclosure Policy
  • Food
    • Recipe Index
      • Indian
        • C.K.P recipes
        • Curry – Meat, Seafood
        • Curry – Vegetarian
        • Sides
        • Chutneys
      • Healthy
        • Soups
        • Salads
      • Quick and Easy
      • Baking
        • Desserts
      • Meat
      • Seafood
      • Vegetarian
        • Salads
      • Vegan
    • Product Reviews
    • Events
  • Travel
    • UK
    • India
    • Around the World
  • Lifestyle
    • Home
    • Kitchen
    • Restaurant Reviews
    • Miscellaneous
  • Giveaways
  • Work with me
    • Meet interesting foodie entrepreneurs here

Stuffed Marrow Bake

September 28, 2014 by manjirichitnis 6 Comments

It was on a sunny summer Sunday morning that I finally went to the local car boot sale to look for any treasures that I may find to use as food props and found this beauty.

1-IMG_9056 (Copy)

But it wasn’t just this beauty that we came home with. We found a beautiful marrow and I instantly knew what we would be having for dinner. sometimes things just come to you by some sort of divine alignment of separate incidents to become one. I had some Lactofree mature cheddar cheese which I was looking to experiment with and this was the perfect chance to use it in a bake. Had a packet of smoked bacon cubes and yes had some cute, tiny bottles of olive oil which had been sent to me. I normally would infuse my own oils and always have a big bottle  of olive oil into which I stuff a few cloves of crushed garlic, some chill flakes and fresh herbs – the oil adds beautiful depths of flavour in whatever I use it for and because it is a lovely bottle, it looks pretty on my kitchen counter too – which reminds me I need to get around to doing this again soon – hummm

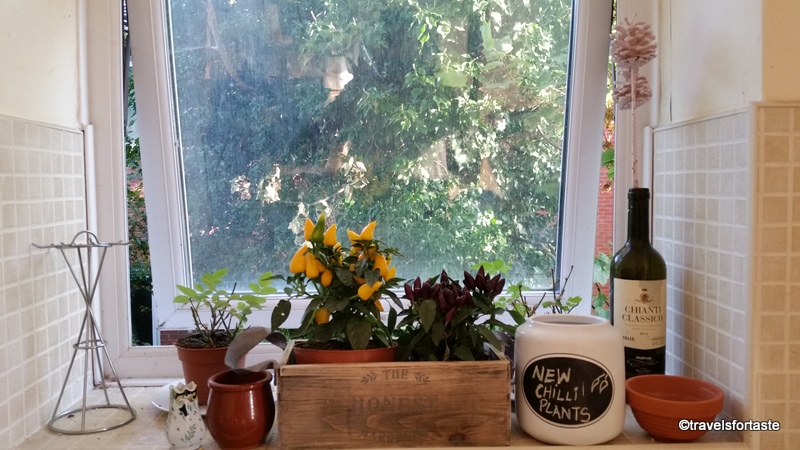
Also, I had these bright and colourful mini chilli plants now sitting on my window sill, looking all pretty and waiting to be used – yellow and deep aubergine coloured chillies – this was going to be one colourful bake!

1-2014-08-17 18.40.24

So this beautiful marrow came home with us and just like that became part of our dinner plans…..

Stuffed Marrow Bake 

Ingredients

  • 1  beautiful marrow
  • 3 heaped tbsp grated Lactofree mature cheddar
  • 3 flakes of garlic chopped fine
  • 500 gm smoked bacon cubes
  • 4 tbsp sweet corn
  • 2 medium-sized red onions
  • 2 tbsp chilli infused Terra Rossa Olive Oil
  • 1/2 tsp chilli flakes
  • Sea salt to taste

Method

  • Chop the red onions lengthwise, set aside.
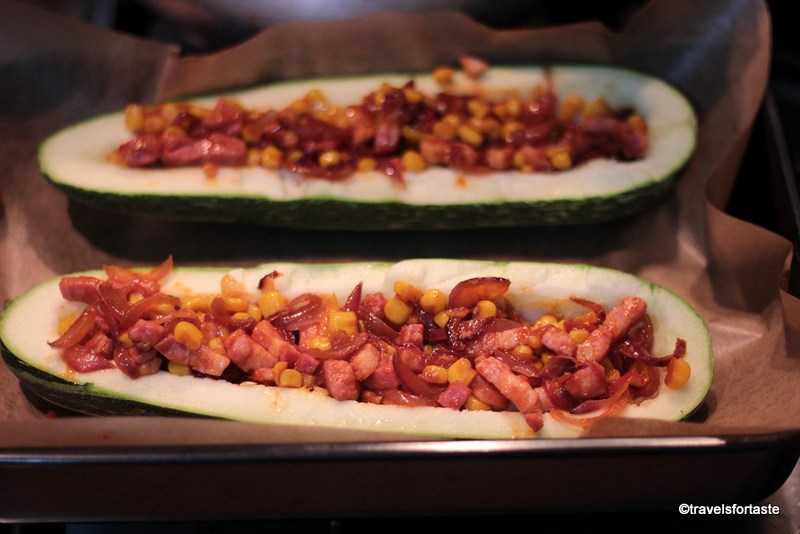
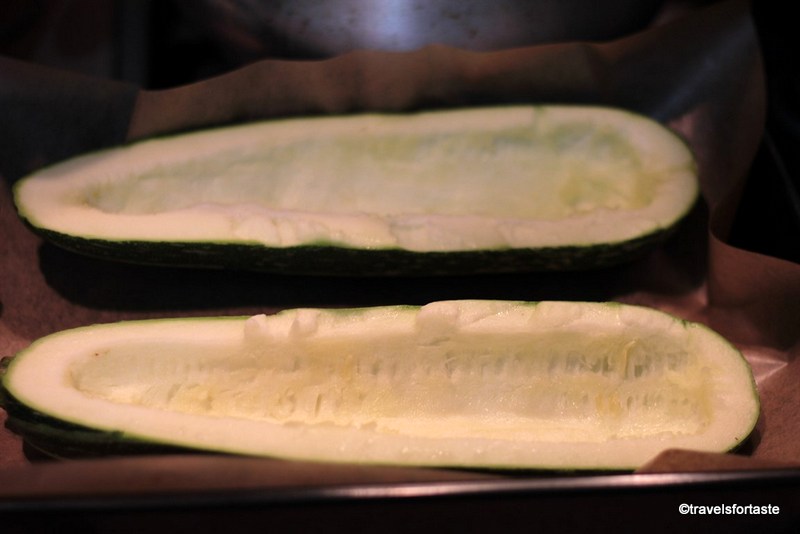
  • Cut the marrow into half and scoop out the insides and discard, I know I should have saved them for making something else …

2-IMG_8492 (Copy)

In a saucepan heat 1 tbsp chilli Terra Rossa Olive Oil.

  • Sauté the chopped garlic first and when it begins to brown and the aroma explodes into the kitchen its time to add in the chopped red onions and toss them around till they begin to change colour. Then add the smoked bacon cubes and cook on a medium flame stirring occasionally for about 3 minutes.
  • Then add in the sweet corn and mix well for about a minute, season with sea salt and chilli flakes.

3-IMG_8493 (Copy)

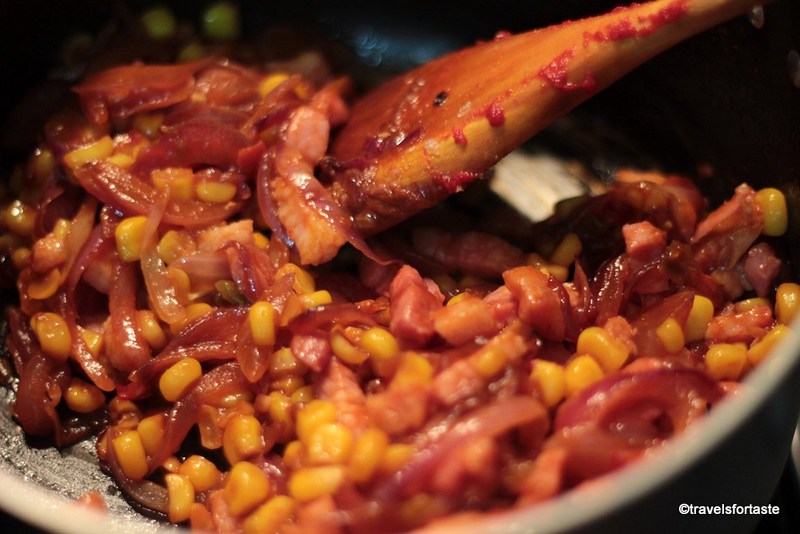
  • Remove the saucepan with this onion, bacon and sweet corn mixture off the flame and set aside.
  • Line a baking tray with parchment and brush some olive oil on the marrow inside out so that it has a bang of flavour when you bite into it.
  • Stuff both halves of the marrow with the mixture.

4-IMG_8497 (Copy)

  • Wrap the stuffed marrow halves in foil and bake for half an hour at about 180°C – I have a fan oven, please adjust time accordingly to suit your oven.
  • Remove from foil and add the grated Lactofree mature cheddar cheese on the top.
  • Then bake again without foil till the cheese browns or for 10 minutes approximately.
  • Serve with a warm fresh baguette or a cheesy bread – simply so that you can scoop every single bit of juicy goodness as you eat

Terra Rossa oils - product shots

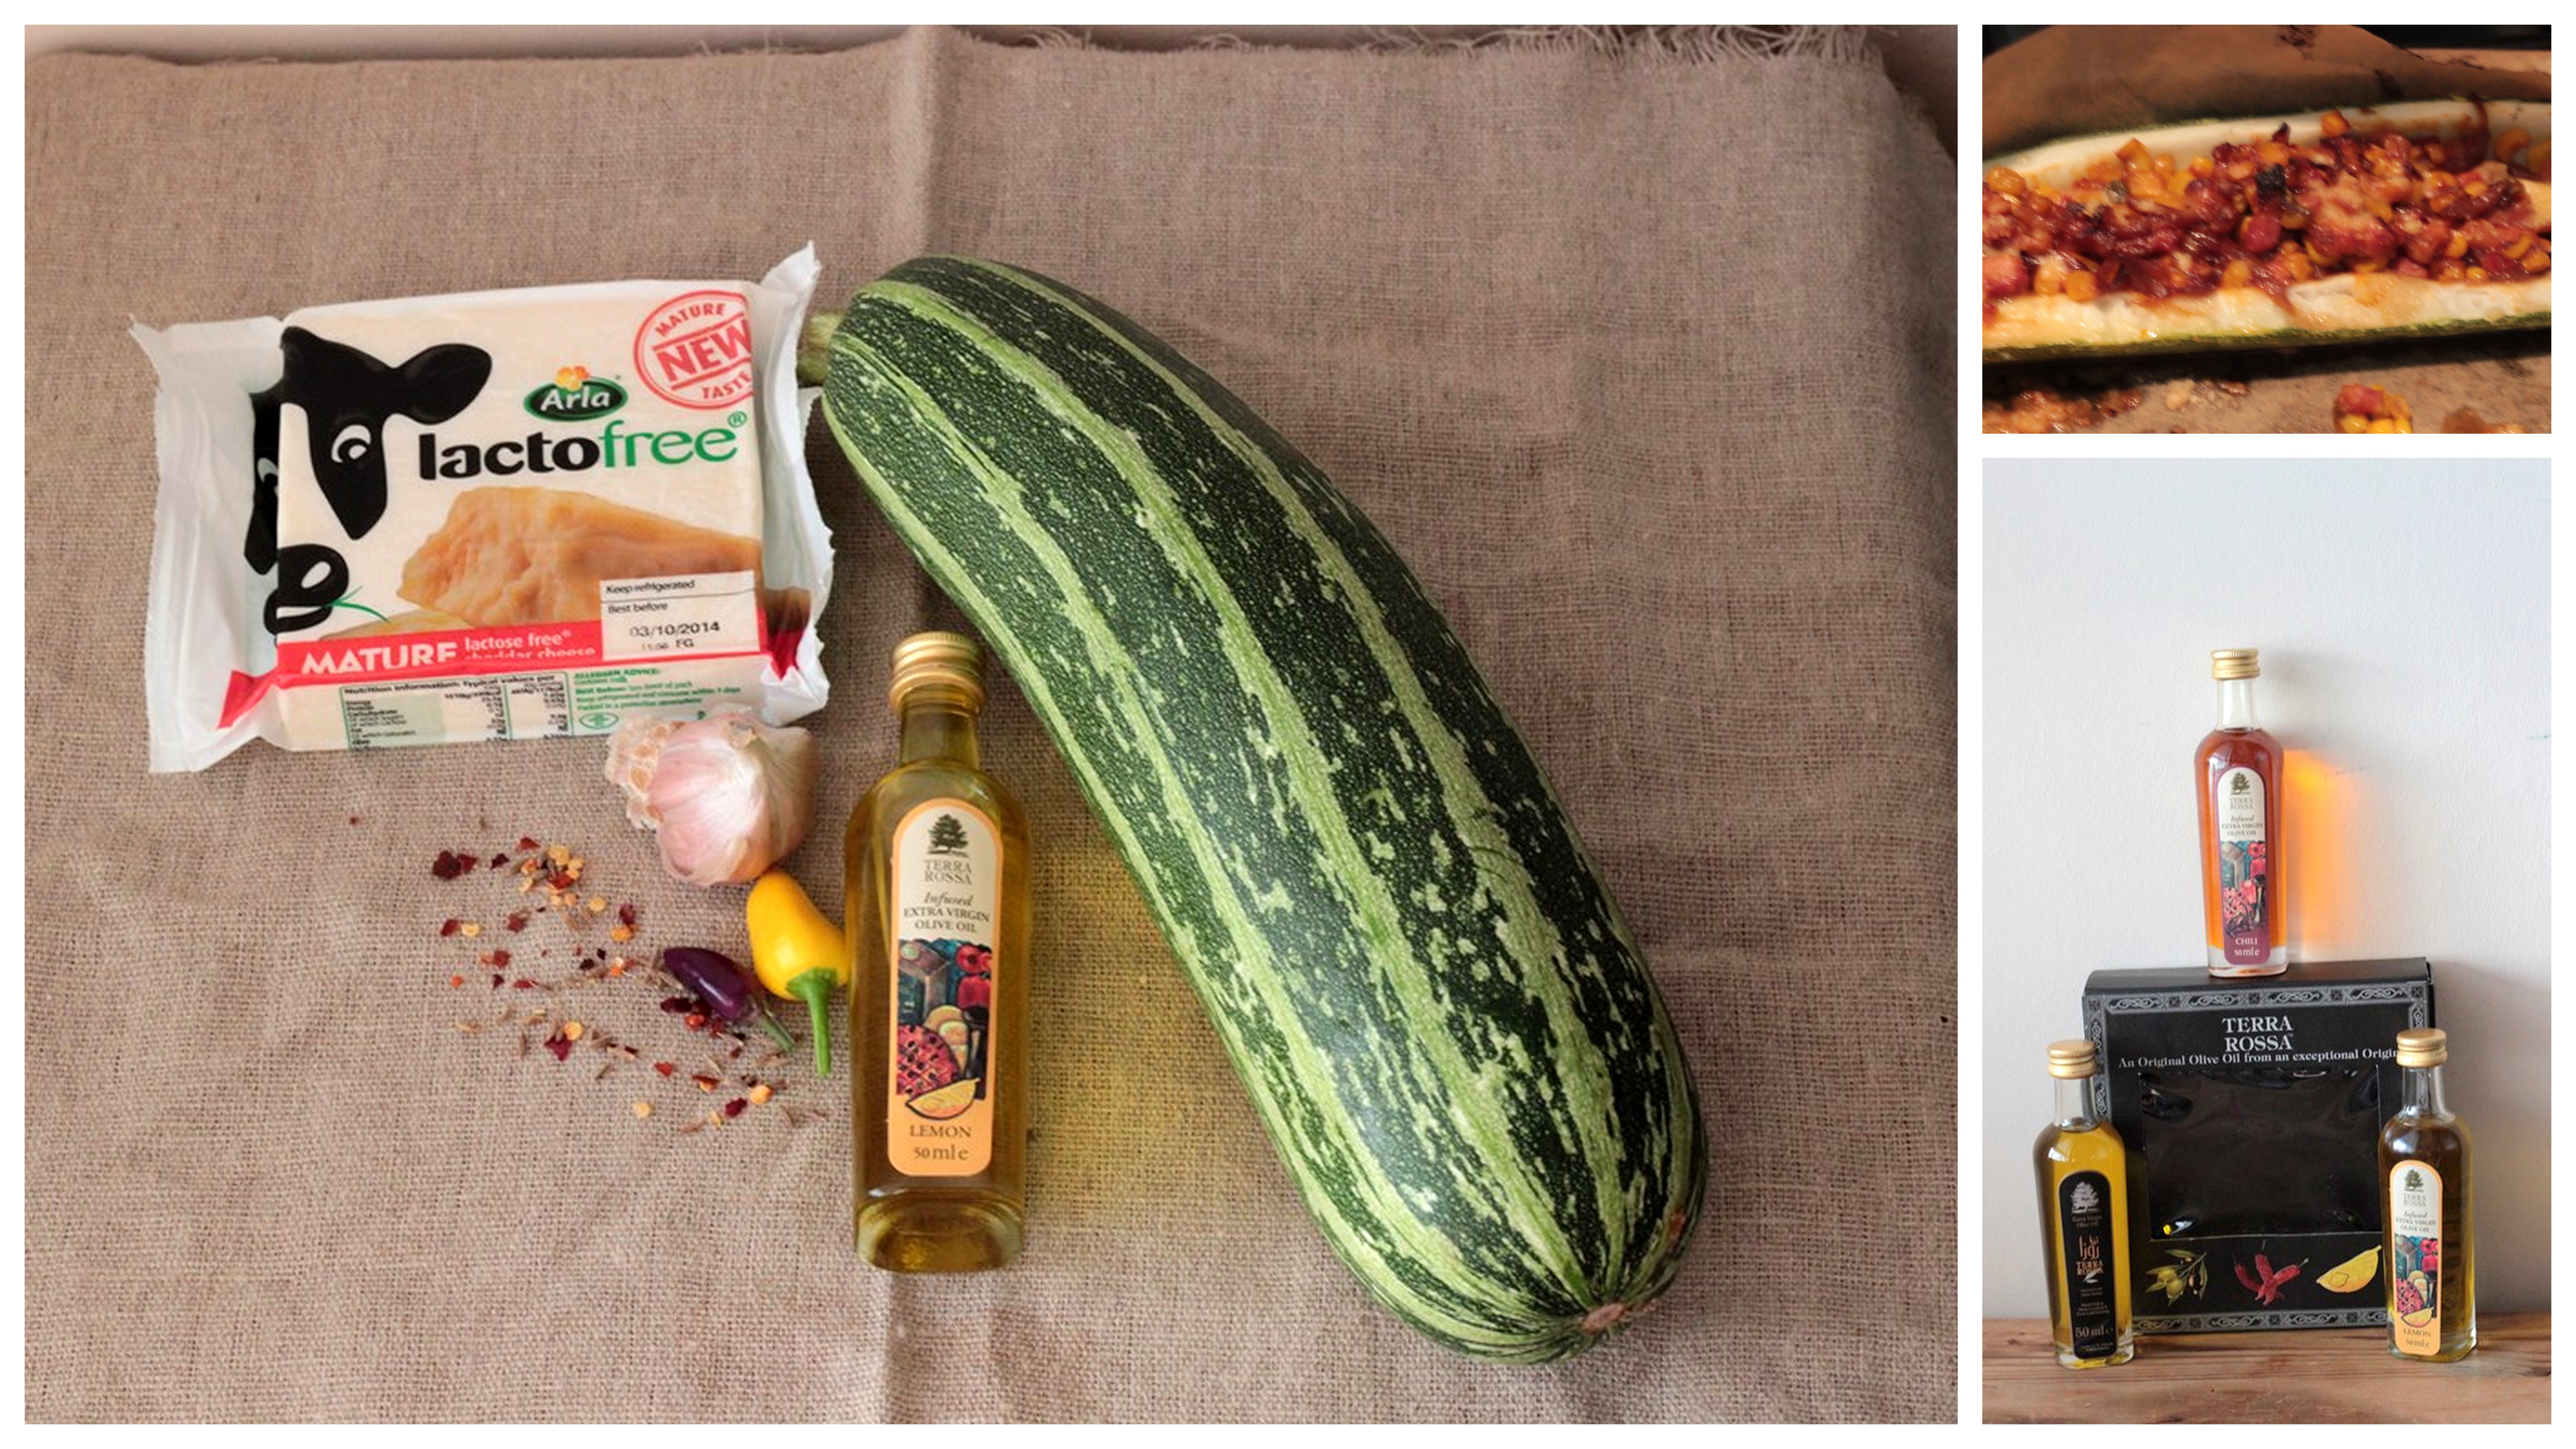
The Terra Rossa oils, I received a pack of 3  exquisite Jordanian infused extra virgin olive oils – chilli and lemon infused oils and an unfiltered, cold dripped Sinolea extra virgin olive oil. Not only is it good to have in the store cupboard, I think it makes for a lovely gift idea too! Yes, it isn’t too early to start planning your Xmas gift list is it?

It is incredible how much flavour this humble marrow packs in. I cannot wait to use it again in soups and stews. Yes, it’s autumn and we are going towards colder weather. So along with getting those woollies out we also need to get started with beautiful soups and stews hummm – the seasons they are a-changing! This easy recipe is perfect for busy weekend evenings ( or for a lazy Sunday evening when you want to spend some time watching telly sipping a glass of wine and chilling out rather than slaving in the kitchen!) when you do not want to compromise on flavour and want a wholesome meal too. For a meat-free option replace the bacon with a spicy potato and cauliflower mix. Whatever you choose to add as the stuffing, the result will always be satisfactory – that’s the nature of this beautiful marrow ….

*With thanks to Terra Rossa for the samples. No monetary compensation was offered for a positive review. As always all opinions expressed here are entirely my own.

Stuffed Marrow Bake

Filed Under: Food, Product Reviews, Quick and Easy Tagged With: delicious dinner, easy dinner recipes ready under an hour, easy dinners, food blog, food blogger, food writer, Jordanian infused extra virgin olive oils, Lactofree mature cheddar cheese, Manjiri Chitnis, Manjiri Kulkarni, meat free version possible, oven bales, Product review, quick and easy recipe ideas, recipe development, slice of my life, sliceoffme, sliceoffme recipes, smoked bacon cubes, Stuffed marrow bake recipe, tasty, travel blogger, travel writer, travelsfortaste, yummy

Radha Krishna Bhavan – Tooting , a review

September 10, 2014 by manjirichitnis 7 Comments

On a dreary Saturday afternoon a few weeks ago after my weekly Indian shop form Dadu’s at Tooting, not feeling particularly in the mood to cook , we walked into Radha Krishna Bhavan for an early lunch . The place was open and barring one table we could pick and choose where to sit , unusual for a Saturday afternoon , little did I know that minutes later the place would be buzzing with activity.


1-2014-08-16 12.54.53 (Copy)


This is a sea food lovers heaven with authentic ,well balanced south Indian cuisine. We ordered a starter of spicy Vadas – flat, fried lentil dough spiced with green chillies and onion , this was crunchy and delicious and just the thing needed on a boring Saturday afternoon when the weather was playing traunt ! (£2.95)


2-2014-08-16 12.56.48 (Copy)


6-2014-08-16 13.09.31 (Copy)


The first thing I noticed was the many sticker on the glass outside with various ratings from the Good Food Guide, Square Meal etc  and a bright yellow mini menu saying ”3 courses for just £5.95′ ! Super ! That definitely drew us in.


1-2014-08-16 13.21.16 (Copy)


But we decided to go a la Carte and ordered for some Kerala Fried Rice (£4.50)and Kerala Fish curry (£7.50) .The fish curry was yum but the portion size was a bit small to share , same with the rice and we found the rice had more than a generous use of oil but it was delicious all the same.


2-2014-08-16 13.21.41 (Copy)


Hungry for more we decided to experiment with some Vellappam – a pancake made of fermented rice with ground coconut and coconut milk with a  lacy egg like appearance . These were light yet  filling and 2 panckakes per dish came with the curry at a combined price (£7.95 ) .The pancakes were mopped up with the accompanying  curry –  a spicy King Fish Malabar.


3-2014-08-16 13.50.44 (Copy)


With no room left for dessert after this we decided to skip and just get ice lollies on our way home 😉


5-2014-08-16 13.07.56 (Copy)


I’d definitely recommend you visit Radha Krishna Bhavan if you are looking for delicious and authentic  flavours of South India at budget rates in a clean , welcoming atmosphere with quick service head (opposite Sainsburys on Tooting High Street)


3-2014-08-16 12.57.11 (Copy)


*This review was written by me of my own accord . I bore the expense of this meal. All views  expressed as always are my own and no monetary compensation of any sort by provided to me by either the restaurant or any other third party.All opinions expressed are valid for this particular visit .

Filed Under: Lifestyle, Restaurant Reviews Tagged With: authentic cuisine, blogger review, budget eats in south west london, budget eats in Tooting, curry leaves, delicious, eating out in London, fish curry, flavours of India, food blogger, Kerala, lifestyle, lifestyle blogger, london, love Indian food, meal deal under £5 in London, prawn, Restaurant Review, rice, sliceoffme reviews, South Indian cuisine, spicy, tasty, theatre, Tooting Broadway, travel blogger, travelsfortaste, water, yummy

Zingy Turkish Poached Eggs

April 2, 2014 by manjirichitnis 30 Comments

I am a fan of eggs in any form and when I chanced upon this delightful Turkish recipe for combining eggs with thick and fulfilling greek yoghurt I just had to go ahead and experiment! Total Greek Yogurt 0% is fat-free, gluten-free and suitable for vegetarians and pregnant women – all good, no nasties! Besides these virtues its consistency is great and I have in the past few days consumed one of the smaller pots per day part in smoothies and just a dollop with my rice and curry dinner. There are so many versatile combinations that are possible with this yoghurt. From smoothies and shakes to use in cooking as a marinade or cooling dip with chopped goodies like fresh chives, garlic, chilli flakes etc.The thick and creamy consistency is a bonus if you’re trying to watch your weight too!

I made these poached eggs for brunch and served them with wholemeal pitta toasted in the same pan where I made my chilli butter – fabulous!

Traditionally this dish is called Cilbir (pronounced as chillburrr, roll the r’s!) is a Turkish dish of poached eggs with yoghurt (often with garlic mixed in). There are records of Cilbir being eaten by Ottoman sultans as far back as the 15th century. It is now common to serve the dish topped with melted butter infused with Aleppo pepper, for which paprika can be substituted. (Source: Wiki)

1-IMG_6791 (Copy)

Serves :2

Ingredients:

  • 4 large eggs – 2 per person
  • a handful of fresh mint roughly chopped
  • 5-6 cloves of garlic peeled and chopped fine
  • 500gm Total Greek Yogurt 0%
  • Butter 50gm
  • 1/2 tsp smoked paprika
  • Plenty of freshly cracked black pepper
  • Sea Salt as per taste
  • a pinch of chilli powder – as per your tolerance levels

Method:

  • Boil water in a large saucepan (my time-saving trick -boil water in the kettle and add to the saucepan), then cover with the lid and allow to simmer on a medium flame for a while
  • When the water is absolutely boiling hot, take off the lid and reduce the flame to a very low simmer. Then, carefully crack the eggs into the water one by one. They seem to sort of go ‘freeze frame’ once dropped into the boiling water. Give them about 30 seconds and when it seems like they have been poached carefully remove them one by one using a slotted spoon. If you suspect that the yolk will just burst open it means it needs some more time inside. Don’t worry if this process isn’t perfect the first time around , its a learning curve and you will get it right in a few tries – in case of disaster scoop out as much of the egg as you can and after you are done with all the eggs use a sieve to save the remaining egg 🙂
  • Use two bowls or plates to serve. First, scoop some yogurt into each of the serving bowls. Season with sea salt, a generous sprinkling of cracked black pepper and a pinch of chilli powder. Mix well
  • Create a bit of shallow space in the middle of the yoghurt mix and place the poached eggs on top
  • Heat a non-stick pan on a medium flame, reduce flame to a simmer. Melt the butter and before it starts to brown add the finely chopped garlic and smoked paprika. Then add some sea salt
  • Quickly pour this delicious golden spiced butter over the eggs and yoghurt
  • Garnish by sprinkling some fresh mint leaves, roughly chopped for a burst of fresh flavour
  • Toast the mini wholemeal pitta bread portions in the same pan that was used to melt and spice the butter and it will give your pitta that extra kick of flavour!
  • Scoop the flavoured poached egg and the cooling yogurt with the pitta bread. It’s a beautiful sensation on your palate as the cold yogurt and smoked paprika work their magic on your taste buds.
1-IMG_6774 (Copy)
Disclaimer: With many thanks to Total UK. I was not required to write a positive review and was not compensated monetarily for this post. Like all my previous posts about events and reviews, ALL opinions expressed here are entirely my own.
1-IMG_6766 (Copy)

Egg-citing egg recipes to inspire you!

  • Indian Masala egg omelette
  • Smoky chorizo and chives with eggs oven-baked in pots
  • Masala egg curry, a recipe famous on the street-food stall in Mumbai
  • Soft-boiled eggs and asparagus soldiers
  • An omelette with a twist

Filed Under: Food, Product Reviews, Quick and Easy, Recipe Index Tagged With: #TryTotal, butter, chopped fine, Çılbır, cracked black pepper, delicious, easy brunch idea, easy trick to make poached eggs, eggs, fat free, filling, fresh chives, fresh mint, garlic peeled, gluten free, Good Food, hearty, how to poach eggs, low fat brunch recipe, mini wholemeal pitta breads, Ottoman sultans, pinch of chilli powder, poached eggs, recipe development, sea salt, smoked paprika, sprinkle, suitable for vegetarians and pregnant women, tasty, toast, Total Greek Yogurt 0%, Turkish recipes, wholesome, yogurt, Zingy Turkish Poached Eggs

Mushroom Omelette with French Cheese

February 5, 2014 by manjirichitnis 34 Comments

Egg Omelettes are my ultimate delicious start for the day and on weekends if we wake early to have breakfast I like to do a huge omelette with salad ,toast and steaming hot cuppas of Masala Chai. Heaven !

My current favourite addition into a lot of salads,soups and omelettes are chestnut mushrooms so when I was sent the French Cheese Chaource produced by family-owned French dairy Fromagerie Lincet, I decided to make my own recipe for a fluffy, stuffed and thick cheesy egg omelette.

Family-owned French dairy Fromagerie Lincet has been producing cheeses typical of the Champagne and Burgundy regions for five generations. Rich,soft and creamy, the dairy’s Chaource AOP is great in omelettes ,risottos and tarts.Similar in texture to Brie and Camembert, Chaource AOP is creamier, richer and slightly acidic. With no artificial colours or flavours and 100% natural ingredients, it also benefits from PDO status.

Lincet is committed to its founding principles ‘flavour, natural ingredients and tradition, brought together to make good food’; using all-natural ingredients, traditional cheese-making methods  and milk from local farms.Lincet has upheld the tradition of ladle-moulding since its opening and the dairy’s cheese curdling technique is the oldest known for making cheese.Longer than usual (12 hours +), this is what gives Lincet cheeses a melting texture and distinctive slightly acidic, flavour

image002

2-IMG_6505 (Copy)

Serves :2 Prep Time:5 minutes Cooking Time :5 minutes

Ingredients:

  • 4 medium sized eggs
  • 1 small red onion finely chopped
  • 3-4 cherry tomatoes halved
  • 2-3 chestnut mushrooms chopped into bite size bits
  • Sea Salt
  • 1/2 tsp red chilli flakes – if you don’t want heat avoid completely
  • Freshly CRacked Black Pepper
  • A generous portion of Chaource Cheese
  • Some fresh coriander chopped fine to garnish
  • a blog of butter for the pan(2 tsp)

3-IMG_6507 (Copy)

1-IMG_6508 (Copy)

Method:

  • In a large bowl crack the eggs and add the chopped red onion,mushrooms,cherry tomatoes and chopped coriander and whisk well with a fork.
  • Then season with salt ,red chilli flakes (if you don’t want heat avoid completely) and pepper and whisk again with a fork.
  • Now add the cheese and mix thoroughly and whisk again to get the air circulating and make this omelette really fluffy and thick.
  • On a pan on medium heat melt about 2 tsp of butter and pour the egg and cheese mixture.
  • Cook for about 2-3 on one side and loosen edges with a spatula.
  • To watch the cheese bubble while it cooks is such a delight!

2-IMG_6513 (Copy)

  • Then with a light hand loosen the omlette with the spatula ensuring it isn’t stuck to the pan or it will break while tossing over.
  • Flip over and cook on the other side for under 2 minutes to get a beautiful light brown golden delicious colour.

4-IMG_6515 (Copy)

  • Serve hot with fresh cherry tomatoes or iceberg lettuce and warm toast and lots of Earl Grey,English Breakfast or my new fav Chamomile tea 🙂

03-IMG_6519 (Copy)

What I like about the Fromagerie Lincent Chaource is the goeey soft ,rich taste with woody undertones, it definitely gave a depth of flavour to my omelette and am now going to use the remaining in a risotto for a weeknight dinner.

It is available at:

  • Waitrose, Top Tier Chaource AOP Hugerot 250g, £4.49 Waitrose
  •  Tesco Finest Chaource 250g, £3.00 Tesco
  •  TTD Chaource AOP 250g, £3.30 Sainsbury’s

07-IMG_6523 (Copy)

Disclaimer: I was sent a sample of  Fromagerie Lincent Chaource to test in my kitchen and was not required to write a positive review and was not compensated monetarily for this post.Like all my previous posts about events and reviews, ALL opinions expressed here are entirely my own.

2-IMG_6528 (Copy)

2nd Feb'14 Omlette with Cheese Sample

Filed Under: Food, Product Reviews, Quick and Easy, Recipe Index Tagged With: 100% natural ingredients, AOP, blob of butter, bowl, Brie, Camembert, cherry tomatoes, chestnut mushrooms, coriander, delicious, finely chopped, fluffy and stuffed and thick cheesy egg omelette, French Cheese, Fromagerie Lincent Chaource, Mushroom Omelette, no artificial colours or flavours, original recipe, pan, PDA status, recipe development, Red chilli flakes, red onion, risottos, Sainsbury’s, sea salt, sliceoffme creative kitchen, slightly acidic, smoky, soft cheese, tarts, tasty, Tesco Finest Chaource, Tesco’s Finest Range, Top Tier Chaource Hugerot, TTD Chaource AOP, Waitrose, woody, woody notes, yummy

Chicken and Red Lentil Stew – a complete ONE POT meal (Suran & Red Lentil Stew)

February 3, 2014 by manjirichitnis 33 Comments

There are times when I really want a hearty meal but don’t have the energy to stand and cook an elaborate meal. It is at times like that I turn to One pot meals, served with a warm baguette it is a filling, healthy and easy and quick to meal option which NO compromise on taste whatsoever! Moreover, its homemade, has flavour and is a satisfying experience to make .

I had been meaning to try and cook a stew using red lentils (masoor – Marathi for red lentil )for some time , they are my most favourite lentils and I am ALWAYS stocked up on a large 2 kilo pack of dried red lentils split and without skin , from my local Indian grocery shop at Tooting called Dadu’s. Also since all the other fresh ingredients were procured from my local LIDL this dish is GREAT value for money too! Am totally in love with the FRESH fruits and vegetable selection at LIDL right now.I bought some bright red long crunchy sweet peppers, a pack of medium hot chillies, fresh chicken breast fillets, a very cute packet of garlic, mixed pack of cauliflower and broccoli florets and a packet of gorgeous looking Shallots.( I have always wondered why the lentils are called RED when clearly they are a  lovely light orange colour !)

I love inventing a recipe as I go along and when I got my vegetable tray out on Sunday morning I had all these lovely vegetables staring at me and I just threw in what I thought would taste good together and VOILA ! A Steaming hot , thick, wholesome and tasty chicken and red lentil broth was born.

I love having some baby potatoes in stock and they are always handy in a stew , besides being quite the self-proclaimed ”queen of curries” I always am well stocked on Indian spices so bay leaves and cinnamon sticks aplenty in my kitchen larder – oh yes

Please don’t feel put off by the ingredient list , trust me they marry well together in the taste department and the end result is well worth your time and effort!

The biggest bonus of this stew recipe is that you can create your OWN vegetarian version by replacing the chicken with Quorn or if you don’t for some reason like or have never tried or have no access to Quorn then try replacing the chicken fillets with  Suran/Elephant Foot Yam, it can be chopped into big chunks and it takes up flavours very easily. But with the yam the cooking time drastically will reduce as it can go from just right and chewy to soft, goeey or totally disappear into the stew ! My aai (mum) always used suran as a meat replacement and marinated it well in the spices we would use for chicken or lamb and made a thick gravy dish with it, when I was younger she has managed to fool me many times over thinking it was mutton 🙂 – Aai I miss you and all the food you cook – sigh…. no India trip in sight anytime soon 🙁

(Dangerous though it looks the elephant foot yam is very very tasty! )

4-IMG_6502 (Copy)

Serves:4  Preparation Time: 10 minutes  Cooking time:35 minutes

Ingredients:

  • Red Lentils / Massor Dal -3/4th cup
  • Chicken breast mini fillets – 750gm / Comparable Quorn fillets
  • 5-6 baby potatoes
  • 6 shallots approx 200gm
  • 2 large sweet and crunchy pointed Red Peppers – approx 200gm
  • 2 short medium hot chillies
  • 2-3 bay leaves dry
  • red chilli flakes as per taste
  • sea salt as per taste
  • 1 veg stock pot
  • 3 dried red Kashmiri chillies
  • 1 large roll of cinnamon
  • 4 tbsp sunflower oil
  • a handful of Broccoli and Cauliflower florets
  • 2 large tbsp of tomato puree or half of a large tomato finely chopped
  • Red chilli powder
  • Sugar 2 tsp

Method:

  • Wash and soak the red lentil in water to soften them so they cook more quickly then get on with all the other chopping and cutting prep’s.
  • Chop the shallots lengthwise.
  • In a large stew pot or huge saucepan heat the oil and add the bay leaves,cinnamon stick and dry red kashmiri chillies which I have a very big packet of and am trying to finish , they only add colour and no heat so if you don’t have these you can totally leave them out – no harm done here.
  • Now add red chilli powder and sugar and just when the sugar starts to caramelise add the shallots and shallow fry them till they reduce and begin to turn a lovely brown colour.
  • Now add the 2 large tbsp’s  of tomato puree or half of a large tomato finely chopped and stir till it mixes well with the shallots.
  • Add the roughly chopped long red peppers and baby potatoes and saute’ for 2 minutes.
  • Add the washed chicken fillets/suran (elephant yam), soaked red lentils with the water it was soaked in.
  • Add the washed and roughly chopped Broccoli and Cauliflower florets and now add enough water.
  • I did not measure the water I added but add enough to get a nice thick stew , while the ingredients are cooking together on a low flame ,feel free to top up with more water as the lentils easily soak up as much water as you feed it with. Having said that you don’t want to end up with a watery stew so don’t add more than 3/4th cup at one go.
  • Season with sea salt , I love MALDON SEA SALT which I use and I have a few packets ALWAYS stashed away, great n salads it is!
  • Then sprinkle red chilli flakes and gently place a veg stock cube on top on this lovely pot of goodness bubbling away. I prefer the KNORR veg stock cubes , they have a great bouquet of flavour and are very handy at times when am exhausted and need to quickly cook up something tasty!
  • Stir well, cover with a lid and cook on a medium flame.
  • The red lentil will froth as they cook not to worry simply stir now and then and mix well, don’t allow the stew to get too thick we want enough lovely gravy to slurp this stew and dip the baguette into!

1-IMG_6495 (Copy)

I was so hungry that I didn’t click any photos of my lovely fresh ingredients but it was a brilliantly sunny day yesterday and after this wholesome stew for lunch we had to really force ourselves to go and get some much needed fresh air at Morden Hall Park – I happily left my smartphone behind so photos to share but suffice to say that it was a gorgeous walk through the huge grounds and we saw many happy families ,happy couples and cute old folks and even happier kids and dogs romping around in the muddy park  fun! And because we were so good we treated ourselves to hot tea and a sandwich at a local Turkish Cafe 😉 hehehe

Am very happy and proud of this new original recipe creation from my experimental kitchen. Next time I make this stew I will smoke the sweet and crunchy long red peppers and peel off the skin , to add a deep smoky flavour to the stew and not have the skin floating around – double whammy I say 🙂

1-1st Feb'14 Chicken & Red Lentil Stew1

Chicken and Red Lentil Stew – a complete ONE POT meal (Suran & Red Lentil Stew)

Filed Under: Food, Meat, Quick and Easy, Recipe Index Tagged With: baby potatoes, baguette, bay leaves, Broccoli and Cauliflower florets, Chicken & Red Lentil Stew, Chicken breast mini fillets, chop, cinnamon, combine, cut, delicious, dried red kashmir chillies, dry lentils, finely chopped, full bodied flavour, hob, Indian Spices, kitchen larder, Knorr, large tomato, low flame, Maldon Sea Salt, Massor Dal, medium hot chillies, ONE POT meal, original recipe, recipe development, Red chilli flakes, red chilli powder, Red Lentils, saucepan, saute, sea salt, sliceoffme creative kitchen, smoky, spicy, stir, stock, stockpot, store, sugar, sunflower oil, Suran and Red Lentil Stew, tablespoon, tasty, teaspoon, tomato puree, veg stock pot, yummy

Spicy Grilled Chicken Bites With a Cooling Avocado Dip

September 5, 2013 by manjirichitnis 2 Comments

With an obvious change in the weather, we all are living in fear that this year’s glorious summer is coming to an end. I was lucky enough to get a few invites to barbecue parties in the past few months and had my share of some really divine meats and grills and some rather lumpy or burnt bits too!!!

Lucky because I live in a tiny rented flat with a small open plan kitchen. I try all sorts of tricks to fool myself into thinking that I am cooking in the fresh open outdoors. One of my favourite tricks to fool myself and get some tasty tidbits on my plate is by using a grid pan and earthy spices with smoked sea salt, delicious dips and of course washing these down with chilled beer.

Since I always seem to have some basic purees and pastes frozen and hiding in some corner of my tiny freezer I try and use them up quickly to ensure I always have place for some frozen desserts. One such favourite spicy green paste is made with one medium sized bunch of fresh coriander and 2 bright green chillies. Coriander is expensive and a regular feature in my kitchen so I try and freeze it after chopping it fine or better still making this paste and just adding large spoons to curries which gives them an instant face lift!

For a spicy twist on grilled chicken I decided to make these easy to pick and pop in the mouth pieces of chunky chicken making it a more fun way to share your food on the table. I love that it’s easy to just throw things on the pan and even the dip is a no fuss 3 step recipe which is a brilliant companion to the heat of the chillies on the chicken. The fact that the dip has zero oil is a big bonus.

You can make the coriander paste and store it in the freezer and even with the dip recycle it as a quick spread on sandwiches and use up any leftover meats the next day for a packed lunch. So convenient, especially on a Monday morning after a lazy weekend!

Placing the chicken on chunky cabbage leaves smeared with some mustard paste is another inexpensive alternative to posh salad leaves and helps finish of the last of that quarter portion of cabbage which lies neglected in your veggie tray and faces the threat of going into the bin soggy and spoilt, not a pleasant thought at all.

Guaranteed to tickle your taste buds this original recipe from my tiny kitchen is a food adventure in itself. Here’s how you can make this quick grilled chicken in easy steps:

Spicy grilled chicken bites with cooling avocado dip

(Serves: 4, Cooking Time: including 40 mins for marination is 1 hour):

Ingredients:

  • 4 chicken breasts
  • 4 large tbsp coriander and green chilli paste (proportion of 1 bunch of coriander with 2 green chillies)
  • Himalayan Pink Salt for seasoning
  • 2 tbsp refined oil
  • 1 tsp mustard paste
  • 4 cloves of garlic finely chopped
  • ½ tsp red chilli flakes
  • 4-5 leaves of fresh cabbage washed
  • ¼ medium sized red onion cut lengthwise
  • Toothpicks with little flags

For the dip

  • 2 avocados
  • 1 stalk fennel with few leaves
  • ½ medium sized red onion finely chopped
  • Himalayan pink salt for seasoning

Method:

Marinate the chicken breasts with coriander and green chilli paste, salt as per taste and 3 cloves of finely chopped garlic. Make small cuts on the chicken breasts with a knife and rub in the marinade. Add one tbsp oil to this mixture allowing the garlic to marry with the coriander and chilli paste. Marinate for 40 minutes

Cutting the chicken into thick cut style bites

On a grid pan spritz enough oil to coat the pan. Pan fry the breasts turning the sides over when they begin to change colour. When both sides appear to have changed colour remove the chicken breasts on a chopping board and let them cool for a while.

Meanwhile, smear the cabbage leaves with a small amount of mustard paste and place on a wooden board which will be used to serve the dish.

Now prepare the dip – Halve the avocados and scoop out the fleshy part. Take the thin green stalk and tender leaves of the fennel and put them together through a blender to make a coarse paste. Chop ½ a red onion fine and to the avocado and fennel paste, season some Himalayan salt. The dip is now ready.

Pan Grill red onion ,garlic and red chilli flakes close up shot

Now get back to cooking the chicken. In the same grid pan add a 1 ½ tbsp oil with some red onion cut lengthwise and sauté for a while for a caramelise finish. Now cut the pieces of the chicken into “thick cut home-made potato-chip” like sizes and place them on the grid pan along with the onions.

Chicken on pan being grilled with the spices

Sprinkle the red chilli flakes .Cook on low flame till done and flip over using tongs, a bit of charring is allowed to add more flavour. Place the chicken strips with toothpicks on the fresh cabbage leaves in a flat plate.

The chunky avocado and red onion dip will offset the grilled chicken bites.

close up with all elements of display

Serve with garlic bread on the side and some chilled drinks and soak up all the sun you can before the leaves turn auburn.

chicken on a toothpick with dip close up


This was my first post for the Great British Chefs community and can be found here

Filed Under: Food, Meat, Recipe Index Tagged With: avocado, bbq, cabbage, chilled beer, chilli flakes, community, cook, cooling dip, delicious, eat, Great British Chefs, grid pan, mustard, original recipe, spicy chicken, summer, tasty, toothpick, yummy

Spicy Mexican Chicken Wings

August 16, 2013 by manjirichitnis 4 Comments

I was sent this amazing new product from the Gran Luchito Kitchen – their new Salsa sauce and ever since I laid my eyes on it all I wanted to do was make some spicy chicken wings and enjoy them on a summer evening with some chilled beer.

IMG_4260 (Copy)

What I most love about this new HOT sauce from Gran Luchito is that it makes life so easy so if you want to make a quick ,tasty and easy starter dish and really impress your guests or you suddenly decide to take home the entire hungry gang you went for drinks with on a Friday evening(Egad!) this bottle of goodness is a going to be your life saver. It’s very versatile because I can think of so many ways to use this sauce. It’s also a great dip for that bag of tortilla chips which can do the rounds with some chilled beer or wine for your guests, or a lazy brunch on Sunday just make lots of wings to gr around for the family!It’s definitely my new spicy ketchup and will be a perfect pairing with a zillion foods!

Ok, so here’s a quick recipe for the Spicy Mexican Chicken Wings:

Serves: 2 – 3

Cooking Time: 15 minutes marination, on pan 10 – 15 minutes,chopping time 5 minutes.

Ingredients:

  1. Grand Luchito’s HOT Sauce – 5 heaped tbsp
  2. 8 chicken wings
  3. 1/2 medium sized red onion sliced lenghtwise
  4. Half a lemon
  5. Smoked sea salt
  6. 2 large tbsp oil (I used refined sunflower)
  7. Smoked Sea salt
  8. Cumin powder 1 tbsp
  9. An entire garlic with all its pods sliced through.

Method:

If you ask me this is one for the barbecue but since I have no access to one and work off a tiny urban kitchen which is literally a single small platform I love using my pan with grids to get those grid lines on my meat and pretend am in the garden with a nice barbecue going,sighhh, oh yes and my smoked sea salt is my best ally , giving my food that wonderfully smokey aroma -oak smoked it is !

  • Wash the chicken wings and in a bowl and pour about 1/2 a tbsp oil on them,add the smoked sea salt,cumin powder and 2 tbsp of Gran Luchito HOT sauce.Rub well and cover and set aside for about 15 minutes

Marinating the wings in Gran Luchito's HOT sauce

  • On a pan with grids add the oil and allow it to heat till it starts to bubble slightly, add the chopped red onion and saute till it just begins to change colour,carefull to not brown them too much.
  • Now saute two heaped tbsps of the Gran Luchito HOT sauce on the pan.Stir for about a minute and then add the marinated chicken.Place the garlic face down allowing it to turn a delicious brown and release it’s magic kick into the onion and sauce mix and boost the flavour of the chicken.
  • Use tongs to turn when one side is properly browned and juicy but stir the sauce and onion sautee mixture which the chicken is sitting on not allowing it to stick to the pan or burn!
  • It should take about 10 -15 minutes to get to the right crispy and juicy stage for the chicken wings on a medium flame with this pan.(In case you need to do a large batch of chicken wings, scale up the ingredients proportionately and blanch the chicken wings in hot water for 5 – 7 minutes before marinating so that they are semi cooked , this way you can get them in batches on the pan and ready to serve, keep them warm by placing in a baking tray covered in foil – you could even keep bigger batches warm in a pre-heated oven if need be!)

The unique smoky taste of Gran Luchito with the sweetness of pineapple

I hope this product hits the shelves soon!To do this as quickly as possible Gran Luchito has  partnered with Crowd Funding Network We Are The Million to raise some investment and create jobs too.Help Spread the word by reading more about the campaign here.

Spicy Chicken Wings

*Thanks to Gran Luchito for sending me some of their test sauce as a sample to review. As usual, all opinions are my own. No monetary compensation was provided for this post and I was not expected to write a positive review.

Filed Under: Food, Product Reviews Tagged With: @Luchito_Mexico, Barbecue, crowd funding, cumin powder, delicious, drink, easy recipes for spicy chicken wings, easy starter recipes, eat, finely chopped, garlic, good cause, Gran Luchito, Hot Sauce, Mexican food, Mexican Ketchup, nomnom, pan with grids, quick and easy starter, red onion, smoked sea salt, Spicy Chicken Wings, sunflower oil, tasty, tongs, We are the Million, yummy

Young Entrepreneur Farrah shares how MOOSE MAPLE BUTTER was conceived- in her first-ever Interview.

July 26, 2013 by manjirichitnis 12 Comments

This is the first ever interview Farrah has given, she confessed, when we spoke over the phone trying to decide where we could meet. I told her that I would promise to keep it simple and conversational and I am so glad we spoke like long-lost friends exchanging ideas and chatting away. We decided on a beautiful pub called The Bolingbroke in Battersea and it was a hot, summer evening with the sunlight streaming in through open doors onto thick wooden tables.

Farrah is an especially inspiring person to meet; she seems to emit these waves of positivity around her in tiny, invisible bubbles; landing on me, they made me feel as if I could win any war I wanted to.

A high-flying lawyer by profession, Farrah divides her time between New York and London; and when she isn’t acting as legal counsel to some very big names, she is busy in her home kitchen making an extremely delicious spread called Moose Maple Butter. And yes, the recipe is a secret!

Read on to find out how she came about making this heavenly tasting, pure, wholesome goodness of butter.

(As it goes with my interviews, we shall refer to me as MJ and to my new-found friend as FM short for Farrah ‘’Moose’’; MMB is short for Moose Maple Butter)

MJ: What inspired you to create this amazing new product?

FM: Soon after a detox in France, where I spent a few weeks learning about healthy eating habits and especially learning to avoid “added sugar’’ in my diet, I was in New York for work and having breakfast at a hotel. I was looking for something sweet to spread on my already buttered, hot toast but I wanted to avoid added sugar at any cost. The jam and chocolate spread options available on the table were all laden with sugars and other artificial nasties that I really wanted to avoid! Finally, and really through a lack of choice and an insatiable desire for a sweet taste that morning, I poured some of the organic maple syrup – on the table for pancakes – over my toast. It was that ‘’Eureka’’ moment, coupled with the fact that I couldn’t find maple butter to buy in any shops, either Stateside or in England, that prompted me to experiment at home until I came up with my current recipe for Moose Maple Butter.

Image 1 MMB sample close up shot

MJ: Great! That’s an interesting and ever so creative way to make a whole new product. Now for my old favourite trusted question, why the name Moose?

FM (With a big smile) Well I have to admit, even though it’s probably going to make me sound a bit odd, that I have been obsessed with moose for years.  I have moose things everywhere!  I was doodling for the maple butter logo and cute, funny images of moose kept appearing … Moose Maple Butter just seemed a natural choice, especially as there are generally moose around where maple syrup is produced!

MJ: I must mention here that Farrah has the most beautiful and neat handwriting I have ever seen and her notebook has beautiful doodles, hardly doodles really, but neat, cartoon creations of a moose which ultimately became her logo, I even managed to get this quick picture of her final drawing that is now her officially registered logo. I love it. The little black doodle near the jar at the bottom of the page is the moose’s nose; talk about perfection and practice!

How the MOOSE logo was born

MJ: So now that you have created this wonderfull product and christened it, what happens next?

FM: Well, I have only just had the brand and logo registered, both in Europe and the US, so I now feel confident about getting Moose Maple Butter out there to as many people as I can! It’s a brand awareness campaign in full swing from now until November this year, when hopefully you’ll find Moose Maple Butter on the shelves of supermarkets!

MJ: Wow, that’s good news, pity you can’t give away any names (naughty smile). Any other ways of promoting MMB then? (Moose Maple Butter = MMB)

FM: Yes! I am looking at actively promoting MMB at various food fairs, events and festivals in the run up to November. As you know, I had a stand and basically introduced MMB, at the recently concluded Food Blogger Connect (FBC5). That was wonderful for MMB! I’m so glad they found me.

(Heck, so am I Farrah, or I wouldn’t have met you and would have lived my life not knowing Maple Butter existed! No way!)

MJ: Tell me more about your ‘’Eureka’’ moment and what followed.

FM: Initially, I was really only making Moose Maple Butter for family and friends and then also supplying, on request, to family and friends of friends! Everyone kept asking for more and where they could buy it and it all got me thinking!  Every time I had kids over at home, I had a little ‘’tasting’’ session and would lay out hot toast slathered with my maple butter spread along with some toast with chocolate spread on it and some with the usual butter and jam. It was always reassuring to see ALL the toast with Moose Maple Butter being gobbled up in comparison to the other offerings! That, along with lots of encouragement from everyone around me, gave me the shove I needed to sell Moose Maple Butter at a few of last year’s school Christmas fairs, in London and Los Angeles (Farrah’s second home). I have been flooded with requests ever since from a rapidly growing group of mothers and fathers alike and have been selling tubs of MMB ever since.

Of course there are all the not-so-fun things to deal with, like premises inspections and registrations and food hygiene certification and all the rest! I was so relieved when the local council left very impressed with my clean and shiny, brand-new kitchen!  I think I have a bit of an obsession on the cleanliness side!

(Farrah: I totally agree – I am sure I have cleanliness OCD geee)

MJ: I notice you have a very nicely done Facebook Page for Moose Maple Butter, I love it!

FM: Thank you! I love sharing art work done by my little fans who send me their pictures. You will see quite a lot of creative ones on the page. Of late, a lot of food bloggers have asked me for samples too and have created so many beautiful and delicious recipes.

Any recipe that calls for butter and sugar is a possible one for using Moose Maple Butter instead and results in a more wholesome but equally tasty outcome!

MJ: How does MMB compare to butter and spreads in its nutritional content?

FM: I am so glad you asked this question! MMB in comparison to say a chocolate spread is much more well ‘’spreadable’’ and hence you use up much less than say a thick peanut butter. Since I only use purely organic Maple Syrup at all times, what you get is much more taste with very little MMB.

So in the case of Moose Maple Butter a little goes a long way!

So everyone looking for any alternate spread, especially to chocolate spread, Moose Maple Butter it is!

I must say I agree with Farrah here, my first bite of Maple Butter was enough to make me fall madly in love with this new find – Hook, Line and Sinker if you will!

 To put this into perspective:

10 gms of average chocolate spread = 53 calories and one needs at least 30gms to properly cover one slice of toast, whereas only 10 gms of Moose Maple Butter will go a long way on that same one slice of toast! Brilliant! And tasty!

close up MMB close up shot with table details

MJ: So if I was to ask about the shelf life and nutritional contents of Moose Maple Butter what would you say?

FM:  I have currently given samples of MMB to Eclipse Scientific who will provide me with an accurate analysis of the exact shelf life and the precise nutrient content. But like any butter, it needs to be kept refrigerated.

Moose Maple Butter has no artificial additives; it has no E numbers, nothing. It is absolutely nothing but pure fresh butter and pure grade A maple syrup – with a dash of sea salt.  It is a superb alternative to processed sugar-laden products. It is a great, quick and easy breakfast option and just melts into the grooves of a hot crumpet and is of course best paired with pancakes.

Wow! That mention of hot crumpets makes me want to quickly grab hold of those cute sample jars from the table and run home for some tea and crumpet time. But to avoid such madness Farrah has kindly agreed to part with a large pot of Moose Maple Butter just for me to sample and make something delicious out of! So folks watch this space, in a few days you will see some delicious recipe posted on my blog Travelsfortaste with Moose Maple Butter as the divine ingredient.

MJ: What would you like to make of this new venture Farrah? Or put it plainly where do you see yourself in 5 years time

FM:  I’d just love to see Moose Maple Butter become a household name. I think the biggest kick would be when some kid I don’t know asks me if I’ve ever had Moose Maple Butter – that would be a great moment.

Our conversation becomes something of a friendly banter. The glorious sunshine refuses to go away but the shadows have shifted. The pub is filled with loads of families, kids running around; there is a buzz of activity. The usual lone ranger, armed with a net book and ale, occupies the table opposite us and looks down on me with disdain as I take some snaps of the cute jars.

(Image below is a picture of Farrah – the creator of Moose Maple Butter)

Farrah's Pic

I hate to tear myself away from this happy pub and evening chat but the promise of a dinner and movie by the hubby beckon.

Just realised that, of all the entrepreneurs I have met so far, 4 in all including Farrah, three of these entrepreneurs had never been interviewed before!

(To read the older blog posts with these inspiring entrepreneurial stories just click on the links below:

  • Dum-a-Dum Biryani Biryani & Kebabs – An Interview with an entrepreneur and a passionate foodie
  • Interview of Pune’s Leading Fruit Wine Manufacturer
  • Escape the Urban Jungle – Go Adventure ”Eco Camping” at Panchgani

I am sure Farrah is as excited as I am if not more,about her first ever interview where she has shared her story and how Moose Maple Butter was born. Now can’t wait to use her creation in my home kitchen!

Apart from the fair amount of persuasion it took to meet the two first time interviewees in India, I must admit that the one common thing amongst ALL entrepreneurs is their humility and their generosity to share their dreams, a few apprehensions and most of all, their time. I cannot thank you all enough.

Do leave your thoughts and comments about this interview and while you are at it, spread the MOOSE!

Say Hello to MOOSE at: http://www.moosemaple.co.uk/

Find MOOSE on Facebook:https://www.facebook.com/MooseMapleButter

Follow MOOSE on Twitter: https://twitter.com/FarrahMoose  (@FarrahMoose)

Buy Moose Maple Butter (or pick up a free sample) at The Petal Pusher in Kew.

Share the MOOSE folks!

Filed Under: Lifestyle, Miscellaneous Tagged With: 2013, Battersea, blogging, chocolate spread, Delicious.Spread The Moose, detox, E numbers, eat healthy, Eclipse Scientific, entrepreneur, Exclusive First Interview at sliceoffme, food and travel blogger, food blogger connect, food blogging, food lovers, France, great BRITISH summer, hot buttered toast, hot crumpets, Kew Gardens, Lawyer, london, Los Angeles, Manjiri Chitnis Kulkarni, Moose Maple Butter, Mumbai, New York, no artificial additives, nutrients, organic maple syrup, Pune, Pure, Share the Moose, simple, tasty, testing for food, The Bolingbroke, The Petal Pusher, You read it first on Sliceoffme, yummy

Jerk Chicken and Coconut Rice

July 20, 2013 by manjirichitnis Leave a Comment

The first time I ate Jerk Chicken, was at a pop up Caribbean food stall near Haymarket Station, it was served with some tasty rice with red kidney beans and the most deliciously sweet plantain. Ever since I have been waiting to experiment and make this spicy chicken at home. Please resist the temptation of using a jerk sauce out of a bottle, it’s almost a crime because in the recipe I used from the BBC Good Food guide, it makes preparing the marinade a thing of joy. Not only will you learn how each ingredient lends its individual flavour but you can learn how to adjust the ”heat” in this amazing marinade. An advance warning, if you have sensitive skin PLEASE use gloves to marinate the chicken as Scotch Bonnet peppers are PACKED with heat. Ensure you THOROUGHLY wash your hands after you handle these ”hot babies” too! Humm now for the recipe, it’s essentially what was in the original but of course, I have added my own touches and I think they make quite an impact 🙂 So read on folks.

Jerk Chicken

Manjiri Chitnis
Caribbean Jerk chicken is an all-time favourite and tastes even better with a home-mademarinade
Print Recipe
Prep Time 20 mins
Cook Time 45 mins
Total Time 1 hr 5 mins
Course Main Course
Cuisine Caribbean
Servings 4 people

Ingredients
  

For Jerk Chicken:

  • 12 chicken thighs with bone
  • 1 garlic sliced through the middle to go in the oven
  • 2 lemons halved to go in the baking tray
  • 1 pair of clean gloves if you have sensitive skin – to marinate the chicken

For the Jerk marinade:

  • 4 Garlic Cloves de-skinned
  • 1 small red onion
  • 1 bunch fresh spring onion roughly chopped
  • 1 portion ginger size that fits inside your closed fist washed, skinned and roughly chopped
  • 1 tbsp thyme – I had none so I used 1 tbsp of Mixed Italian herb powder
  • 3 scotch bonnet chillies de-seeded if you cannot handle very spicy
  • 2 tbsp soy sauce
  • 2 tbsp oil – I used sunflower
  • 4 heaped tbsp brown sugar – I used dark muscovado sugar
  • 1 tbsp ground allspice powder
  • 1 lime Juiced

Instructions
 

  • Blitz all the ingredients for the marinade in the mixer/food processor/blender and make a thick paste, do not add water as far as possible to ensure a thick puree like grainy paste
  • Wash and deskin the chicken thighs and make cuts using a knife
  • Then generously apply the marinade paste all over rubbing into the cuts made to ensure the flavour really seeps into the chicken
  • Marinate overnight in the fridge. Cover vessel with cling film
  • Keep about 2 tbsp marinade aside for adding in the baking tray
  • When you are ready to prepare the chicken pre-heat the oven to 180 – 200 degree Celsius, I have a fan oven
  • Prepare the baking tray by greasing with some oil, place the marinated chicken pieces and surround them with the lime slices and place the garlic halved
  • Cook in the oven for about 45 minutes or until juices run clear
  • When the chicken is in the oven start with the rice

Coconut Rice with Peas

Print Recipe
Prep Time 5 mins
Cook Time 10 mins
Total Time 15 mins
Servings 4 people

Ingredients
  

  • 200 g Basmati Rice
  • 400 g Coconut Milk can
  • 1 bunch fresh spring onion finely chopped
  • 2 large sprigs of fresh thyme
  • 2 large cloves of garlic skinned and chopped very fine
  • 1 tbsp ground allspice
  • 200 g green peas

Instructions
 

  • Wash the Basmati rice under cold running tap water
  • In a heavy-bottomed vessel, add the washed rice and coconut milk, chopped spring onions, thyme, garlic chopped and allspice
  • Add 300 ml water, mix and add salt to season
  • Cook with lid on a medium flame till water begins to boil
  • Stir with a wooden spatula and then add the green peas
  • Reduce flame and do not cover completely, leave a bit of space for the steam to pass
  • Cook until done

Although the recipe I followed, uses red kidney beans since I was already using them in my Caribbean Sweet Mini Pepper Salad, I choose green peas for my Coconut Rice. I made my own homemade replacement for allspice powder too, it’s very easy and I intend to make it fresh each time I need instead of the store-bought one, simply because it is so quick and easy to prepare! Actually allspice is a spice by itself but it tastes similar to a mixture of cinnamon, cloves, nutmeg, and pepper.

Also Known as: Jamaican Pepper or New spice

Home made all-Spice Powder recipe

Home made all-spice seasoning

Manjiri Chitnis
Try myeasy to prepare and store home-made all-spice seasoning
Print Recipe
Prep Time 2 mins
Cook Time 5 mins
Total Time 7 mins
Servings 1 portions

Ingredients
  

  • 1 tbsp Cinnamon powder or cinnamon stick – thumb-sized
  • 1 small tbsp pepper powder
  • 1 heaped tbsp of cloves
  • 1 full nutmeg grated

Instructions
 

  • In a pestle and mortar mix the ingredients and grate the nutmeg into it
  • Then smash together to makes a grainy powder
  • Some bits of the clove you may not be able to grind fine, I wouldn’t worry about it unless you want a fine powder then the smallest attachment on your mixer. I have an Indian mixer which I use for my coconut chutneys and it has 3 jars I used the one with 3 blades. Or else just use the pestle and mortar it should work.
  • Store away the remaining homemade allspice replacement powder in a tiny airtight container

A note about the brown sugar vs. dark muscovado sugar

Dark Muscovado sugar is the unrefined form of brown sugar ,its stickier ,heavier,has a longer shelf life than refined sugars and adds a more intense flavour to marinades and since it is stable at high temperatures is great for baking.If you do not have brown sugar its ok to replace it with dark Muscovado sugar. Although as the water content dark muscovado holds is higher one should accordingly taper the use of water in the recipe.

Brown sugar is white sugar and molasses and hence the colour and soft texture. It has the light and dark brown sugar varieties and the lighter it is the milder the flavour.

Muscovado,White & Light Brown Sugar

Filed Under: Food, Meat, Recipe Index Tagged With: allspice powder, bake, basmati rice, BBC Good Food Guide, can, caribbean, caribbean jerk chicken recipe, caribbean recipes, chicken thighs, cinnamon, coconut milk, coconut rice recipe, cook, cooking, delicious, easy home-made all-spice seasoning recipe, easy home-made caribbean jerck seasoning recipe, easy meals, eat, fiery, finely chopped, food, food blogger, foodblogger, garlic, green peas, homestyle jerk chicken recipe, hot, ingredient list, italian herbs, jerk chicken recipe, lemon, lime, marinate, muscovado sugar, nutmeg, oven, pepper, quick and easy recipes, red onion, roast, roughly chopped, scotch bonnet chillies, scotch bonnet peppers, simple jerk chicken recipe, sliceoffme, spicy, spicy lunch recipes, sprig f thyme, spring onion, summer party menu, sunflower oil, tarvelsfortaste blog, tasty, temper, tin, wikipedia, yum, yummy

Easy and healthy one-pot chicken noodles

June 17, 2013 by manjirichitnis 4 Comments

It was one of those days when I wished the dinner made itself ,but hey you know what I am saying right?Like it’s ONLY Monday and am wishing it was the weekend again , ya, ya that kind of a horrible feeling- gaaahhh! Happens to the best of us , yes even me , ok ok I will get on with the recipe.I  had this vegetable stock packet in my kitchen cupboard that had to be used or else! And I had some tomatoes, bright red  chillies, half a red onion sliced , some unused tiny onions, a juicy lime and a spanking new bottle of Kafir Lime leaves .

Since I had spent the better part of the day, well on facebook 😉 I got my lazy,fat a** out of my house and walked to the supermarket.Some chocken thighs ,a mixed bag with chopped carrot and brocolli on reduced price , just what I was looking for!

Ok so here’s a list of all the ingredients I threw in and managed to make something that made hubby go from ”hummm ummm” to ”interesting” to ” u came up with this recipe like now?” the best compliment, ok am showing off and that sickening right?

Serves:2 , Cook time including serving time :25 miutes

Ingredients:

  1. 500ml vegetable stock
  2. 100ml water
  3. 1/2 of a medium sized red onion sliced lengthwise
  4. 2 -3 shallots chopped lengthwise
  5. 2 cloves of garlic with the skin on
  6. 1 tiny pinch of cumin seeds
  7. 2 Kaffir lime leaves – no more ,they are POTENT!
  8. 2 bright red chillies slit lenghthwise
  9. 1 small tomato chopped into tiny pieces
  10. 3 pieces of chicken with the skin taken off
  11. Red chilli powder as per taste
  12. Salt as per taste
  13. 1 portion of thin egg noodles  – 100 gm approx
  14. 1 small palmfull of diced carrot  – 100 gm approx
  15. 2 -3 bits of broccoli cut into smaller bite sized portions – 100 gm approx
  16. 1/4th of piece of lime to squeeze onto the chicken
  17. 2 tbsp sunflower oil
  18. A smile on your face because you are going to make a new yum dish super quick and you n yours are gonna love-uh it!

The Ingredients

Preparation:

  • Wash the chicken pieces and remove the skin
  • Pan on hob and add one tbsp oil ,saute the thinly length-wise sliced red onion saving a few bits to go into the stock pot.
  • place the chicken pieces and lower the flame, turn the pieces in a few minutes after they start to fry, do not cook them fully as this pan fry bit is to ensure flavour on double impact and get the chicken to release it’s juices
  • at this stage add the tomato bits into the pan and flatten with a spatula after they have sizzled for a bit, this will make the sauted onion flavour marry with the tomato and lock in the chicken juices,squeeze the lime onto this
  • add about 2 tbsp of the vegetable stock to the chicken in the pan and simmer on  as low a flame as possible,keep checking to ensure it does not dry up!
  • Now add 1 tbsp in a saucepan and when it’s hot throw in the 2 big red chillies which have been split lengthwise,followed by the cumin,crushed garlic cloves with skin, some of the red onion chopped leftover from what went in the pan and the shallots chopped lengthwise.Keep the saucepan on a low flame to prevent burning of these ingredients.

IMG_2931 (Copy)

  • When the garlic is done and the pungent chilli and garlic gives off its trademark punch of aroma throw in the Kaffir lime leaves ,when the onion is totally pink n garlic crisp , throw in some of the vegetable stock and some water , add the noodles carrot and broccoli ,cover and bring to a boil, at this stage the carrot is almost cooked and the noodles too, scoop in the chicken and the thick onion-tomato gravy it was in, ensure you get every last bit of the thick sauce from the pan to not loose any of that wholesome goodness!

IMG_2935 (Copy)

  • Now throw in all the remaining vegetable stock and water and add salt and red chilli powder as per taste.
  • cook on a low flame with lid till done, the chicken should just fall of the bone easy and the carrot should be well cooked but not squidgy.
  • Serve hot with soft boiled potatoes in butter and herbs or a crisp baguette.

At 2 small spoons of oil and how it fills you, this one dish stock pot is filling, wholesome,relatively easy and a good for a weekday dinner when you are feeling  well BLAH 😉

please leave comments to let me know if this recipe rocked your boat or totally sucked !

Love,peace and good night bloggy world ,I love ya !

One stock pot chicken and noodle dinner

Filed Under: Food, Meat, Quick and Easy, Recipe Index Tagged With: chicken, chilli, cumin, delicious, easy dinner recipe, eat well, garlic, healthy low calorie dinner recipe, hob, kaffir lime leaves, low flame, noodles, one stock pot, pan, ready in 20 minutes, recipe development, red chilli, red onion, salt, saucepan, shallots, slimming food, sunflower oil, tasty, vegetable stock, water, wholesome goodness, yumyum

  • 1
  • 2
  • 3
  • Next Page »

Food,travel and lifestyle writer. Photographer.

  • Email
  • Facebook
  • Instagram
  • Pinterest
  • Twitter
  • YouTube

Categories

  • Baking
  • Breads
  • C.K.P recipes
  • Cakes
  • Chutneys
  • Cocktails
  • Curry – Meat, Seafood
  • Curry – Vegetarian
  • Desserts
  • Events
  • Featured Food and Drink
  • Featured Lifestyle
  • Featured Travel Adventures
  • Food
  • Healthy
  • Home
  • India
  • Indian
  • Kitchen
  • Lifestyle
  • London and rest of U.K
  • Meat
  • Miscellaneous
  • Product Reviews
  • Quick and Easy
  • Recipe Index
  • Rest of the World
  • Restaurant Reviews
  • Salads
  • seafood
  • Sides
  • Smoothies
  • Soups
  • Travel
  • Uncategorized
  • Vegan
  • Vegetarian

Featured Blogger on Great British Chefs

GBC_blogger-badge_150x300px    

Need a New Power Blender?

13076814_10154185434898293_7387808474266473605_n

Read Travelfortaste’s interview on Gourmandize UK & Ireland

 Sliceoffme interviewed by Gourmandize UK & Ireland

Travelsfortaste is Featured on Expats Blog

England expat blogs

Read Travelsfortaste reviews on Zomato

View my food journey on Zomato!
Privacy & Cookies: This site uses cookies. By continuing to use this website, you agree to their use.
To find out more, including how to control cookies, see here: Cookie Policy
Squaremeal.co.uk - Restaurant Reviews

About me

Writer and Photographer. Food,Travel & Lifestyle, Blogger and Digital Marketer. Read More…

  • Email
  • Facebook
  • Instagram
  • Twitter
  • YouTube

Recent Posts

  • Easy Spinach and Pea Soup
  • Grenada Chocolate Festival – Festive Giveaway
  • Royal British Legion Centenary Cookbook – Cooking with Heroes
  • The Instagram Foodie Bag – Must have for all Food Photographers
  • Restaurant quality meat – Swaledale Online Butchers – a review

Copyright © 2023 · Foodie Pro Theme by Shay Bocks · Built on the Genesis Framework · Powered by WordPress

This website uses cookies to improve your experience. We'll assume you're ok with this, but you can opt-out if you wish.Accept Read More
Privacy & Cookies Policy

Privacy Overview

This website uses cookies to improve your experience while you navigate through the website. Out of these, the cookies that are categorized as necessary are stored on your browser as they are essential for the working of basic functionalities of the website. We also use third-party cookies that help us analyze and understand how you use this website. These cookies will be stored in your browser only with your consent. You also have the option to opt-out of these cookies. But opting out of some of these cookies may affect your browsing experience.
Necessary
Always Enabled
Necessary cookies are absolutely essential for the website to function properly. This category only includes cookies that ensures basic functionalities and security features of the website. These cookies do not store any personal information.
Non-necessary
Any cookies that may not be particularly necessary for the website to function and is used specifically to collect user personal data via analytics, ads, other embedded contents are termed as non-necessary cookies. It is mandatory to procure user consent prior to running these cookies on your website.
SAVE & ACCEPT