Travels for Taste

Tales of travel and food with a touch of spice

  • Home
  • About
    • In the Press, Published Work and Interviews
    • PR and Disclosure Policy
  • Food
    • Recipe Index
      • Indian
        • C.K.P recipes
        • Curry – Meat, Seafood
        • Curry – Vegetarian
        • Sides
        • Chutneys
      • Healthy
        • Soups
        • Salads
      • Quick and Easy
      • Baking
        • Desserts
      • Meat
      • Seafood
      • Vegetarian
        • Salads
      • Vegan
    • Product Reviews
    • Events
  • Travel
    • UK
    • India
    • Around the World
  • Lifestyle
    • Home
    • Kitchen
    • Restaurant Reviews
    • Miscellaneous
  • Giveaways
  • Work with me
    • Meet interesting foodie entrepreneurs here

Peach Melba with Vanilla Ice Cream

July 20, 2013 by manjirichitnis Leave a Comment

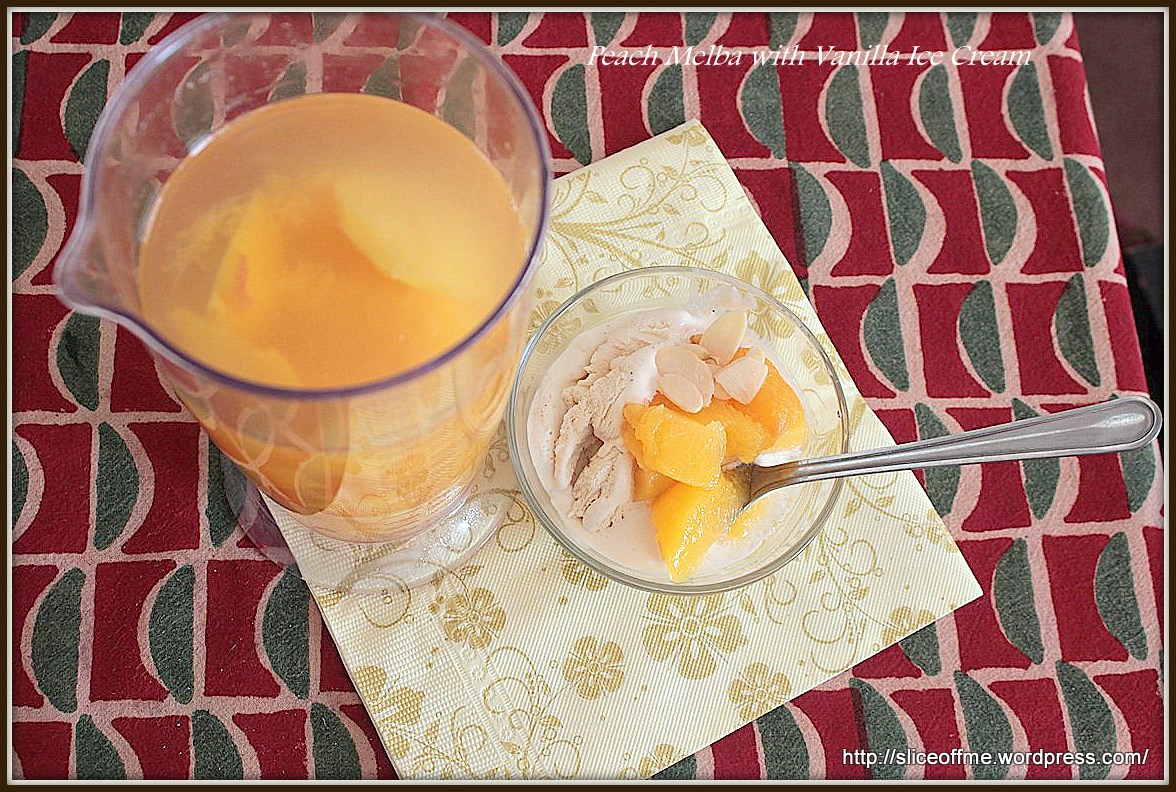
This recipe of Peach Melba is a favourite with my mum in law.On one of the days when I wasn’t feeling too bright she decided to set the mood right with one of her sweet fixes.She disappeared into the kitchen and 20 minutes later appeared with a tray with this gorgeous dessert topped with vanilla ice cream begging to be devoured!

A bit of history about how this dessert came into being should be shared here I guess as it makes me appreciate the recipe so much more.This is a brainchild of French Chef Auguste Escoffier who created this in honour of Australian Soprano Dame Nellie Melba, known as the ”first Australian Diva” to quote from the website of a museum dedicated to her. When she was performing in London, The Duke of Ore’lans hosted a dinner party to celebrate Dame Nellie Melba‘s triumph and  Chef Auguste Escoffier gave the world what we now know as the Peach Melba – peaches served on a bed of ice cream, he later created various versions of which the one topped with raspberry sauce is most popular now.

Serves:4 Prep Time :20 minutes + cooling for few hour in the refrigerator

Ingredients:

  • 4 fresh juicy peaches
  • Plain everyday white sugar
  • The best vanilla ice cream you can lay your hands on
  • Toasted blanched almonds to garnish

Method:

  • Heat water in a pan,when it has boiled,gently lower the washed peaches into it  and blanch them.When you remove them the skin should readily come off. Test for how ripe your fruits are before you blanch ,over ripe fruits will not take well to being dunked in hot water!
  • Remove the skin and remove the seed and halve, if you are unable to do that just get of as much of the fleshy bit from around the seed as you can.
  • In another saucepan add enough water to hold these peaches in a pool of sugary syrup approx 250ml .
  • Add 4 heaped tablespoons of sugar and stir continuously on a low flame til the sugar is totally dissolved and you have a proper sugar syrup,nice and thick and of course sweet!
  • Dunk the peaches into this syrup and on a very low flame let them soften , do not allow the sugar syrup to turn dark in colour and a maximum of 5-7 minutes should do the trick as the peaches will ”cook” quickly”
  • Thoroughly cool the fruit+syrup mix and decant into a bowl and place in the refrigerator.
  • Serve on a bed of your best vanilla ice cream and top off with the toasted almonds.
  • Smile when your guests praise you and regale them with the story of how this lovely dessert was created or how much you enjoyed reading this blog and creating the dessert, ok all right all right, won’t show off 😉

This dessert was something I had drafted quite some time back and thankfully as I made this yum dessert to finish off my Caribbean themed summer party menu, it will now finally appear on my blog!That’s why you must make the most of the summer days and have as many parties and barbecues and picnics as you can!Wooohooo!

Peach Melba with Vanilla Ice Cream

Filed Under: Desserts, Food, Recipe Index Tagged With: dessert recipe, easy, fruit dessert, fruity, gorgeous, Peach Melba, peaches, ready in under 20 minutes, ripe, summer dessert recipe, toasted blanched almonds

Key Lime Pie

June 29, 2013 by manjirichitnis 4 Comments

Calling all DEXTER Fans!

Key Lime Pie – or one of Dexter ”victims” last meal, (who wanted to be a well ”victim”, if you watch Dexter as obsessively as I do, you will know! Season 3 episode 8 – Easy as Pie)

Well, this popular American Dessert is very easy to make and a delicious dessert option to serve. Recipe adapted from Martha Stewarts’ recipe for homemade Key Lime Pie and from BBC Good Food.

Key Limes get their name from the association with the Florida Keys and because they are the main ingredients in well, Key Lime Pie! I have used the darker green skinned limes and they give that – much required and tangy citrus taste to the pie.

Ingredients:(Serves 8)

  1. 300gm HobNobs (hob-nobs are the U.K version of the U.S Graham Crackers, use any biscuit/ cracker that will give you a good crumbly base)
  2. 150gm unsalted butter melted and cooled
  3. One 397gm tin of  condensed milk
  4. Four egg yolks
  5. Zest and juice of 4 limes

Method:

  • Put the hobnobs into a thick, strong, food-grade plastic bag and give them a good bashing, what fun, totally de-stressing! Or if you are less violent and do not watch Dexter then please use a food processor.
  • Mix these beautiful crumbs with the soft melted and cooled butter in a bowl, my big orange plastic bowl is so good for this (for a quick peek at the bowl check out my post about cookies and headache ok well just cookies tehehehe)
  • Firmly pat onto a tart tin 22 cm is what I have, I used a thick white ceramic pie pan which I purchased earlier on in the day and ended buying a gorgeous Brita Water Filter with it too, I love low price deals and my old water filter jug needed to be chucked!
  • Bake the base for 10 minutes in a pre heated oven at 160C/fan 140C/gas 3
  • Then separate the 4 egg yolks from the whites and add the entire tin of condensed milk, whisk for about 3  minutes , good if you have an electric whisk , I was making this pie at an obscenely late hour in the night and didn’t dare use my electric whisk ;), so had to mix really well for about 5 minutes.
  • Zest the limes so that some of the zest can go into the mix and some can be used to dress the pie
  • Now add the juice of the limes and some of the zest into the egg & condensed milk mix and whisk for another 3 minutes.
  • Pour onto the cooled base and bake for another 10 minutes.
  • Cool completely on a wire rack and then refrigerate for at least 3 hours or overnight.
  • Dress the pie with some more lime zest, I didn’t want to do the whipped cream bit on the top but ended up using the ready made squeezy ready to use cream from a can, it sits very quickly and if you do not consume immediately it will form a puddle on the top so please avoid !

This is a wonderfull dessert to be shared with friends and family and is apt for weekend meals, make ahead and refrigerate.Great for summers!

Key Lime Pie n some pine cones
Key Lime Pie dug in
Oh so good ...ummlicious

Looking for more inspiration to indulge your sweet-tooth? Why not browse through my dessert recipes:

  • Cinnamon Pecan GF cake
  • Chocolate coconut cake with coconut icing
  • Easy chocolate cake with chocolate icing
  • POSH Victoria sponge cake

Filed Under: Desserts, Food, Recipe Index Tagged With: American Desserts, an american life, bake, BBC Good Food Guide, Condensed Milk, cool, Crime Drama, delicious, desserts for the weekend, Dexter, Dexter and Rita, double cream, easy dessert, eat well, family favourite recipes, Florida Keys, food bloggers, HobNobs, Key Lime Pie, lemon zest, limes, Martha Stewart recipes, Nestle, oven, overnight, quick and easy summer desserts, ready in 25 minutes, sugar, summer dessert recipe, unsalted butter, whipped cream

Christmas Pudding

December 31, 2012 by manjirichitnis Leave a Comment

Last year we had a supermarket pudding , the intense flavours, the dry fruits steeped in alcohol the soft delicious feeling of putting a spoon through a perfectly set pudding on christmas night ummmm… I decided that the next time I MUST make one at home !After sifting through a few recipes I knew it had to be Nigella’s Ultimate Christmas pudding.

I have now promised myself that I shall plan months ahead and soak the sultanas much in advance but well this year I soaked the sultanas and a nut mix for 2 nights in sherry. The variations in ingredients recommended by Nigella are my use of a regular apple, supermarket sherry and a currant and dry fruit mix off a shelf. But the resultant mixture and the process of slow steaming gave me a deep rich colour, a lovely texture and 2 yes two puddings instead of one and that is what was the MOST satisfying part of this process! Landing up with 2 awesome well set perfect puddings , one to eat at home and one to share with a special close pal made christmas special 🙂

Oh yes and a big thank you to Lakeland for making such an awesome product, my pudding steamer with a lid that fits so well and is really easy to clean. The pudding just slipped out after a gentle tap and sigh…. I couldn’t stop admiring the perfect shape, the dark colour …I almost burst into song !

Well now for the list of Ingredients:

  1. 150 grams prunes – mine were soaked in syrup and came from a cam but they served the purpose just the same, I squeezed the syrup out before adding them to the sultanas.If yours are out of a packet they need to be snipped into smaller bits.
  2. 150 grams sultanas
  3. 150 grams currants or a currants and nut mix for puddings available in all leading supermarkets.
  4. 175 ml sherry of your choice
  5. 100 grams plain flour
  6. 125 grams white breadcrumbs
  7. 150 grams suet – I used beef suet, if you are considering a vegetarian option I haven’t used vegetable suet , if anyone has tried it please share your experience.
  8. 1/4 ground cloves
  9. 1 teaspoon ground cinnamon – I used a ready-made powder
  10. 3 medium eggs
  11. 150 grams dark muscovado sugar
  12. 1 teaspoon baking powder
  13. 1 lemon large zest and juice
  14. 1 cooking apple (ideally) peeled and grated , I used 2 small red apples.
  15. 2 tablespoons honey
  16. 125 ml Vodka

Method:

  • This mixture gives 2 full-sized puddings , I have a 1 litre pudding steamer with lid from Lakeland and I had enough to make two full-sized puddings.
  • I must say our pudding is still sitting on a plate as I type this on the last day of 2012 , it’s asking to be microwaved and gobbled with some Remy Martin laced cream lying in fridge left over from Christmas, we had it Champagne cream on Christmas day and I assure you we had a feast and some very sleepy house guests after that …yes made me chuckle with satisfaction too.
  • Mix the sultanas,prunes and currants into a large bowl and let them steep in sherry overnight or upto a week. I let them soak for 2 nights.
  • When you are to start making the pudding mix take another large bowl and add all the ingredients in any order and then stir in the soaked sultana mix, scooping all of it off from the bowl.
  • Fill a large saucepan with enough water such that your pudding basin is soaked in it and use butter to grease the pudding bin and the lid as well.
  • Add the mixture into the basin and steam for 5 hours, checking ever so often and add some water to the saucepan. I must add that my pudding basin lid fits real well and after 5 hours were done it was quite easy to remove the basin from the saucepan and leave it aside to cool . No tying of strings , no foil and no danger of burning, besides like I mentioned cleaning is a breeze.
  • Keep aside your wonderful pudding which is done now, I peaked inside and it looked so good I had to really take a deep breath and stop myself from turning it onto a plate and start digging right it, but NO it’s meant for the Big Day!
  • Ok so now on D-day, steam the pud in its basin for 3 more hours, yes I trust Nigella’s recipes and hence the success for me a first time pudding maker 🙂
  • Well after it has had its steam and had cooled to an extent when you can open it and turn it on to a serving dish , it needs a gentle tap this basin and Viola! a rich dark well set pudding is there for you to admire and show off.
  • I did not add any charm before I started to steam it and I did not flambe’ it either but by all means use vodka and flambe’ to impress your guests !

Do leave your comments !

The sultana currant and prune mix in sherry Ground some CinnamonThe SuetThe mix is almost ready to go into the basinTa - Dah ! Here it is !Sigh, Pudding Perfection , I loveeed making this !Thanks Nigella!


Filed Under: Desserts, Food, Recipe Index Tagged With: apple, breadcrumbs, christmas, currants, easy food, flambe', follow me, food pictures, foodblog, grate, honey, Lakeland, Merry Christmas, Nigella Lawson, pudding basin, sherry, suet, sultanas, tasty, Ultimate Christmas Pudding, vodka, well set, yummy

Basic Chocolate Cake with Frosting

August 20, 2012 by manjirichitnis Leave a Comment

What better way to celebrate a new FOODISTA Badge for my post on Shahi Khichadi than by baking a chocolate cake, I firmly believe that chocolate is the one word that instantly lifts sagging spirits and the whole baking process itself is cathartic! So sistahs let’s BAKE!

Basic Chocolate Cake with Frosting

Manjiri Chitnis
Delicious, easy must-have Chocolate cake recipe with frosting
Print Recipe
Prep Time 25 minutes mins
Cook Time 30 minutes mins
Course Dessert
Cuisine Fusion

Equipment

  • Cake tin
  • Whisk
  • Hand-Blender or Stand-Mixer
  • Wire-rack to cool the cake
  • Probe to test cake
  • Spatula to frost the cake
  • Measuring spoons
  • Baking Parchment

Ingredients
  

  • 225 gms Butter softened
  • 225 gms Caster Sugar
  • 4 Eggs
  • 220 gms Self-Raising Flour
  • 3 tsp Baking Powder
  • 1 tbsp Cocoa Powder
  • 1/2 tsp Soda-Bicarbonate

For the frosting

  • 100 gms Butter
  • 100 gms Icing Sugar
  • 1 tbsp CocoaPowder
  • Shaved Chocolate for garnish
  • Fresh Strawberries for garnish
  • Granish of choice

Instructions
 

  • Lightly Grease two cake tins and line the bottoms with non stick-parchment. I manage without parchment , it's up to you, if yo are baking for the first time use it as it prevents the sides from burning.
  • Preheat Oven to 180C/350F/Gas 4.
  • Ensure butter is completely softened or else use the old foolproof way – heat water in a pan ,place a vessel on top with the butter inside minus any packaging, watch it soften like a man melts when he looks onto the eyes's of his dearest ,ahem …
  • Measure the Butter and sugar into a bowl and mix well they form a creamy mix, I used a fork and gave it a good old whipping:) – think of someone you dislike – your boss , your mil, your annoying neighbour, Baba Yaga the Witch – whoever – just whip away,hehehe
  • Add 3 medium or 4 small eggs, I used 3 medium-sized eggs.
  • Swift the self-raising flour into this mix ,followed by the baking powder, soda bicarbonate ,cocoa powder and beat till really smooth , I didn’t even need a hand blender as the butter was perfectly soft and the flour well swifted , though do go ahead and use a hand blender on low setting for about a minute , have added a picture so you know the look of consistency.
  • Divide the mixture between the two tins. I used the foil of the butter packaging to grease the cake tins, no wastage in my kitchen !
  • Bake in a pre-heated oven for approximately 25-30mins.
  • While in the oven make the icing by creaming together the butter and icing sugar and add cocoa powder, mix until smooth.
  • Cover frosting and set aside
  • Allow the baked cakes to cool down completely on a wire-rack before frosting
  • Sandwich the frosting in-between the two cakes
  • Add some on the sides and sprinkle the crunchy choco balls on the top , go all crazy and add some chocolate shavings , I did !
Keyword Basic Chocolate Cake


Looking for more inspiration to get baking?

Why not have a look at my other recipes:

  • Choco-chip cookies to kill insomnia and cure heartache
  • Sundried tomato and chilli spiced bread  
  • Chocolate coconut cake with coconut-flavoured icing
  • Banana Loaf – Mary Berry’s recipe
  • Cinnamon-pecan Gluten-free coffee cake
  • Halloween forgotten-graveyard cake


Filed Under: Desserts, Food, Recipe Index Tagged With: award, badge, bake, baking powder, butter, cake tins, celebrate, choco, chocolate cake, cocoa, crunchy, delicious, easy, eggs, Foodista, icing, oven, recipe, self raising flour, sistah, soda bicarbonate, softened, swift, whip

”POSH ”Victoria Sponge Cake

August 3, 2012 by manjirichitnis 4 Comments

What better way to celebrate the excitement surrounding the Olympics happening in London than sinking my teeth into a perfectly delicious soft Victoria Sponge Cake!

It’s an easy recipe and the result left me feeling like so very happy!

I tried to read up online why it is called a ”Victoria” Sponge cake and the apt answer seems that since Queen Victoria loved this soft cake with her afternoon tea! So I am going to savour the cake and afternoon tea as I cheer myself hoarse in front of the telly whilst watching the Olympics 🙂

Lovely! So let’s get baking and when your done gobbling some of it, drop me a line and let me know how much you enjoyed creating this yummy delight!

This cake serves 8 people, takes about an hour to prepare.

I choose to call it ”POSH” because that’s Victoria Beckham’s pop name, our very own British star and this cake is modernised version of a British Classic recipe with a twist as it is layered with Creme Chantilly’ – very posh sounding indeed!

Ingredients:

  • 225 g unsalted butter, softened, plus extra for greasing
  • 4 medium-sized eggs, organic if you please
  • 225 g caster sugar
  • 225 g self-raising flour
  • 4- 5 Large tablespoons of Strawberry Jam, the traditional version uses raspberry Jam, I used strawberry conserve.
  • 250 gm fresh strawberries sliced lengthways
  • Icing Sugar for dusting on top of the cake
  • Soda Bicarbonate – 1 teaspoon
  • Baking Powder 1 Teaspoon

To make the  crème Chantilly:

  • 300 ml double cream – so sinful 😉
  • 25 g icing sugar
  • I tiny cap full of Vanilla essence, the original recipe inspired by The Good Food Channel advises to use – 1 vanilla pod, halved lengthways and seeds scraped or vanilla extract

METHOD :

  • Preheat the oven to 180C/160C fan/gas 4. Grease and line two 18cm cake tins with a removable based with baking paper. I inaugurated my brand new weighing scales and cute cake tins I purchased for all future cake making experiments!
  • Put the butter and sugar in the bowl of an electric mixer and cream well until light and fluffy – this will take at least 10 minutes to get it properly aerated. Use the 10 minutes you have to wash and clean the strawberries and slice them lengthwise. This was also a first for me in terms of using my food processor to mix the butter and sugar mix. Then empty this butter sugar mix into a large mixing bowl, I also have a NEW nice bright Orange bowl!
  • Break each egg and add one at a time, whisk the mixture well after each addition to ensure it is soft and fluffy.
  • Add the self-raising flour to the above butter, sugar and egg mixtures, I added one spoon at a times and mixed it really well each time. Add the Bicarbonate of soda and Baking Powder to this mixture, I used this as I do in every cake but the original good food channel recipe does not mention these 2 ingredients. Later I used a hand blender to really get this mixture to feel like one entity and till it felt right to pour into the ready cake tins.
  • Now pour the above cake mix in equal portions into the  2 cake tins and smooth the top with a plastic spoon, the type you get with a food processor.
  • Bake for 20 minutes, with a timer, until risen and golden. Ensure you do not go over the 20 minutes, also if you are using a fan oven as I do, use only the setting that heats from below.

For the crème Chantilly:

  • Put the cream in the food processor, add the icing sugar and the vanilla essence. Whip to the soft peak stage, using the slow speed setting then refrigerate until slightly firmed.
  • Take the strawberry jam into a small pan and warm gently whilst stirring, use low flame and do not leave on pan for tool long.
  • Remove the cakes from the cake tin, on the top of one cake spread the jam from the pan and add the chopped strawberries.
  • Then get the Creme Chantilly’ from the fridge and spread generously over this.
  • Place the second cake on this and press down ever so gently.
  • Dust the top of this lovely sponge cake with a bit of icing sugar and decorate with a blob of the Creme Chantilly’ and some sliced strawberries!

Voila, the classic British cake with a twist – Posh Victoria Sponge is ready for you to savour, impress your family and friends and enjoy baking over and over again!

Filed Under: Desserts, Food, Recipe Index Tagged With: afternoon snack, bake, beat, butter, celebrate, easy, easy recipe, eggs, fluffy, food, Good Food, icing, mixture, pipe, Queen Victoria, recipe, self, simple, soft, sponge, strrawberries, sugar, tea, tea party, Team GB, time, unsalted, Victoria, weighing scale, whisk

Goda Sheera (Sooji Halwa in Hindi, Prasadacha Sheera for Satyanarayan Pooja)

April 4, 2012 by manjirichitnis 6 Comments

I have been planning for ages to make some Goda sheera (goda =sweet in Marathi , my mother tongue and sheera stands for a sweet preparation made using Semolina as the primary ingredient ). I wanted to prepare this for Holi but was too lazy to do it but on Gudi Padwa, which is the Maharashtrian New year, I decided to be a good girl and prepare this sweet dish and offer it to my favourite god Ganpati Bappa:)

I love using milk and mashed bananas as it reminds me of the way my elder Sister prepares it and also of the many Satyanarayan Pooja Prasad (Prasad = offering made to god in the form of food etc) that I have greedily gobbled up all my life back home in India. My mother though prefers to prepare this dish using a mixture of sugar dissolved in water to add a sweet taste. Any way you choose to prepare it, I assure you it is a hugely satisfying experience preparing it  and gobbling it afterwards 🙂

It would be unfair to throw Indian terms at my non Indian readers so , Gudi Padwa is a festival wherein we Maharashtrians celebrate the end of the harvest season and welcome a brand new year with the Hindu Calender. Satanarayan Pooja is a Hindu ritual of worship performed to celebrate new beginnings like a wedding, a housewarming or during the annual Ganesh Festival. It requires the Man and the Lady of the house to perform an elaborate offering to god and the beautiful part of the pooja or the ritual is the Katha (Katha simply means story in Marathi) as it takes the listener on a journey through tales that define our religion. The ultimate offering of love for god at the end of this ritual is called a Prasad and is almost always Sheera. Please click on the hyperlinks to enjoy reading in detail about the terms used. I thank all contributors to Wikipedia for providing such useful and beautifully written information. Oh yes, and the most fun part of Gudi Padwa is the Gudi, it is basically a long stick covered in shiny wrapping paper and a decorative piece of cloth is placed on the top and an inverted ”gadoo” or a stainless glass of a particular shape is placed over it or a brass container which is used for poojas and is again a very auspicious piece of the ritual. The swastika symbol is made on it using bright red kumkum, then this is wrapped with a garland of fresh marigolds and bright green leaves of the mango tree and also a garland made from ” Batashe” which is a white leaf-like thing made from concentrated sugar syrup and strung onto a string and made into a garland. This is then perched on the balcony and worshipped and kept on display for all to see, it is quite a sight to see colourful ”gudi’s” swaying outside everyone’s windows and balconies.

I had to make mine this year using an unused shower curtain rod, golden wrapping paper recycled from Christmas, a steel bowl instead of the traditional glass and a bright red stole instead of the usual auspicious colours of green or gold! Anyway, this is what it looked like :), am quite proud of it really!

Below I have chosen 2 images from google that I feel are really good and stunningly clear images and really capture the spirit of the festival, the first of a couple dressed all traditionally and with the beautiful Gudi being worshipped using a well-decorated thali (plate containing several items for performing the ritual) and the second image is of the sexy Ms Isha Koppikar looking like a million bucks and the Gudi looks lovely as well!

Pic 1: Image courtesy iDiva dot com

Pic 2: Image Courtesy Click here

Ok ! so now, let me try to put down here the recipe in a simple and easy-peasy manner.

Preparation time: Approx 45 minutes Serves:4

Ingredients :

  1. Semolina /Rava/Suji – I use fine rava as it is what I find is best for this recipe. approximately 2 small watis or ramekins.
  2. Ghee – plenty!
  3. Raisins – a handful
  4. Badam/Almonds – again a handful
  5. Saffron/Kesar/Zafran – a small pinch just to add colour and pomp!
  6. Cashewneuts/Kaju/Kajoo – if you like them, not necessary) – a generous handful without the peel and unsalted.
  7. Milk about 200 ml
  8. One ripe Banana
  9. Elaichi/ Green Cardamom – about 6-8 – open them and crush the brown seeds to make a powder using a mortar pestle we will also use the green outer cover to add a distinctive aroma to the recipe :), sounds so romantic doesn’t it ( err well …)
  10. Sugar – I use granulated white sugar, and take 2 – 2.5 measures of a small bowl, actually, the proportion is always 2:1 for the Semolina: Sugar for this dish so choose the quantity accordingly.

Method :

  • Boil some water and add into a small bowl, add the almonds, this will make it easy to peel off the skin. Soak some raisins in lukewarm water so that they absorb water and can be dunked into the semolina at a later stage.
  • Add the Saffron strands ever so carefully to a small bowl of water so as to allow the beautiful golden orange colour to disperse into the water.
  • Take 2 bowl fulls of Semolina and add to a pan and constantly stir it until it turns a light brown colour, if you do not keep stirring or put the pan on a very high flame it might burn and we don’t want that do we? Also, I use a rather heavy bottom pan to ensure that the heat spreads evenly and that the Semolina browns well.
  • This is how it looks before we brown it :
  • This is how it will look after stirring for a while :
  • This is how it will look when it is done and ready for the next stage,i.e to be added to the ghee:
  • Remove the pan from the flame and keep the Semolina aside .Now take 2-4 large tablespoons of ghee (Clarified Butter) in a vessel and warm it on a low flame, be very carefull when frying with ghee as GHEE heats up very fast and anything unattended inside the hot ghee can char easily. When the ghee is warming up add the cashew nuts first and wait for them to start browning, then add the remaining raisins – not the ones which are kept soaking in water ! The strong aroma of the warm Semolina , the beautiful smell of desi ghee and the in-your-face tasty aroma of the fried cashews will assault your senses in the most pleasant way and fill up your kitchen with an almost auspicious atmosphere, it’s when this happens that one truly feels festive from within and it is also at such moments I have massive nostalgia attacks and realise how deeply coded our childhood memories are and  how much a part of our memories are made up of familiar sights and sounds. I oftentimes find life in the western world paler, less colourful and too quite compared to the pomp , blast of colours and festivity that make up India …sighhhh !
  • The cashew nuts and raisins turn a golden hue as seen in the picture above and the raisins puff up quite a bit due to the heat of the ghee,be careful not to overdo the raisins as they are akin to tiny missiles filled with boiling hot oil and if they burst , you can get serious burns …booooo! The kitchen is quite a dangerous place for the uninitiated isn’t it ?!
  • Ok, while the cashew nuts are being processed , take a small vessel and add the 200 to 250 ml milk on a low flame, add the sugar and dissolve, stirring till it completely dissolves, do not allow the milk to boil but reduce it on a low flame, add the crushed green cardamom powder and the outer green cover. Add some of the saffron and the water in which it was soaked as well, keep some for adding into the mixture later. When this mixture is on the flame , it gives out an unmistakable aroma of sweet sugary milk and I can almost feel my teeth sink into the soft sheera and mentally I am biting into the fried cashews and the yummee soft Banana bits that play hide and seek with my tongue as I devour the sheera – AAHHH , anyway , don’t allow that to happen as it is considered wrong to savor the ”Prasad” before the Almighty is offered some for ”bhog” or in simple words god has been offered the sweet dish and it is assumed that he has symbolically consumed our offering and blessed us with all that we wish and desire for 🙂
  • When the cashew nuts and the raisins have been fried, add the semolina slowly in the hot ghee mixture, stirring continuously to prevent any lumps from forming and also to ensure that the semolina soaks up the ghee properly.
  • Once all the Semolina is mixed well into the ghee and fried dry fruit mix it will look like the picture above, then add the remaining saffron and water in which it was soaked to the mixture.
  • Then add the roughly mashed banana pieces to the semolina mixture.
  • When the sugar has completely dissolved and the milk has reduced a little, it is ready to be added to the semolina mixture. Add it stirring slowly, it will look like the picture below immediately after adding the milk and sugar into it.
  • Stir a bit more and here is what it will look like now:
  • For the smallest possible time , cover the mixture above on the lowest possible flame , it is then ready to be served, now add the almonds to season over the top , peel off the skin , thanks to the warm water they will come off very easily and then just halve the almonds or if you want to be very artistic and have some time cut the almonds into longish thin strips ,anyway which they add a definite crunch to the sweet dish and I love that ,you dish will now look like this :
  • Take some of this beautiful dish and serve into a small bowl to offer to the Ganpati Bappa – who has been made to shine and sparkle for the day and place it in front of him , hands folded ask for his blessings and wait for sometime till you are convinced he’s had some of the offering or ”Prasad”.

Aaah , now just look at the cute Bappa 🙂

HAPPY EATING ALL YE READERS who attempt to make it, do let me know any feedback 🙂 all good of course 😉

Learn how to cook western coastal Indian cuisine from the C.K.P community with my easy-to-follow recipes.

Find below a list of Indian recipes on my blog, some traditional, some fusion, and many regional favourites!

  • Valache Birdhe – (वालाचे बिरडे) – Made in a typical C.K.P way
  • Fresh dill and yellow moong daal recipe
  • CKP Surmai curry
  • Pompfret fry
  • Konbichi khichadi – Prawn khichadi
  • Vaangayche Bharit/ Smoked stuffed Aubergine ( Eggplant/Brinjal) in a thick gravy/ Baingan ka bharta
  • Kairi Panhe/ Aam ka panha – Raw mango summer drink
  • Cauliflower- vatana bhaji – cauliflower and green peas vegetarian side dish
  • Podhnichi khichadi
  • Akkha masoor aamti CKP style / Whole red lentils with skin curry recipe
  • Achari Mutton curry
  • Spicy Chicken curry
  • Egg curry
  • Kadhi – fusion of Punjabi and Gujrati kadhi recipes with vadi’s
  • Upma
  • Gujrati Kadhi
  • Shahi Khichadi
  • Sweetcorn and paneer bhaji/sabzi (vegetable side dish)
  • Tomato and coconut chutney
  • Steamed Idli batter
  • Ragi (Finger Millet) and blueberry pancakes
  • Masala egg omlette
  • Chicken tikka masala
  • Tikka masala curry paste
  • Tawa chicken Frankie roll
  • Chai concentrate
  • Grated carrot salad
  • Strawberry flavoured shrikhand

Filed Under: Desserts, Food, Indian, Recipe Index Tagged With: add, almonds, aroma, banana, bappa, bhog, bowl, brown, cardamom, chop, clarified butter, colourful, colurfull, desi, dessert, dish, dry, elaichi, festivakl, flame, fried, fruits, fry, ganesh, ganpati, ghee, god, golden, green, gudi, Indian, kajoo, kaju, katha, lord, low, maharashtrians, Marathi, milk, mix, mortar, offering, padwa, pan, pestle, pooja, prasad, raisins, rangoli, rava, recipe, ripe, saffron, satyanaryan, semolina, sheera, shira, soak, sooji, spirit, stir, sugar, suji, sway, sweet, sweet dish, tahli, tasty, thali, waft, zafaran

Food,travel and lifestyle writer. Photographer.

  • Email
  • Facebook
  • Instagram
  • Pinterest
  • Twitter
  • YouTube

Categories

  • Baking
  • Breads
  • C.K.P recipes
  • Cakes
  • Chutneys
  • Cocktails
  • Curry – Meat, Seafood
  • Curry – Vegetarian
  • Desserts
  • Events
  • Featured Food and Drink
  • Featured Lifestyle
  • Featured Travel Adventures
  • Food
  • Healthy
  • Home
  • India
  • Indian
  • Kitchen
  • Lifestyle
  • London and rest of U.K
  • Meat
  • Miscellaneous
  • Product Reviews
  • Quick and Easy
  • Recipe Index
  • Rest of the World
  • Restaurant Reviews
  • Salads
  • seafood
  • Sides
  • Smoothies
  • Soups
  • Travel
  • Uncategorized
  • Vegan
  • Vegetarian

Featured Blogger on Great British Chefs

GBC_blogger-badge_150x300px    

Need a New Power Blender?

13076814_10154185434898293_7387808474266473605_n

Travelsfortaste is Featured on Expats Blog

England expat blogs
Privacy & Cookies: This site uses cookies. By continuing to use this website, you agree to their use.
To find out more, including how to control cookies, see here: Cookie Policy
Squaremeal.co.uk - Restaurant Reviews

About me

Writer and Photographer. Food,Travel & Lifestyle, Blogger and Digital Marketer. Read More…

  • Email
  • Facebook
  • Instagram
  • Twitter
  • YouTube

Recent Posts

  • Diamond Jubilee Tea Salon, Fortnum & Mason – Afternoon Tea Review
  • Brown’s Brasserie and Bar celebrates 50th Anniversary with Covent Garden Grand re-opening
  • Hampton Court Palace Food Festival – Review
  • Brigit’s Bakery Afternoon Tea, Covent Garden, London – Review
  • Maplin Photo Walk around Central London

Copyright © 2025 · Foodie Pro Theme by Shay Bocks · Built on the Genesis Framework · Powered by WordPress

This website uses cookies to improve your experience. We'll assume you're ok with this, but you can opt-out if you wish.Accept Read More
Privacy & Cookies Policy

Privacy Overview

This website uses cookies to improve your experience while you navigate through the website. Out of these, the cookies that are categorized as necessary are stored on your browser as they are essential for the working of basic functionalities of the website. We also use third-party cookies that help us analyze and understand how you use this website. These cookies will be stored in your browser only with your consent. You also have the option to opt-out of these cookies. But opting out of some of these cookies may affect your browsing experience.
Necessary
Always Enabled
Necessary cookies are absolutely essential for the website to function properly. This category only includes cookies that ensures basic functionalities and security features of the website. These cookies do not store any personal information.
Non-necessary
Any cookies that may not be particularly necessary for the website to function and is used specifically to collect user personal data via analytics, ads, other embedded contents are termed as non-necessary cookies. It is mandatory to procure user consent prior to running these cookies on your website.
SAVE & ACCEPT