Travels for Taste

Tales of travel and food with a touch of spice

  • Home
  • About
    • In the Press, Published Work and Interviews
    • PR and Disclosure Policy
  • Food
    • Recipe Index
      • Indian
        • C.K.P recipes
        • Curry – Meat, Seafood
        • Curry – Vegetarian
        • Sides
        • Chutneys
      • Healthy
        • Soups
        • Salads
      • Quick and Easy
      • Baking
        • Desserts
      • Meat
      • Seafood
      • Vegetarian
        • Salads
      • Vegan
    • Product Reviews
    • Events
  • Travel
    • UK
    • India
    • Around the World
  • Lifestyle
    • Home
    • Kitchen
    • Restaurant Reviews
    • Miscellaneous
  • Giveaways
  • Work with me
    • Meet interesting foodie entrepreneurs here

Butter chicken

May 18, 2020 by manjirichitnis 2 Comments

Incredibly easy Butter Chicken recipe

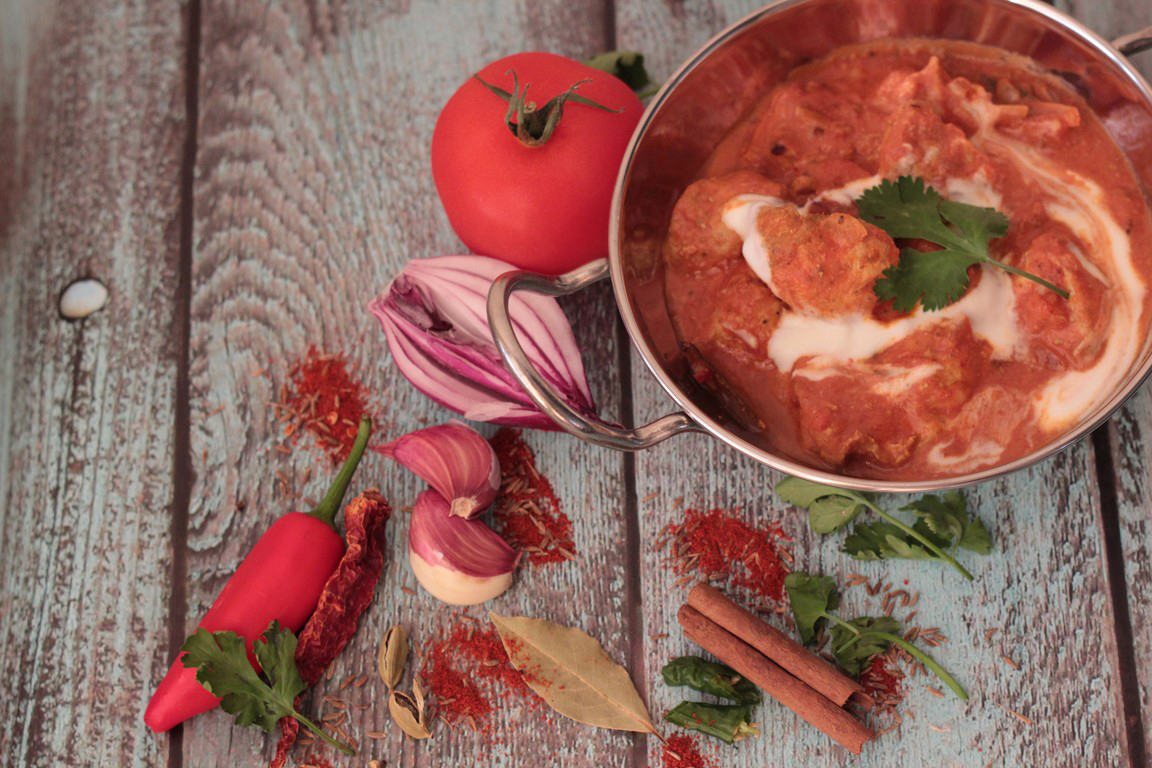
The very mention of the name of this dish conjures up images of a creamy and buttery gravy with delicious tandoor cooked chunks of chicken just begging to be scooped up with warm buttery naan

Butter Chicken – Travelsfortaste blog

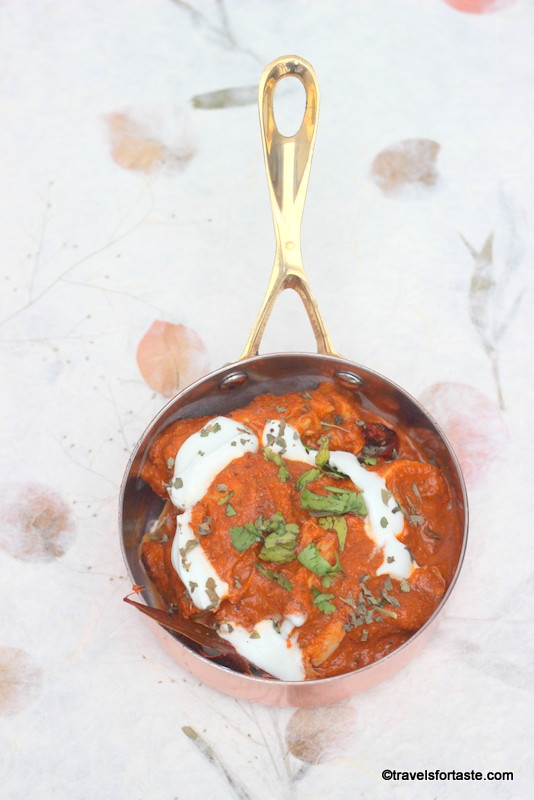
Delicious chicken in a creamy and flavourful yet mild gravy sauce

This version is sort of a cheat’s version, meaning you can be create this much quicker if you follow my handy tips and tricks given below. There are also several adjustments I have made here which allow for alternate ingredients, especially swapping fresh cream for thick Greek yoghurt. Believe me it tastes just as good but it so much lighter on your tummy and your conscience!

Hugely popular North Indian chicken dish

This recipe adapts well to those using an Instant Pot or slow cooker too and is a great way to celebrate a BBQ. It is a very user-friendly recipe so if you do not have an oven you can still crack the code with some smart hacks. Yes, yes, I call my own smart, what can I say, am very humble like that 😉

Usually, I am a very happy bunny creating traditional Maharashtrian curries and especially from my home cuisine – CKP. But because I have lived in Bombay ne Mumbai most of my life in India , I have a palate that appreciates and loves a whole host of varied regional cuisine. And Butter Chicken sits right up there among those much-loved dishes. I don’t make this often enough is the only complaint I hear from the OH!

Butter Chicken

Manjiri Chitnis
Incredibly easy Butter Chicken recipe for a delicious chicken in a creamy and flavourful yet mild gravy sauce
Print Recipe
Prep Time 10 mins
Cook Time 20 mins
Marination and resting time 8 hrs
Total Time 8 hrs 30 mins
Course Main Course
Cuisine Indian
Servings 2 People

Equipment

  • Mixer / Blender
  • Heavy Bottomed Pan
  • Griddle pan/oven and skewers

Ingredients
  

Round one of margination -Overnight margination of chicken/ or six hours before cooking

  • 450 grams Boneless chicken – personally, I prefer chicken thighs

  • 2 tsp Kashmiri red chilli powder (check notes below – I make mine fresh)
  • 2 tbsp Freshly ground ginger & garlic paste
  • 1 heaped tbsp Garam masala
  • 1.5 tbsp Freshly squeezed tbsp lime juice
  • Salt as per taste

Mix for round two of marination

  • 2 tbsp Cooking oil – ideally mustard oil

  • 4 heaped tbsp Hung curd (check notes below) – approx 1 cup
  • 1.5 tbsp Lime juice

Ingredients for the curry

  • 2 tbsp Unsalted butter

  • 1 tsp Oil
  • 350 grams Chopped tinned tomato– or 3 to 3.5 medium fresh ripe tomatoes
  • 1 medium-sized Red onion
  • 1 – 2 Green chillies
  • 1-2 Bay leaves
  • 1/2 thumb-sized Stick of Cinnamon (ideally cassia bark)
  • 1/2 thumb-sized Piece of Fresh ginger
  • 6 – 7 Cloves of Garlic with skin on
  • 2 Peppercorns
  • 4 Cloves
  • 1 Badi Elaichi /Black cardamom
  • 4 Elaichi/green cardamoms
  • 6 Cashew nuts
  • 6 Almonds without skin
  • 1 tsp Kasuri Methi
  • 1 tsp Sugar
  • Water as required
  • Salt to taste
  • 1.5 tsp Fresh cream or Thick Greek yoghurt
  • Handful Fresh Coriander leaves finely chopped to garnish

Instructions
 

  • Wash the chicken pieces and set aside in a bowl
  • Make small cuts in the chicken to allow the marinade to penetrate thoroughly
  • I prefer an overnight margination for the first stage as it makes the flavours shine through, you can do it about 6 hours before cooking as there are two stages to marination
  • Mix all the ingredients from the overnight margination list above and coat the chicken pieces thoroughly, place in the refrigerator overnight
  • The reason hung curd is used is to as to ensure that no extra water gets into the gravy and the gravy has a beautifully creamy consistency
  • Use a muslin cloth to hand the curd for about 2 hours
  • Place the dahi /curd/ Indian set yoghurt in a fine muslin cloth and twist the ends to close the muslin and made a big potli/ parcel
  • Once all the water from the yoghurt collects in the vessel below, it isokay to remove it from the muslin *Check notes
  • Beat the hung yoghurt with a fork and then pour onto the chicken, add the lime juice and mix well, then add the oil
  • Now put the chicken back into the refrigerator for at least four hours
  • About 4 hours before making the chicken remove from the refrigerator and let is sit outside for about 45 minutes (during winter, during summer – depending upon the room temperature let it sit out for at least 20 minutes)
  • Let the chicken rest outside at room temperature while you make the gravy
  • Soak the almonds in lukewarm water for 10 minutes, the skin will come off easily
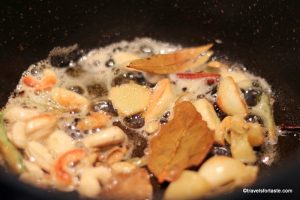
  • In a heavy bottomed pan heat the oil and then add the butter , follow this up with the green chillies, crushed ginger , crushed garlic, bay leaves, peppercorns, cloves, black cardamom, green cardamom pods opened
  • Sauté well till all the whole spices are lightly fried , releasing all their gorgeous aromatic flavours
  • Now add in the whole cashews and whole almonds, stir and sauté
  • Then add the finely chopped onion and cook until they turn a light brown colour
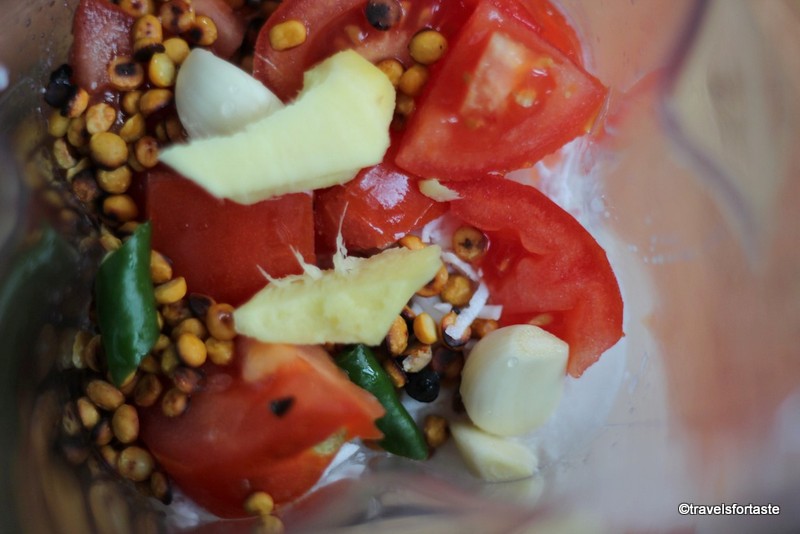
  • Follow this up with the chopped tomato from a tin or concentrated tomato puree. Dilute the concentrated paste before adding. Read my notes below for tips.
  • Let this simmer for under 2 minutes, then transfer to a ceramic bowl and cool
  • String the chicken pieces through a skewer, spray some oil and cook them in a pre-heated oven at 200 degree Celsius until almost done. Turn the pieces so both sides get grilled equally
  • Alternatively, use a heavy bottom griddle pan and cook on either side till you see juices releasing
  • The best way to cook the chicken is over hot coal on a BBQ, which imparts a beautiful smoky flavour note to the chicken
  • Remove the chicken from the skewers and using a scissor cut them down to smaller chunks
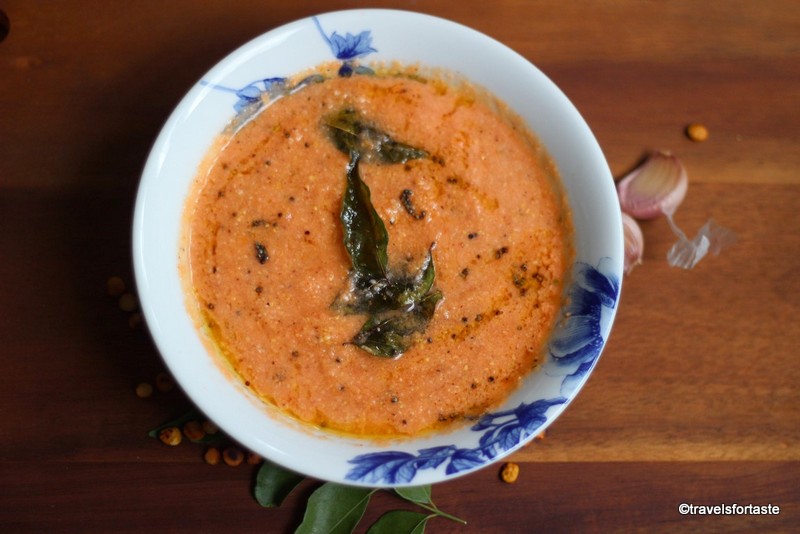
  • Now blend the gravy using a blender – blend until you get a smooth consistency. Read my pro-tipbelow for this step – it can make or break your dish
  • In the same pan used to sauté the gravy, add the smooth gravy from the blender, if you want you can add an additional dollop of butter before adding the gravy
  • Now stir in the chicken pieces and mix well
  • Then add in the kasuri methi/dried fenugreek leaves, sugar and salt as per taste and cook on a very low heat setting until done. Cover and cook
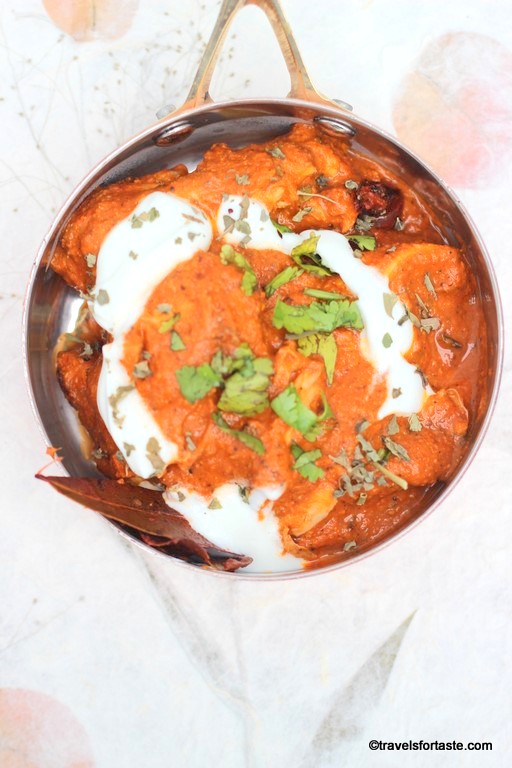
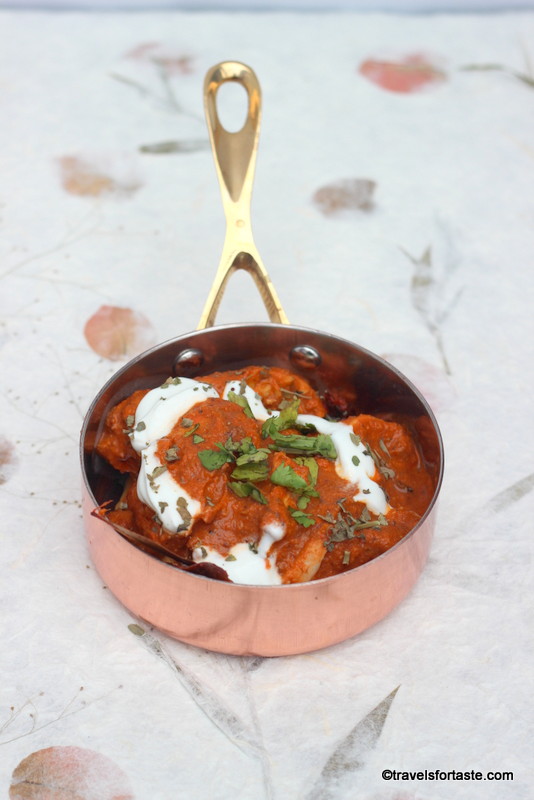
  • When the chicken has cooked through transfer to a serving bowl
  • Garnish with fresh cream, some chopped coriander leaves, some kasuri methi/ dried fenugreek leaves and serve hot
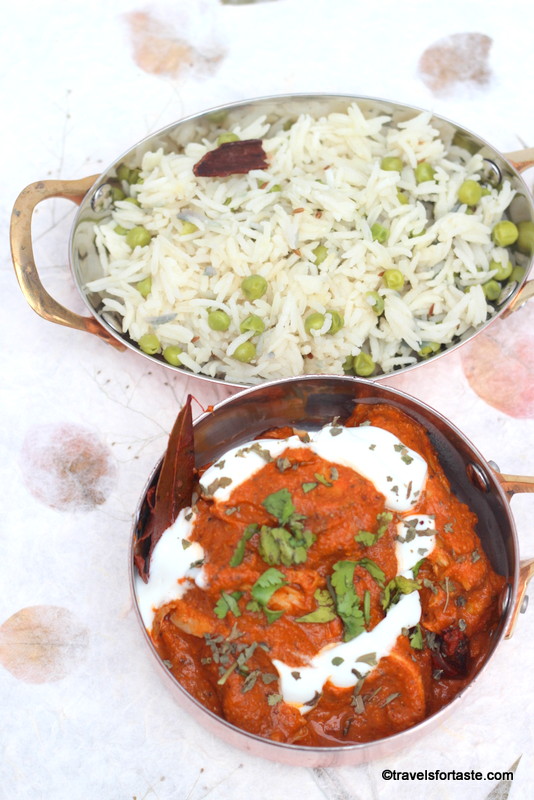
  • Serve with a side of buttery garlic naans, or plain tandoor roti’s or steamed basmati rice or simply plain naan
  • Whatever you choose to pair it with remember to add a blob of butter on top for that added decadence
Keyword Butter Chicken

Smart Swaps:

  • Unsalted butter over regular salted
  • Few soaked dry fenugreek seeds can be used if you cannot find Kasuri methi. Dried fenugreek leaves
  • Thick Greek yoghurt over fresh cream
Butter Chicken – Recipe by www.travelsfortaste.com

Tips:

  • Chopped tomates in a tin and concentrated tomato puree in a tube are store cupboard essentials, also they have the right kind of acidity that you need. Fresh tomatoes tend to be sweet which may change the balance of flavours we are after here
  • Before blending the gravy sauce, you may want to remove the bay leaves and the badi elaichi. I do this both my husband and I believe that the sauce tastes better without blending this. Later just add these back with the chicken pieces.
  • Frozen onion and tomato gravy is very handy
  • Frozen ginger garlic paste is another time saver
  • Pressed for time? Skip the overnight marination and go for only one marination for 4 hours
  • Making a large batch of Butter Chicken? You will need more hung curd. I hang the muslin cloth from my kitchen sink tap so the excess water simply drips into a bowl waiting in the sink. Do not throw this water away! It is loaded with flavour and nutrients. It is great for mixing into chapati/Indian flatbread dough and a base for salad dressings (Yes!)
  • Batch cook – this curry freezes very well; I make 4 times the amount and stash my freezer when I have a packed schedule. It is amazing to come home late from work to this beautiful curry (I cheat and get store-bought naan when am unable to make any fresh!)
  • Skip the green chillies entirely if you cannot handle the pungent undertones

Notes:

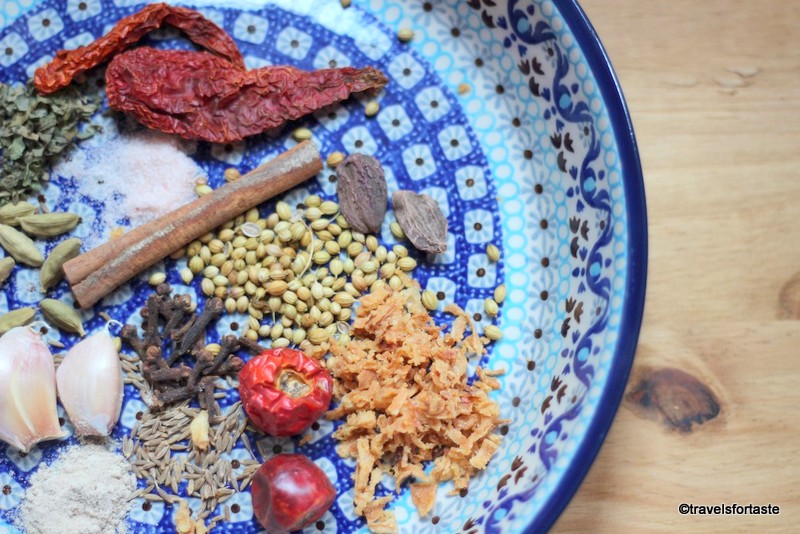
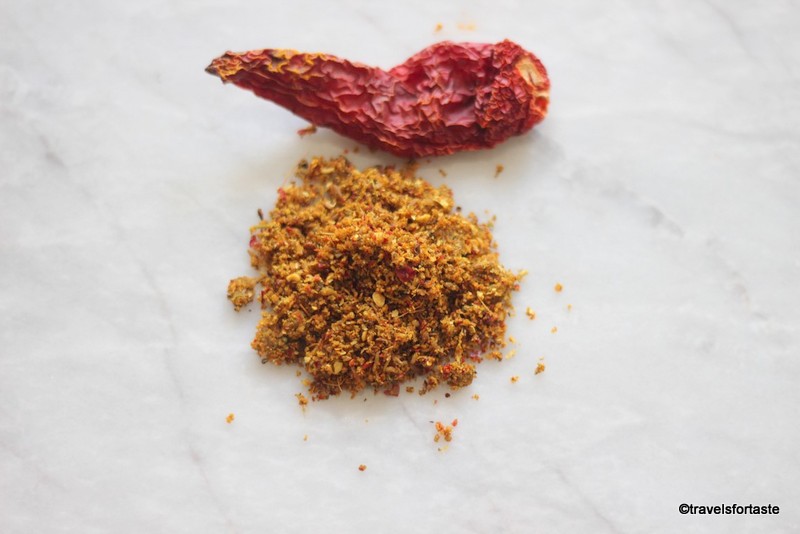
  • Kashmiri dry red chillies are easily available in most Indian grocery stores/ Online as is the bright red ready to use powder. The powder is what gives this recipe it is trademark bright red colour. Do not fret if you can’t find the powder, just blitz a handful of the dried Kashmiri chillies in a spice grinder – dry blitz and make your own powder! If you want, you could also add water and all the other ingredients of round one of margination and make a paste. Saves time too!
  • Using an Instant pot? I will be sharing a version of this recipe in the coming days – will update a link here

Did you follow my recipe? Please let me know in comments, I love reading your comments and feedback

Snap a picture of your creations and use the hashtag #travelsfortasteblogrecipe and share it to Twitter, Instagram and Facebook and I will re-post it.

Butter Chicken – Recipe by www.travelsfortaste.com

Filed Under: Curry - Meat, Seafood, Food, Indian, Recipe Index

Quick Red Lentil curry

May 9, 2020 by manjirichitnis 2 Comments

Easy basic Indian daal recipe

Dried Lentils – versatile, flavourful, and absolutely brilliant to cook with not to mention pocket-friendly, are an omnipresent part of my kitchen pantry. Every region of India has its own versions of lentil curries or daal’s as we refer to even the cooked version.

Made using storecupboard essentials

The skinless masoor daal or the split red lentil cooks very quickly and is a great choice for a quick dish that can be rustled up in next to no time. Perfect for busy evenings, steamed rice will cook alongside this curry and you will have a hearty and delicious meal all ready under 20 minutes.

Traditional Roots

My recipe is something I have been making for a while now and even Aai approves – which is high praise indeed. Ideally, Aai would have me cooked akkhe masoor or the whole masoor – brown with skin and whole. The recipe involves using some of our trademark ingredients like tamarind and freshly grated coconut and the result is a creamy, delicious and moreish daal that warms my soul.

Basic Indian Curry recipe for beginners

My recipe is a perfect for those getting familiar with Indian cuisine . This is one daal recipe you want in your repertoire. Adaptable and highly versatile, you can bulk up this recipe with veggies if you are cooking for fussy little ones. Everything about this recipe is user-friendly. This curry freezes well, make in batches and freeze for busy days.

Quick Split Red Lentil Curry

Manjiri Chinis
Delicious Red lentil curry, easy to prepare, vegan friendly recipe
Print Recipe
Course Main Course
Cuisine Indian

Ingredients
  

  • 1 cup Red lentil washed
  • 1.5 tbsp Sunflower Oil
  • 1 small pinch Hing/Asafoetida
  • 2-3 Kadipatta/Curry leaves
  •  ½ Hirvi Mirchi/ Green Chilli
  • ½ tsp Mohri/ Black Mustard seeds
  •  ½ tsp Jeere/ cumin
  • 2 cloves Lasun / Garlic with skin on
  • A small piece of fresh ginger washed and roughlysliced  – keep mortar pestel handy
  • ½ Laal Kanda/ Large Red Onion chopped fine
  •  2 tsp Garam Masala
  • ½ tsp Halad/ Turmeric Powder
  • 1 heaped tsp Laal Mirchi/ Red Chilli Powder
  • 1 heaped tsp Dhane/Coriander Powder
  • 1 small tomato chopped fine or ½ heaped tbsp canned chopped tomatoes
  • Salt as per taste
  • Water as per the quantity of lentils used
  • Fresh coriander leaves to garnish

Instructions
 

  • Wash the red lentils, drain and set aside
  • Finely chop the red onion
  • Heat oil in a pan
  • Leave the skin on the garlic cloves and smash the cloves using a pestle, remove the skin from the ginger and use a mortar pestle to crush it to release all the juices.
  • When the oil is hot add a pinch of asafoetida, mustard seeds and cumin, once the mustard seeds and cumin begin to pop and crackle, add the garlic, green chilli, curry leaves and the ginger. Remember to use a spoon to scoop all the juice from the crushed ginger into the pan, you don't want to waste all that goregous juicy flavour
  • Tip in the chopped onion, add the corinader powder, garam masala and saute until the onion turns a soft brown colour, keep stirring to ensure the onion does not burn
  • Add the chopped tomatoes and mix well, then reduce the flame and add the washed red lentil
  • Add enough water, cover and cook until done
  • Garnish with freshly chopped coriander leaves just before turning off the gas
  • Serve with steamed pressure cooked rice, always top with a nice blop of puree ghee, a nice cucumber raita will complete the meal

Learn how to make Indian food from scratch with my easy to follow recipes

  • Fresh dill and yellow moong daal recipe
  • Goda sheera/ sooji ka halwa/ Indian dessert
  • CKP Surmai curry
  • Pompfret fry
  • Konbichi khichadi – Prawn khichadi
  • Vaangayche Bharit/ Smoked stuffed Aubergine ( Eggplant/Brinjal) in a thick gravy/ Baingan ka bharta
  • Valache Birdhe – (वालाचे बिरडे) – MADE IN A TYPICAL C.K.P WAY
  • Kairi Panhe/ Aam ka panha – Raw mango summer drink
  • Cauliflower- vatana bhaji – cauliflower and green peas vegetarian side dish
  • Podhnichi khichadi
  • Akkha masoor aamti CKP style / Whole red lentils with skin curry recipe
  • Achari Mutton curry
  • Spicy Chicken curry
  • Egg curry
  • Kadhi – fusion of Punjabi and Gujrati kadhi recipes with vadi’s
  • Upma
  • Gujrati Kadhi
  • Shahi Khichadi
  • Sweetcorn and paneer bhaji/sabzi (vegetable side dish)
  • Tomato and coconut chutney
  • Steamed Idli batter
  • Ragi (Finger Millet) and blueberry pancakes
  • Masala egg omlette
  • Chicken tikka masala
  • Tikka masala curry paste
  • Tawa chicken Frankie roll
  • Chai concentrate
  • Grated carrot salad
  • Strawberry flavoured shrikhand

As part of our #LockdownRecipes, I cooked this live on Instagram and have it saved on my IGTV – do go and have a look, please let me know in comments if you enjoyed watching my very first IGTV video!

My friend and fellow food-blogger Heidi cooked along with me on live from her home kitchen in St.Albans and I was so happy that some of my followers cooked along too. Check out my album Lockdown recipes in my Instagram highlights to see photos of their creations.

And if you do cook to my recipe do snap a picture of your creations and use the hashtag #travelsfortasteblogrecipe and share it to Twitter, Instagram and Facebook and I will re-post it.

Filed Under: Curry - Vegetarian, Food, Indian, Recipe Index

Dill and yellow moong daal recipe

April 14, 2020 by manjirichitnis 12 Comments

Shepu ani moogachi chi Bhaji

My very first memory of eating this dish goes back to when I was in primary school. Back home from a busy day at school , I barely used to manage to wash my hands before running into the kitchen demanding a snack. Aai had cooked up this then strange looking green leafy vegetable with an aroma that was new to me, but it was served with a freshly made Jowar Bhakri, which I absolutely love. I guess it was love at first bite.

Simple, homely, delicious

This bhaji (Marathi for sabzi) is a very traditional dish, part of the Maharashtrian cuisine. Shepu (Marathi for Dill) leaves are known for the string flavour and certain foods, this leafy vegetable can evoke strong emotions. I belong to the camp of people that love this dish.

Traditional cuisine from Maharashtra

Dill and Yellow Moong Dal bhaji – (Shepu ani moogachi Bhaji)

Traditional Maharashtrain recipe using fresh Dill leaves and Yellow Moong daal, tastes great with a Bhakri
5 from 4 votes
Print Recipe
Course Main Course
Cuisine Indian
Servings 2 people

Ingredients
  

  • 1 I bunch Shepu / Dill leaves
  • 3/4 cup Split Yellow Moong daal without skin
  • 1 tbsp Sunflower Oil
  • 1 small pinch Hing/Asafoetida)
  • ½ tsp Mohri/Mustard seeds
  • ½ tsp Jeere/ Cumin
  • 3 – 4 Kadipatta/ Curry leaves
  • 3 cloves Lasun / Garlic with skin on
  • 1 Thumb sized piece Fresh Ale/ Ginger – smashed with a khalbatta – Mortar Pestle
  • ½ Kanda/Red onion finely chopped
  • 2 tsp Hirvi Mirchi/ Green Chilli and Kothimbi/ Coriander leaves paste
  • 1 tsp Laal Tikhat/ Red Chilli Powder
  • ½ tsp Halad/ Turmeric powder
  • 2 tsp Goda Masala
  • 1.5 heaped tsp freshly grated khobra /Coconut

Instructions
 

  • Wash the moong daal and soak it in hot water for a while – until you find the daal begins to soften , ensure it doesn’t totally get soft
  • Meanwhile wash and roughly chop the shepu/Dill leaves and tender stalks – and drain onto a tea towel
  • In a pan gently roast half the chopped onion and the grated coconut, do not allow the mix to to burn – remove from pan and set aside on a ceramic plate to cool
  • In the same pan heat the oil and prepare the phodni/tadka – when the oil heats add the mustard seeds and cumin, when they start to sputter add the garlic cloves and ginger , stir till the garlic begins caramelise
  • Meanwhile remove the daal from the water , drain the water through a colander and pat dry
  • Then add the remaining onion and the moong daal, allow the daal to almost fry but not quite
  • Add the goda masala and cook for about a minute , allowing the goda masala to coat the onion and daal thoroughly
  • Add the green masala, red chilli powder, turmeric, then add the shepu and stir for a while
  • Add the roasted onion and grated coconut mixture, and allow to cook on a low flame.
  • The shepu shouldn’t totally go soft and limp, that means it has overcooked. The daal should be cooked like pasta – al-dente – that means you have got the texture just right. Serve hot with a freshly made Jowar or Bajra Bhakri and some chopped onion.
Keyword Dill, Moong, Shepu

Memories of going to small villages in the interior of Maharashtra years ago, enjoying a hot bhakri made over a stove with a spicy bhaji like this in dim lighting and really enjoying everything that the place has to offer. These and other memories come rushing back to me when I make such recipes. After all, what is cooking traditional dishes, if not a journey to some part of our life, even if it may seem like a whole lifetime away?

Explore more recipes from Maharashtra, India:

  • CKP King Fish curry – सुरमाई चे कालवण 
  • Valache Birdhe – C.K.P style recipe -वालाचे बिरडे
  • Konkani Pompfret Fish Curry पापलेटचं कलवण
  • Prawn Khichadi – कोळंबीची खिचडी

Have you tried any of my recipes? Do let me know in comments, share your photos on social media with me with the hashtag:

I love reading your comments and seeing your photos! Stay Safe and Stay home during this lockdown.

Filed Under: C.K.P recipes, Food, Indian

Paneer Firecracker Parcels

October 12, 2017 by manjirichitnis 6 Comments

A delicious paneer starter for special occasions

 The countdown to the most opulent and bright Hindu festival of the year has begun. DIWALI – the festival of lights is knocking on our doors. Delicious spicy shredded paneer bhurji encased in a delicate filo pastry parcel and baked to just the right temperature. These bite-sized mini parcels of deliciousness pack a punch of flavour and are certain to become a crowd-pleaser in no time. These mini ‘firecrackers’ explode when bitten into engulfing one’s palate in a riot of beautiful flavours and textures.

Easy Vegetarian Party food recipe, a sure-fire crowd-pleaser

A great recipe to rustle up quickly and impress guests, perfect for both at a planned party or for surprising those guests that drop in unexpectedly. And with ASDA by my side, I can bring home all these beautiful ingredients and unleash my creative side in the kitchen. It also gives me an opportunity to save some precious time and spend it with those that matter most – my family – and celebrate this amazing and lively festival with pomp and pageantry – at home.

Paneer Firecracker Parcels

PANEER FIRECRACKER PARCELS

manjirichitnis
Delicious, Vegetraian and festive this is a great recipe torustle up quickly and impress guests, perfect for both at a planned party orfor surprising those guests that drop in unexpectedly.
Print Recipe
Prep Time 10 mins
Cook Time 25 mins
Course Appetizer
Cuisine Fusion Indian
Servings 6 people

Equipment

  • Pan, Oven

Ingredients
  

  • 250 grams Paneer
  • 2 sheets Filo pastry
  • 1 handful cashews and almonds for purée
  • 2 Red onions medium sized
  • 1.5 small juicy sweet tomatoes
  • 2 Sweet Peppers (small, sweet crunchyones)
  • 2 tbsp Tomato purée
  • 4 tbsp Oil
  • 1 small pinch Asafoetida
  • 1/2 tsp Cumin (jeera)
  • 2 Green chillies
  • 1 tsp Red chilli powder
  • 1.5 tbsp Ginger garlic paste
  • 2 tsp Garam masala
  • 2 tsp Coriander powder
  • 1/2 tsp Black pepper powder
  • 1/4 tsp Kasoori methi
  • 2 tbsp finely chopped fresh coriander leaves
  • 1/2 tsp salt or as per taste
  • 2 tbsp Ghee (clarified butter)
  • 1 handful Almonds + cashew nuts +Raisins ( for garnishing)

Instructions
 

  • Grate the paneer to get longcheese like curls, set aside
  • Soak a handful of cashews andalmonds in warm water, it becomes easier to peel off the skin, peel and leavethem to soften in lukewarm water. Once they soften, make a thick smooth pasteof the cashews and almonds. Set aside
  • Remove the seeds and thenroughly chop the tomatoes
  • In a heavy bottomed pan heat 1tbsp oil, then reduce the flame and add a pinch of asafoetida and 1/2 tspginger garlic paste, roughly chopped tomatoes, 2 tbsp tomato puree, 1/2 a green chillies chopped roughly, 1/4 tsp black pepper powder
  • Cook on a medium flame forabout 2 mins, stirring to ensure the paste doesn’t burn or overcook
  • Remove this mixture fromthe pan and allow to cool, once it has cooled down blend the mixture tomake a thick paste. Add 1 tbsp water to blend to a smooth consistency
  • Meanwhile, start on the peppers by removing all the seeds andfinely chopping the sweet peppers into tiny bite-sized cubes,similarly chop the red onions very fine. Set aside
  • In the same pan add 3tbsp oil, when the oil is hot sputter some cumin seeds and add 1/2tsp  ginger garlic paste, reduce the flame
  • Then add the chopped onions andreduce the flame to low, allow the onions to brown slightly while stirringoccasionally
  • Now add the dry powdermasalas (garam masala, 1/4 tsp black pepper powder, red chilli powder,coriander powder) and saute well until the onions are reduced and releasea strong aroma. To ensure the onions and masalas don’t burn, stir occasionallywhile they reduce
  • To this, addthis cashew-almond paste and the thick tomato mixture and mix wellThen add in the chopped sweet peppersand cook them until they begin to soften.
  • Now add in the gratedpaneer, turmeric powder, kasoori methi and finely choppedcoriander leaves. Cook on a low flame until the mixturethickens it looses all its excess moisture. Do not cook with a lid on, do notadd water and ensure that you stir occasionally
  • Allow this mixture to cool completelyand then rshapeinto tiny bround balls. On a baking sheet lay open the filopastry pack and use two sheets to make a strong outer covering
  • Cut the sheet using a pizzacutter into large rectangles. If you find this fiddly place the sheet on amuffin tray and cut using a scissor
  • Drizzle some melted butter or use anoil spray to line the inside of the sheets
  • Add one small paneer mixture ballinto each filo rectangle and gently fold to make a neat parcel, spray someoil over this and cook in a pre-heated oven at about 150 deg cel (fan oven). Keep an eye so that the outer filopastry does not burn
  • While this is in the oven heat gheein a small pan and add the raisins, they are ready when they begin to swell insize, then dunk in some skinless whole cashew nuts and skinless whole almondsfry them in the ghee too, once done, remove and set aside
  • When the parcels turn a toasty lightbrown colour on the outside, they are done, remove and serve on a prettyplatter on a bed of chopped coriander, sprinkle ghee roasted nuts on top tomimic tiny jewels
Spicy paneer bhurji encased in delicate filo pastry parcels

This dish is meant to tease the palate before a festive meal. The vibrant spices ensure an explosion of flavour and the rich cashew-almond paste adds a regal twist which also balances the flavours ensuring those who are not partial to heaty spices can savour this dish too. Congratulations – you have in your repertoire a cracking crowd-pleaser recipe. Now all you need to do is to go stock up that list of ingredients 😉 – time crunch? No problem – shop online!

Spicy paneer bhurji encased in delicate filo pastry parcels

ASDA has some really cool offers for Diwali, why not check out the special Diwali offers here before you head out to ASDA?  I have stocked up on oil, ghee, spices and a few store cupboard essentials – after all, it helps to have time-saving tricks up our sleeve!

*With thanks to ASDA. As always, all opinions expressed are always my own.

Filed Under: Food, Indian, Recipe Index Tagged With: ASDA Diwali, autumn, celebrate, celebration recipes, cottage cheese, Deepavali, Deepawali, Diwali 2017, Diwali Food, Diwali in London, Diwali in the U.K, Diwali recipes, festive recipes, Indian Food, Indian recipes, paneer, Paneer Firecracker Parcels, spicy vegetarian starter recipe, starter recipe, the festival of lights

Homemade Spice Rub

June 16, 2016 by manjirichitnis Leave a Comment

Spice rub for everything from Vegetables to meat and seafood

Elevate the taste profile of your grilled or roast vegetables ( or seafood or meat) with this delicious homemade spice rub.

Now I have tried this spice mix on broccoli, kale, and roast potatoes and it always works wonders. But we have loved it most with fish. Grilled, BBQ’ed, fried, steamed, or baked – we love eating fish in our house and I have created my own recipe for an Indian spice rub. I used this on haddock fillets on the BBQ this Sunday and the result was very satisfying. Even with frozen fish fillets straight out of the freezer onto the hot grill, the spice mix hit all the right notes.

Spices - fragrant, warm and fresh

It was incredibly easy to create this spice rub at home using my Optimum G.21 Platinum blender, the panel has six pre-programmed functions which are a real no brainer and one of those functions is ‘Grind’. I try and use my Froothie blender as much as possible and not just for my morning smoothies, it has just made my life that much simpler!

Homemade Spice Rub

Manjiri Chitnis
Homemade spice rub – Versatilespice mix works perfectly well for vegetables like cauliflower, mushrooms,potatoes. Great with chicken chicken , lamb and seafood especially for fishsteaks and prawns
Print Recipe
Prep Time 2 mins
Total Time 2 mins
Course Side Dish
Cuisine Indian
Servings 2 people

Equipment

  • High-speed blender

Ingredients
  

  • 1/4 tsp Peppercorns
  • 2 Cloves
  • 1 Dry Kashmiri Red Chilli
  • 1 Badi Elaichi or black cardamom
  • 3 Green cardamom – without the outer green pod
  • 2 cloves Garlic peeled
  • Cinnamon stick – roughly the length of the tip of your thumb
  • 1/2 tsp Turmeric powder
  • 2 tsp Cumin/ jeera
  • 1 tsp Amchoor powder / dried mango powder
  • 1 tbsp Kasoori methi
  • 1 Heaped tbsp fried onion
  • 1 tbsp Coriander seeds lightly roasted on a pan
  • 1 Whole round Red Chilli
  • 1/2 tsp Himalayan pink salt
  • a tiny pinch of Asafoetida

Instructions
 

  • Add all ingredients into a grinder and blend till you get a grainy consistency
  • Do not grind to a very smooth paste because the texture this consistency will lend to the fish, will hit the right spot on your palate. A finer texture I think would work better for meat
  • Though this spice rub is suitable for freezing, since it contains garlic and fried onion, I would not advise keeping in the freezer for over 10-15 days
  • If you make a small batch and little remains, try adding into your curry for a lift in flavour
  • If you do not deal well with spicy red chilli flavours, then rule out the whole round red chilli completely and instead add a small pinch of paprika just for a hint of flavour
Keyword Spice mix

Homemade spice rub for grilling vegetables, meat, and seafood

These quantities yield enough spice mix for 2 medium-sized fillets with a little leftover. If you want to use it for 4 or 6 fillets simply double the quantities.

Fresh spices

Why not try my recipes for Tandoori spiced grilled Lobster tails and Haddock fillets with this spice rub?

Homemade spice rub

*This post has affiliate links.

Filed Under: Featured Food and Drink, Food, Indian, Recipe Index, seafood Tagged With: cardamom pods, cinnamon, cloves, coriander seeds, cumin, dried red kashmir chillies, fried onion, garlic, Homemade Spice Rub, kasoori methi, recipe development, red chilli, special spice rub for sea food, travels for taste recipe development

Tomato and Coconut Chutney

April 27, 2016 by manjirichitnis 18 Comments

Tomato and Coconut Chutney recipe, a perfect little treat to scoop up with your soft idlis and crispy dosas

A freshly made coconut chutney served with steaming hot idlis or a crisp dosa hot off the pan is a thing of delight.

There are many varieties of this coconut chutney, but I prefer the one with tomatoes. It just adds that much more depth of flavour and dimension.

This easy recipe becomes even more fun to create when using a powerful blender like my new Optimum G.21 Platinum blender. Why? Because the speed and convenience of having a pre-set function to grind means the job is done at the press of a button.

Besides the consistency and texture of the chutney is perfect.

Ingredients for tomato coconut chutney

If you are using frozen grated coconut as I do, it will look like this

Frozen ready grated coconut

Tomato and Coconut Chutney

Manjiri Chitnis
Fresh and delicious this tomato and grated coconut chutney adds a pop of colour and vibrancy to your dishes
5 from 4 votes
Print Recipe
Prep Time 2 mins
Cook Time 2 mins
Course Side Dish
Cuisine Indian
Servings 6 servings

Equipment

  • Blender/Mixer-Grinder

Ingredients
  

For grinding the chutney

  • 55 gm Grated coconut – 1/4 cup
  • 1/2 large Tomato or 1 small
  • 3 Kashmiri red chillies dried
  • ½ Green Chilli
  • 1 tsp Chana dal or yellow Bengal gram split and without skin
  • Ginger – a small knob about the size of your thumbnail
  • 2 Small cloves Garlic – without skin
  • Salt as per taste
  • Water – add according to consistency

For the tadka or tempering

  • 1 tbsp Oil
  • 5 Curry Leaves
  • 1 tsp Mustard seeds
  • 1/2 tsp Urad dal (split black lentil without skin)

Instructions
 

  • Heat a pan on a medium flame and pan roast the chana dal till it turns a dark brown colour, do not allow it to burn, gently keep moving it on the pan with a wooden spatula. Set aside to cool
  • Halve the tomato and add into the blender
  • Add the freshly grated coconut, I buy a frozen packet from my local Indian store, have a look at the photograph in my post
  • Remove the skin of the ginger – this is best done using the back of a spoon if the ginger is fresh – it will come off easily, of not use a knife
  • Now add the garlic cloves, Kashmiri red chillies, and salt. You can increase or decrease the number of Red Chillies depending on how hot you want the chutney to be
  • Add the roasted chana dal which should have cooled down by now
  • Add about one and a half tbsp water and grind to a thick coarse paste-like consistency.
  • The water level depends on how you would like the consistency to be. I generally add a little more water after the first grind and give it one more pulse in my Froothie to get a better pouring consistency
  • Decant the chutney into a bowl
  • Heat the oil in a kadhai or saucepan and add the mustard seeds in the hot oil
  • Once the seeds begin to pop add the urad dal and let it brown, then throw in the fresh curry leaves
  • Pour this hot tadka mixture onto the chutney and serve fresh with steaming hot idlis or dosas
Keyword Chutney

A peek inside the blender ..

Ingredients for tomato coconut chutney

If you are not using the Froothie power blender, then chop the chillies roughly into small pieces, repeat with the ginger and garlic too.

This is because the sharp blades of the Optimum G2.1 Platinum blender will be able to easily grind the whole ingredients, a task that a regular mixie will struggle with.

I add the dried red Kashmiri chilli for its colour as well as flavour. In many of my curries I just these chillies whole to add a hint of flavour. But remember once made into a paste these chillies release their hidden potency – it’s a very different beast then and the heat can be really intense. So if you don’t deal with heaty – spicy chillies well then use only a half of a Kashmiri chilli in this chutney. It will still add a dash of colour and flavour without scathing your palate

And the green chilli gives it necessary flavour which I find very distinctly pungent and traceable when I eat this chutney, if it was missing I would know instantly and would miss it.

Tomato coconut chutney

The fresh taste of the chutney and the crunch of the curry leaves is simply irresistible, the tomatoes add just the right amount of tang to this beautiful chutney. Typical to the South of India this recipe is something that most families make with variations of their own. Some even prefer to add some onion or roast the coconut before adding to the blender. whichever recipe you use this chutney will never go out of fashion.

Tomato coconut chutney

Need an easy recipe for steam idlis, check out my recipe here

*I am an ambassador for Froothie and was sent a Froothie Optimum G2.1 Platinum blender for review. This post has affiliate links.

Filed Under: Chutneys, Food, Indian, Recipe Index Tagged With: chana dal, curry leaves, dosa chutney, freshly grated coconut, garlic, ginger, grinding with Froothie optimum G2.1, idli chutney, Ingredients for tomato coconut chutney, south indian recipe, tomatoes

Steamed Idli batter recipe + Froothie Optimum G2.1 Platinum blender review

April 14, 2016 by manjirichitnis 14 Comments

When I first moved to the U.K the one kitchen appliance that I really missed was my ‘mixie’ I relied heavily on my old beat up noisy mixie or mixer as it is popularly known as, especially, when I wanted to make chutneys or grind soaked grains. In the past five years, I have tried several blenders and food processors and never really had satisfying results.

So I ended up buying many different types of blenders, right from a handheld blender worth £15 to an expensive and large, space-occupying food processor with several attachments, most of which I never use for various reasons. One of them being the pain involved in washing up – yes am lazy that way 😉

Fast forward to 2016 – When I was offered the opportunity to become an ambassador for Froothie UK and sent the new and shiny high-speed Optimum G2.1 Platinum blender to test and review, the very first thing I wanted to try was making an idli batter with homemade coconut chutney.

Optimum G2.1 power blender

Perfect kitchen companion for dry and wet grinding

I am delighted to announce that the results are really very satisfying. The 6 blade assembly makes it very easy to grind grains so my soaked rice and urad dal mixture reached the right consistency in no time!

I am so relieved that I do not have to keep blending and adding more water than required to reach the right consistency for my idli and dosa batters. Even bigger relief is in knowing that freshly grated coconut can be turned into a fabulous chutney within seconds. This especially is a blessing, considering that my parents had to lug a heavy mixer all the way from India, just so that I would stop complaining about how difficult it is to grind dals or make coconut chutney. Sorry, Baba for all the trouble you had to go through to lugging that device all the way to London!

6 blade assembly

When you are looking to purchase a high investment appliance like a power blender, comparisons are a part of the process. Froothie has made it easy for you to make that decision with this table comparing the  Optimum G 2.1 Platinum blender to a Vitamix – Pro series 500.

Optimum G.21 vs Vitamix

Ease of Use, sturdy jug, and intelligent overload protection best part about the Optimum G2.1 Platinum blender though is the ease with which the sturdy Eastman Tritan Copolyester BPA Free jug sits on the base – no twisting and turning and waiting to hear a click – just simple fit, plug and play. I recollect the horror I felt when the plastic edge of my food processor chipped while I struggled to fit it into the grooves of the base, only days after spending quite some money buying it, about three years ago. What a nightmare that was.

The Optimum G.21 also comes with intelligent overload protection meaning the built-in sensor automatically switches off the motor in case, over-heating is detected. This prolongs the Optimum’s operating life while pre-empting and avoiding breakdowns. If the blender should ever trip, all you have to do is simply switch it back on.

6 pre-set functions

Hot soups, frozen desserts and healthier smoothies in minutes

The idea of making a bowl of soup in minutes is so appealing and especially to a person like me who is trying very hard to loose weight. Not only am I trying to loose weight by eating healthier am also helping my husband throw off excess weight faster by making better food choices. It is a boon to be able to relish fresh homemade soups every single day in less than ten minutes thanks to the heat created by friction.

Nothing beats smoothies packed with fiber and that is something you can enjoy daily, fruits go into this beauty with skin and without chopping  – yes you read that right. Brilliant, isn’t it? A heavy-duty tamper tool has also been provided for improved processing and mixing.

If you need recipe inspiration your blender comes with a recipe book with 80 inspiring ideas for you try at home.

Nut butter, sauces, dips, flours – make everything at home

Throwing a party and need hummus now? I made a large bowl of smoked red pepper hummus over the weekend for a big party we threw for our dearest friends (recipe for humus coming up soon)

I am yet to make any flour in new Optimum G2.1 but that is because I have been so obsessed with soups, smoothies, and chutneys! Buckwheat flour is ready in 10 seconds flat – need to see a demo? Watch this video on the Froothie TV channel, they have a whole host of fab videos from recipes to comparisons with other brands and tests too.

The optimum now comes with a free nut milk bag too as part of the package.

Complete control at your fingertips

I am quite smitten with the latest offering from Froothie, and it’s not just the smart good looks but the 6 pre-set programs on a fabulous modern digital panel, pulse and timer settings that allow me to be in total control at the push of a button, that make this vortex blender so very appealing. It truly is the only blender you will ever need. Especially, if like me, you too have spent a lot of money on experimenting with various types of blenders. The 10-year warranty is an added bonus. You can order this fabulously stylish and highly efficient power blender via this link

Why not make the most of a great limited time offer which expires on the 30th of April 2016 and save £170 on your purchase? Get the Optimum G2.1 Platinum blender for £429 instead of £599. To ensure that the ordering is smooth and delivery process hassle-free Froothie U.K uses a next day courier service and you get your blender delivered with 24-48 hours. There’s also a 30 day trial with a money-back guarantee which includes return postage costs, but I am pretty sure that won’t be necessary!

Ok now for my recipe, I have followed the late master chef Tarla Dalal’s easy to follow recipe, for my Steamed Idli’s recipe but have adjusted the proportions to make approximately 15 idlis – the number will vary based on the size of the moulds.

Idli moulds

Steamed Idlis

Manjiri Chitnis
A Quintessential south Indian delicacy which makesfor a guilt free meal considering it is steamed and wholesome
Print Recipe
Prep Time 10 mins
Cook Time 20 mins
Total Time 30 mins
Servings 15 Idlis

Ingredients
  

  • 1/2 cup Urad dal – split black lentils without skin
  • 2 cups Par-boiled rice/ idli rice
  • 1/2 tsp Fenugreek seeds- methi seeds
  • Salt as per taste
  • Water to adjust consistency
  • Low-calorie oil spray to grease the idli-moulds
  • Coconut chutney to serve with the idlis

Instructions
 

  • Soak the rice in water in a bowl and the fenugreek seeds and urad dal in another. Add enough water to allow the dal and rice to absorb the water and then some
  • Soak for a minimum of 4 hours
  • Drain the excess water from the rice and add in the blender – enough to get a pouring consistency
  • Repeat with the urad dal and fenugreek seed mixture – this mixture will get very thick while blending so you may need to add in more water as required. This mixture gets frothy while blending which is perfectly natural
  • Mix both batters and set aside in a warm place to ferment – it took my batter 24 hours to ferment. Fermentation slows down when the temperature is low
  • Season the batter with salt after it has fermented
  • Grease idli-moulds and spoon the batter into the moulds
  • Steam the idlis in a pressure cooker or idli-steamer for about 12 minutes.
  • Take care while removing the hot idlis from the pressure cooker, to avoid steam burns. Serve the steaming hot idlis with coconut chutney
  • Serve as a breakfast dish for a weekend treat, actually, this is dish ideal for any meal
Steamed idli recipe by Manjiri of www.travelsfortaste.com

*I am an ambassador for Froothie and was sent a Froothie Optimum G2.1 Platinum blender for review. This post has affiliate links. No monetary compensation was offered for a positive review. As always all opinions expressed here are entirely my own and I only endorse products that I love and have experimented with.

Filed Under: Food, Indian, Product Reviews, Recipe Index Tagged With: Steamed Idli batter recipe + Froothie Optimum G2.1 Platinum blender review

Chicken Tikka Masala – Air-Fryer

July 3, 2015 by manjirichitnis 6 Comments

Friday nights – when all you want to do is get home, put your feet up and watch some telly while tucking into your favourite takeaway.

Chicken Tikka Masala
                                                                             Chicken Tikka Masala

But here are some staggering facts about the eating habits of Britons and how many calories are consumed on an average with a takeaway meal. According to Tefal’s ActiFryday Report:

  • From a study of the 5 most popular dishes, it was found that the nation consumes 12,400 tonnes of saturated fat through takeaway’s alone.
  • Brits eat up to 2900 calories and 161 grams of fat in their most popular takeaway meal.
  • Friday is the most popular day to order.

Not surprising then the survey revealed this shocking statistic –

BRITONS FEAST ON MORE THAN 12,000 TONNES OF SATURATED FAT FROM TAKEAWAYS EACH YEAR

Am sure you are as shocked after reading these statistics as I was. So naturally when Tefal asked me to take on their Actifryday challenge – to swap a typical Friday night takeaway for a healthier alternative –  I was in.

Tefal Actifry XL
Tefal Actifry XL

I decided to give the Chicken Tikka Masala recipe that they sent me a go. Why? Because  I have always been very intrigued by the recipe for Chicken Tikka Masala – a dish that I only ate when I first came to the U.K a few years ago. CTM, as it is popularly called, is, without doubt, the nations favourite British-Indian curry. Part of its popularity is attributed to the fact that its origin is quite disputed and many have staked a claim as to the dish being their own invention. While some believe that it was dish born out of necessity to satiate the British palate’s need to serve chicken in a gravy which can be mopped up with naan or rice, it is also believed that it is a variation of butter chicken. Many also firmly believe that it’s rooted like in Mughlai cuisine and it was one of the many culinary inventions that were born to suit the English palate when the migrant population from post-partition India, Pakistan and Bangladesh came into Britain. Of course, I was not going to follow the recipe without making some changes of my own. I normally make all my own masala’s and marinades from scratch and all of them can be stored and/ or frozen to be used later. I used half of the tikka masala paste I made and froze the rest. Find my easy recipe for tikka masala on my blog here.

Tikka Masala Paste
Tikka Masala Paste

Since this is a recipe which aims to reduce the fat content the double cream that normally goes in the curry is replaced by low-fat natural yoghurt. Figuring out how to use my new Tefal Actifry XL was not difficult at all and the instruction booklet is quite simple to follow too. Once the removable parts have been hand washed and dried completely, I set about making a Chicken Tikka Masala. Here is my modified version of the Chicken Tikka Masala recipe:

Chicken Tikka Masala – Air Fryer Recipe

Manjiri Chitnis
Make a lighter version of this hugely popular Indian dish and create your own 'fake'away with my easy to follow recipe for my homemade Chicken Tikka Masala, the air-fryer version
Print Recipe
Prep Time 5 mins
Cook Time 20 mins
Total Time 25 mins
Course Main Course
Cuisine Fusion Indian
Servings 2 people

Equipment

  • Air-Fryer

Ingredients
  

  • 500 g boneless skinless chicken breasts cut into 2cm pieces
  • 100 g Tikka Masala curry paste
  • 2 pots 150g size natural low-fat yoghurt
  • 1 ActiFry spoon of vegetable Oil
  • 1 Large finely chopped onion and made into a thick paste
  • 390 g canned premium chopped tomatoes made into a puree
  • 1 chicken stock cube
  • 1 onion gravy flavour pot – I used Knorr
  • 1/2 tsp of smoked paprika
  • 150 ml of water
  • 1/2 teaspoon of sugar – I used a substitute -Natvia
  • 2 teaspoons on lemon juice
  • Salt as per taste
  • Handful – Fresh coriander leaves – chopped fine – to garnish

Instructions
 

  • In a large bowl mix the Tikka Masala paste with 4 tablespoons of yoghurt. Add the chicken in the coat then cover. Leave the marinate in the fridge for at least 4 hours or ideally overnight – this will ensure the flavours have really seeped in, into the chicken
  • Heat oil in ActiFry for 2 minutes. Add the onion paste and cook for 5 minutes. I simply chopped the onion fine in my food processor and sprinkled some water to give it movement and gave it 2 spins at low speed. The result was a thick onion paste which is a much better way to use the onion in this recipe in the Actifry
  • Add the marinated chicken and cook for another 10 minutes. This ensures that the Actifry is hot enough to bruise the ends of the chicken giving it a similar treatment to what the griddle pan will. But of course, the bruising is minimal and cannot be compared to grilling the meat. But this is where the addition of smoked paprika in the chicken tikka paste plays a big role as it works with the chicken and the cooking process to impart a much better smoky effect than without
  • In a small glass bowl crush the chicken stock cube, add the onion gravy flavour pot and smoked paprika and pour 2 tbsp of hot water. With the back of a spoon mix well until a thick paste is formed
  • Add the tomato puree, the mixture with the stock and water cook for another 10 minutes. Add salt to taste but keep in mind that the chicken stock cube contains a lot of salt, so taste some of the gravy base before adding additional salt
  • Remove the CTM into a bowl and then stir in remaining yoghurt. Then add the sugar and mix well
  • Add the lemon juice mix well and top with a handful of freshly chopped coriander leaves
  • Serve with steaming hot basmati rice, jeera rice or naan
Keyword Chicken Tikka Masala

If you would like to view the original recipe from Tefal click here. To save time you can purchase the tikka masala paste too.

Chicken Tikka Masala

Both hubby and I were quite satisfied with this low-calorie version of CTM and it definitely can hold it’s own in terms of taste. Of course, the texture of tandoor grilled chicken tikkas and the unmistakeable creaminess of double cream is missing. But it’s a win-win on 2 very important factors :

  • Saving on unnecessary calories from the grease and oil from a takeaway. Thus eliminating the risk of eating artery-clogging saturated fats.
  • Tefal Actifry is easy to use and very easy to cook in. With a little effort and planning it’s not at all difficult to produce a delicious curry – a healthier alternative to your takeaway- at home.

The Tefal ActiFry Express XL is available from John Lewis RRP £249.99, subject to availability and price may differ.

*With thanks to Tefal for sending me a Tefal Actifry XL for review. No request was made for a positive review.No monetary compensation was provided. As usual, all opinions expressed here are entirely my own.

Chicken Tikka Masala

Filed Under: Food, Indian, Meat, Recipe Index Tagged With: # ActiFryDay, Chicken Tikka Masala, Chicken Tikka Masala healthier recipe, gadget reviews by travels for taste, Have a happy ActiFryDay, Healthy recipes, low fat yoghurt, reduce calorie intake, shocking facts about takeaway food, take the ActiFryDay challenge, Tefal ActifRy XL, tikka masala paste recipe, travels for taste, travels for taste is a food and travel blog based in London

Tikka Masala curry paste

July 3, 2015 by manjirichitnis 1 Comment

Chicken Tikka Masala is the poster child for British Indian cuisine and definitely tops the list of the nation’s favourite curry. CTM as it is popularly known as is also the top choice for a Friday Night takeaway when ordering in Indian food.

Like any good curry, it’s best to use a homemade marinade, so if you can spare some time, it’s best to make your own tikka curry paste. I made mine and here is a simple recipe that you can use. The quantity is enough to marinade 1 kilo of skinless, boneless chicken breast pieces. I used 5000 gm of chicken for my CTM so the rest is in my freezer and can continue to live there for at least 2 months – I don’t think it will though because am sure the craving for a curry can strike sooner rather than later. Actually the tikka paste can be used as a starter marinade for grilled chicken kebabs as that is what is the basis of a good CTM. Or can be used for marinating even meat or fish to grill or as part of a curry dish.

Tikka Masala curry paste

Manjiri Chitnis
Print Recipe
Course Ingredient
Cuisine Indian

Ingredients
  

  • 2 tsp oil
  • 1 bay leaf
  • Half a red chilli de-seeded
  • 2 medium-sized Kashmiri chillies
  • 2 heaped tsp ginger garlic paste
  • 2 heaped tbsp garam masala
  • 1 tbsp coriander and green chilli puree
  • 1 tsp turmeric
  • 1 tsp roasted cumin powder
  • 1 tsp roasted coriander seeds powder
  • 1/2 tsp smoked paprika
  • Salt as per taste

Instructions
 

  • In a small saucepan heat the oil
  • Reduce the flame to a minimum then add the bay leaf and the dried red Kashmiri chillies, which add flavour and colour and not heat.
  • Then add in the ginger-garlic paste. Stir for 30 seconds before adding in the garam masala, that will allow the ginger garlic paste to mix well with the hot oil but prevent it from drying up the oil.
  • Once the garam masala is mixed well with the paste and the oil add the screaming dry spices and mix well. Allow to cook on a very low flame for under a minute and then add the coriander and green chilli puree. (Again, I make my own puree – simply spitz 2 large bunches of fresh coriander leaves with two small Indian green chillies, add some water in a small food processor to make a thick puree. This can be frozen and used for many curries and sabzi’s or bhajee’s as we call them in Marathi. I store mine for upto 3 weeks)
  • The smoked paprika will work with the chicken while making the curry and impart a fabulous smoky flavour that is hard to miss.
  • Allow the paste to cook for about 2 minutes, stirring occasionally to ensure it does not burn or become too dry.
  • The water content in the coriander and green chilli mixture will totally dry out and you will be left with a dark reddish-brown paste

Looking for an easy yet delicious Chicken Tikka Masala recipe to make at home? Try my super-easy Air-Fryer Fakeaway version here and let me know what you think of it in the comments below!

Tikka Masala Paste
Tikka Masala Paste

Like any marinade, there are many things that been added or omitted according to one’s preferences. For example, the red chilli can be eliminated to reduce the heat. A small pinch of sugar can be added to balance out the green chilli too. Also, a small amount of water can be sprinkled to give the paste a more fluid consistency if required.
I use the dried Kashmiri chillies and the bay leaf later in the curry base and did not purree the tikka paste further. Why?  Because the garam masala already contains both these spices. After marinating the chicken with the paste, the same Kashmiri chilli and the bay leaf can be added to the hot oil, to impart fragrance and colour.

Tikka Masala Paste
Tikka Masala Paste

Did you follow my recipe? Please let me know in comments, I love reading your comments and feedback.

Snap a picture of your creations and use the hashtag #travelsfortasteblogrecipe and share it to Twitter, Instagram and Facebook and I will re-post it.

Filed Under: Curry - Meat, Seafood, Food, Indian, Recipe Index Tagged With: British Indian cuisine, easy Indian recipes, gadget reviews by travels for taste, home made Tikka Masala curry paste recipe, In the kitchen with travelsfortaste, Manjiri's easy Indian recipes, recipe developer, recipe development, Tikka Masala curry paste, Tikka Masala curry paste recipe, travels for taste, travels for taste is a food and travel blog based in London, travels for taste recipe development

Ragi Pancakes with blueberries (Finger Millet)

April 11, 2015 by manjirichitnis 22 Comments

Healthy Ragi Pancakes, Finger Millet Pancakes

I am obsessed with this healthy millet! I have been cooking a variety of dishes with Nachni (Marathi) / Ragi (Hindi) or Finger Millet as it is popularly known in the past few days. From savoury pancakes to porridge and using them in other recipes, I have been experimenting with them for a while now. I wanted to try using them as an alternative to regular pancakes so thought I would rustle up some sweet Ragi pancakes. But had to keep them healthy so opted for Soya Yoghurt instead of eggs which makes these vegan-friendly and then I added in oats so that makes them gluten-free too.

Nachni chya god polya

I really wanted to come up with some name for the Marathi alternative to this recipe and ‘Nachni chya god polya’ sounded like fun 😉

Finger Millet Blueberry Pancakes / Ragi Pancakes

Light and puffy these are just perfect when you are craving pancakes but a healthier version is what you really want!

Ragi and Blueberry Pancakes , Finger Millet Blueberry Pancakes, Nachni chya god polya

Ragi is known to have a whole host of health benefits:

  • Popular amongst diabetics due to it’s low GI
  • High is dietary fiber
  • Rich in calcium, iron and thiamine
  • It is an aid to healthy weight loss due to it’s very low fat content
  • It is a good source of GF protien
  • Popular as a baby food too

Nutritional value of finger millet per 100g

  • Protein 7.6g
  • Fat 1.5g
  • Carbohydrate 88g
  • Calcium 370mg
  • Vitamins – A: 0.48mg
  • Thiamine (B1): 0.33mg
  • Riboflavin (B2): 0.11mg
  • Niacin: (B3) 1.2mg
  • Fiber 3g

Beautiful fields of Ragi

800px-Millet_fields_in_Annapurna

Image Credit: Mikael Häggström

Why you should make these Ragi pancakes!

As if you need any excuses for making blueberry pancakes!!! But anyway, here are some major health benefits.

  • Low GI due to the finger millet flour so ideal for diabetics as it keeps blood sugar levels steady avoiding any sudden spikes and crashes.
  • Gluten-free
  • Ideal for vegans
  • Dairy-Free
  • Egg Free
  • Refined sugar-free as Natvia is a great sugar substitute
  • The oats ensure that this pancake keeps you fuller longer

Ragi and Blueberry Pancakes/ Finger Millet Blueberry Pancakes

Manjiri Chitnis
Healthy Ragi/ Finger millet recipe, low- GI, Vegan, Gluten -free, easy to follow, quick recipe
5 from 2 votes
Print Recipe
Prep Time 10 mins
Cook Time 5 mins
Course Breakfast
Cuisine Fusion Indian
Servings 1 person

Ingredients
  

  • 6 tbsp heaped – Gluten-free Oats
  • 4 tbsp heaped Ragi flour / Finger Millet Flour
  • 3 tbsp Soya yoghurt – I used Alpro – it’s approved by the Vegan society
  • Handful Fresh Blueberries
  • As reqd Water
  • 4 tsp Natvia or any sweetener – adjust quantity as per taste
  • 1 tsp unsalted plant spread or low calorie cooking oil spray

Instructions
 

  • In a large mixing bowl add the oats and finger millet and then the yoghurt
  • Mix well and a thick mixture will form
  • Heat about 2 cups of water in a kettle and let it cool down a bit
  • Slowly pour into the mixture and set aside for about 5-7 minutes
  • Then mix well to form a batter ensuring that it is not runny but has a good consistency, then add the Natvia and stir well till it all dissolves, adjust as per taste
  • On a non-stick pan on medium heat melt one heaped tbsp unsalted butter or if your using the 1 cal sunflower oil spray then about 6 – 8 sprays are enough
  • Ladle enough of the batter in the centre of the pan enough for a mini pancake, do not spread it like a dosa as the batter will disintegrate
  • Cook on each side for about one minute with a lid
  • Use a wooden spatula to loosen the side done first and flip over carefully, the more the blueberries in each pancake that you ladle into the pan the more the water content as the heat will make the fruit pop and melt into gooey fruity goodness Don’t fret if the first few pancakes break especially where the fruit is at the edge
Keyword Ragi Pancakes
Ragi and Blueberry Pancakes , Finger Millet Blueberry Pancakes, Nachni chya god polya

My pancake stack collapsed just as I was about to photograph it – humfph! But it was a very satisfying, delicious, and healthy breakfast which even my husband loved – win-win! Woohoo 🙂

A word of caution though excessive consumption may lead to kidney trouble so don’t over do the consumption.

Fun-Fact about Ragi

Lastly a fun fact! Did you know that the grains are fermented to make a beer in some parts in Nepal? Cool or what?!

Ragi and Blueberry Pancakes , Finger Millet Blueberry Pancakes, Nachni chya god polya

LEARN HOW TO MAKE INDIAN FOOD FROM SCRATCH WITH MY EASY TO FOLLOW RECIPES

  • Fresh dill and yellow moong daal recipe
  • Goda sheera/ sooji ka halwa/ Indian dessert
  • CKP Surmai curry
  • Pompfret fry
  • Konbichi khichadi – Prawn khichadi
  • Vaangayche Bharit/ Smoked stuffed Aubergine ( Eggplant/Brinjal) in a thick gravy/ Baingan ka bharta
  • Valache Birdhe – (वालाचे बिरडे) – MADE IN A TYPICAL C.K.P WAY
  • Kairi Panhe/ Aam ka panha – Raw mango summer drink
  • Cauliflower- vatana bhaji – cauliflower and green peas vegetarian side dish
  • Podhnichi khichadi
  • Akkha masoor aamti CKP style / Whole red lentils with skin curry recipe
  • Achari Mutton curry
  • Spicy Chicken curry
  • Egg curry
  • Kadhi – fusion of Punjabi and Gujrati kadhi recipes with vadi’s
  • Upma
  • Gujrati Kadhi
  • Shahi Khichadi
  • Sweetcorn and paneer bhaji/sabzi (vegetable side dish)
  • Tomato and coconut chutney
  • Steamed Idli batter
  • Masala egg omlette
  • Chicken tikka masala
  • Tikka masala curry paste
  • Tawa chicken Frankie roll
  • Chai concentrate
  • Grated carrot salad
  • Strawberry flavoured shrikhand

References:

  • Wiki
  • Supra Organics
  • Veg Weight Loss Diets

Filed Under: Food, Healthy, Indian, Quick and Easy, Recipe Index, Vegan, Vegetarian Tagged With: 2015, aid to weight loss, dairy free, diabetic friendly recipes, dieters friend, dietersfriend, Eggless Blueberry pancakes, Finger Millet Blueberry Pancakes, food blog, food writer, foodie in London, GF blueberry pancakes, Gluten free vegan bluberry and finger millet pancakes recipe, Health benefits of finger millet, Health benefits of Nachni, Health benefits of Ragi, Healthy breakfast recipes, healthy eggless pancakes, Healthy vegan pancakes, homepage-slider, lifestyle blogger, Low fat recipe, Low GI recipe, Low Gylcemic Index flours, Manjiri Chitnis, Manjiri Kulkarni, Nachni chya god polya, Ragi and Blueberry Pancakes, refined sugar free, sliceoffme, spring, travel blogger, travel writer, travelsfortaste, weight loss friendly, weight loss recipes, Wonderful Gluten free vegan pancakes

  • 1
  • 2
  • 3
  • 4
  • Next Page »

Food,travel and lifestyle writer. Photographer.

  • Email
  • Facebook
  • Google+
  • Instagram
  • Pinterest
  • Twitter
  • YouTube

Categories

  • Baking
  • Breads
  • C.K.P recipes
  • Cakes
  • Chutneys
  • Cocktails
  • Curry – Meat, Seafood
  • Curry – Vegetarian
  • Desserts
  • Events
  • Featured Food and Drink
  • Featured Lifestyle
  • Featured Travel Adventures
  • Food
  • Healthy
  • Home
  • India
  • Indian
  • Kitchen
  • Lifestyle
  • London and rest of U.K
  • Meat
  • Miscellaneous
  • Product Reviews
  • Quick and Easy
  • Recipe Index
  • Rest of the World
  • Restaurant Reviews
  • Salads
  • seafood
  • Sides
  • Smoothies
  • Soups
  • Travel
  • Uncategorized
  • Vegan
  • Vegetarian

Featured Blogger on Great British Chefs

GBC_blogger-badge_150x300px    

Need a New Power Blender?

13076814_10154185434898293_7387808474266473605_n

Read Travelfortaste’s interview on Gourmandize UK & Ireland

 Sliceoffme interviewed by Gourmandize UK & Ireland

Travelsfortaste is Featured on Expats Blog

England expat blogs

Read Travelsfortaste reviews on Zomato

View my food journey on Zomato!
Privacy & Cookies: This site uses cookies. By continuing to use this website, you agree to their use.
To find out more, including how to control cookies, see here: Cookie Policy
Squaremeal.co.uk - Restaurant Reviews

About me

Writer and Photographer. Food,Travel & Lifestyle, Blogger and Digital Marketer. Read More…

  • Email
  • Facebook
  • Google+
  • Instagram
  • Twitter
  • YouTube

Recent Posts

  • Royal British Legion Centenary Cookbook – Cooking with Heroes
  • The Instagram Foodie Bag – Must have for all Food Photographers
  • Restaurant quality meat – Swaledale Online Butchers – a review
  • Vinegar Roast Chicken
  • Mohammed Ali Road, Mumbai’s fabulous Street Food Market – Ramadan Special

Copyright © 2022 · Foodie Pro Theme by Shay Bocks · Built on the Genesis Framework · Powered by WordPress

This website uses cookies to improve your experience. We'll assume you're ok with this, but you can opt-out if you wish.Accept Read More
Privacy & Cookies Policy

Privacy Overview

This website uses cookies to improve your experience while you navigate through the website. Out of these, the cookies that are categorized as necessary are stored on your browser as they are essential for the working of basic functionalities of the website. We also use third-party cookies that help us analyze and understand how you use this website. These cookies will be stored in your browser only with your consent. You also have the option to opt-out of these cookies. But opting out of some of these cookies may affect your browsing experience.
Necessary
Always Enabled
Necessary cookies are absolutely essential for the website to function properly. This category only includes cookies that ensures basic functionalities and security features of the website. These cookies do not store any personal information.
Non-necessary
Any cookies that may not be particularly necessary for the website to function and is used specifically to collect user personal data via analytics, ads, other embedded contents are termed as non-necessary cookies. It is mandatory to procure user consent prior to running these cookies on your website.
SAVE & ACCEPT