Travels for Taste

Tales of travel and food with a touch of spice

  • Home
  • About
    • In the Press, Published Work and Interviews
    • PR and Disclosure Policy
  • Food
    • Recipe Index
      • Indian
        • C.K.P recipes
        • Curry – Meat, Seafood
        • Curry – Vegetarian
        • Sides
        • Chutneys
      • Healthy
        • Soups
        • Salads
      • Quick and Easy
      • Baking
        • Desserts
      • Meat
      • Seafood
      • Vegetarian
        • Salads
      • Vegan
    • Product Reviews
    • Events
  • Travel
    • UK
    • India
    • Around the World
  • Lifestyle
    • Home
    • Kitchen
    • Restaurant Reviews
    • Miscellaneous
  • Giveaways
  • Work with me
    • Meet interesting foodie entrepreneurs here

Jerk Chicken and Coconut Rice

July 20, 2013 by manjirichitnis Leave a Comment

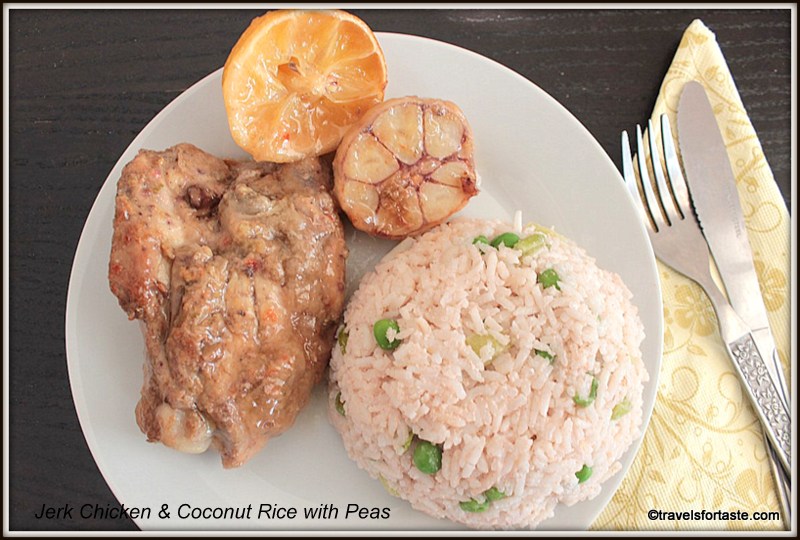
The first time I ate Jerk Chicken, was at a pop up Caribbean food stall near Haymarket Station, it was served with some tasty rice with red kidney beans and the most deliciously sweet plantain. Ever since I have been waiting to experiment and make this spicy chicken at home. Please resist the temptation of using a jerk sauce out of a bottle, it’s almost a crime because in the recipe I used from the BBC Good Food guide, it makes preparing the marinade a thing of joy. Not only will you learn how each ingredient lends its individual flavour but you can learn how to adjust the ”heat” in this amazing marinade. An advance warning, if you have sensitive skin PLEASE use gloves to marinate the chicken as Scotch Bonnet peppers are PACKED with heat. Ensure you THOROUGHLY wash your hands after you handle these ”hot babies” too! Humm now for the recipe, it’s essentially what was in the original but of course, I have added my own touches and I think they make quite an impact 🙂 So read on folks.

Jerk Chicken

Manjiri Chitnis
Caribbean Jerk chicken is an all-time favourite and tastes even better with a home-mademarinade
Print Recipe
Prep Time 20 mins
Cook Time 45 mins
Total Time 1 hr 5 mins
Course Main Course
Cuisine Caribbean
Servings 4 people

Ingredients
  

For Jerk Chicken:

  • 12 chicken thighs with bone
  • 1 garlic sliced through the middle to go in the oven
  • 2 lemons halved to go in the baking tray
  • 1 pair of clean gloves if you have sensitive skin – to marinate the chicken

For the Jerk marinade:

  • 4 Garlic Cloves de-skinned
  • 1 small red onion
  • 1 bunch fresh spring onion roughly chopped
  • 1 portion ginger size that fits inside your closed fist washed, skinned and roughly chopped
  • 1 tbsp thyme – I had none so I used 1 tbsp of Mixed Italian herb powder
  • 3 scotch bonnet chillies de-seeded if you cannot handle very spicy
  • 2 tbsp soy sauce
  • 2 tbsp oil – I used sunflower
  • 4 heaped tbsp brown sugar – I used dark muscovado sugar
  • 1 tbsp ground allspice powder
  • 1 lime Juiced

Instructions
 

  • Blitz all the ingredients for the marinade in the mixer/food processor/blender and make a thick paste, do not add water as far as possible to ensure a thick puree like grainy paste
  • Wash and deskin the chicken thighs and make cuts using a knife
  • Then generously apply the marinade paste all over rubbing into the cuts made to ensure the flavour really seeps into the chicken
  • Marinate overnight in the fridge. Cover vessel with cling film
  • Keep about 2 tbsp marinade aside for adding in the baking tray
  • When you are ready to prepare the chicken pre-heat the oven to 180 – 200 degree Celsius, I have a fan oven
  • Prepare the baking tray by greasing with some oil, place the marinated chicken pieces and surround them with the lime slices and place the garlic halved
  • Cook in the oven for about 45 minutes or until juices run clear
  • When the chicken is in the oven start with the rice

Coconut Rice with Peas

Print Recipe
Prep Time 5 mins
Cook Time 10 mins
Total Time 15 mins
Servings 4 people

Ingredients
  

  • 200 g Basmati Rice
  • 400 g Coconut Milk can
  • 1 bunch fresh spring onion finely chopped
  • 2 large sprigs of fresh thyme
  • 2 large cloves of garlic skinned and chopped very fine
  • 1 tbsp ground allspice
  • 200 g green peas

Instructions
 

  • Wash the Basmati rice under cold running tap water
  • In a heavy-bottomed vessel, add the washed rice and coconut milk, chopped spring onions, thyme, garlic chopped and allspice
  • Add 300 ml water, mix and add salt to season
  • Cook with lid on a medium flame till water begins to boil
  • Stir with a wooden spatula and then add the green peas
  • Reduce flame and do not cover completely, leave a bit of space for the steam to pass
  • Cook until done

Although the recipe I followed, uses red kidney beans since I was already using them in my Caribbean Sweet Mini Pepper Salad, I choose green peas for my Coconut Rice. I made my own homemade replacement for allspice powder too, it’s very easy and I intend to make it fresh each time I need instead of the store-bought one, simply because it is so quick and easy to prepare! Actually allspice is a spice by itself but it tastes similar to a mixture of cinnamon, cloves, nutmeg, and pepper.

Also Known as: Jamaican Pepper or New spice

Home made all-Spice Powder recipe

Home made all-spice seasoning

Manjiri Chitnis
Try myeasy to prepare and store home-made all-spice seasoning
Print Recipe
Prep Time 2 mins
Cook Time 5 mins
Total Time 7 mins
Servings 1 portions

Ingredients
  

  • 1 tbsp Cinnamon powder or cinnamon stick – thumb-sized
  • 1 small tbsp pepper powder
  • 1 heaped tbsp of cloves
  • 1 full nutmeg grated

Instructions
 

  • In a pestle and mortar mix the ingredients and grate the nutmeg into it
  • Then smash together to makes a grainy powder
  • Some bits of the clove you may not be able to grind fine, I wouldn’t worry about it unless you want a fine powder then the smallest attachment on your mixer. I have an Indian mixer which I use for my coconut chutneys and it has 3 jars I used the one with 3 blades. Or else just use the pestle and mortar it should work.
  • Store away the remaining homemade allspice replacement powder in a tiny airtight container

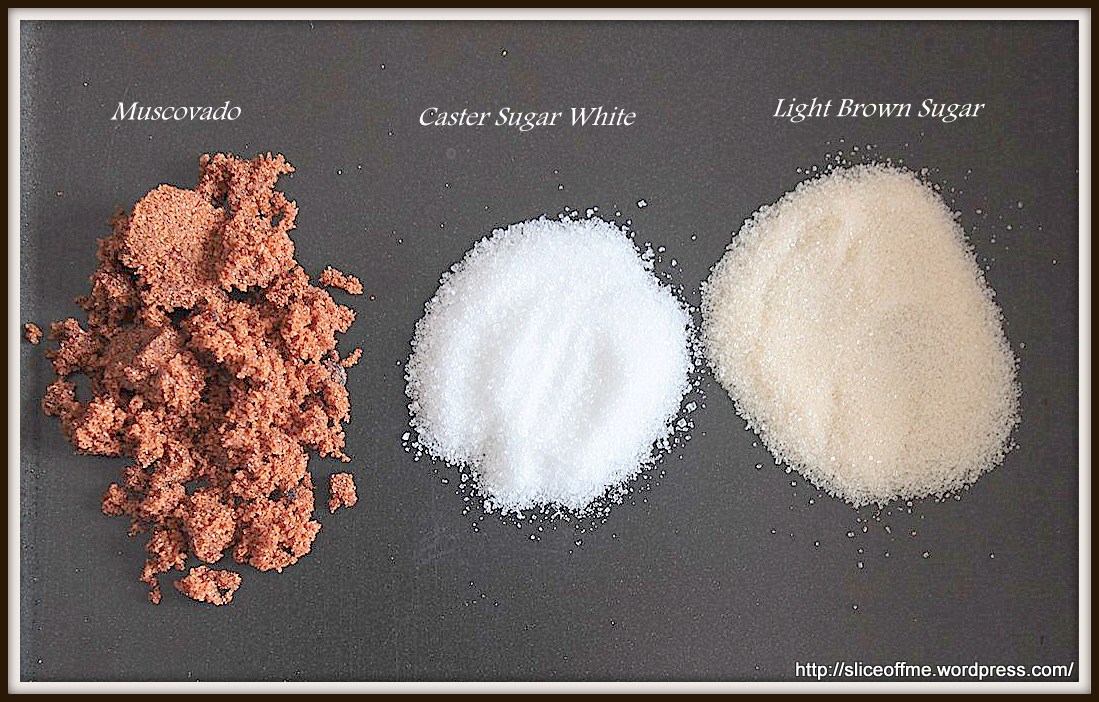
A note about the brown sugar vs. dark muscovado sugar

Dark Muscovado sugar is the unrefined form of brown sugar ,its stickier ,heavier,has a longer shelf life than refined sugars and adds a more intense flavour to marinades and since it is stable at high temperatures is great for baking.If you do not have brown sugar its ok to replace it with dark Muscovado sugar. Although as the water content dark muscovado holds is higher one should accordingly taper the use of water in the recipe.

Brown sugar is white sugar and molasses and hence the colour and soft texture. It has the light and dark brown sugar varieties and the lighter it is the milder the flavour.

Muscovado,White & Light Brown Sugar

Filed Under: Food, Meat, Recipe Index Tagged With: allspice powder, bake, basmati rice, BBC Good Food Guide, can, caribbean, caribbean jerk chicken recipe, caribbean recipes, chicken thighs, cinnamon, coconut milk, coconut rice recipe, cook, cooking, delicious, easy home-made all-spice seasoning recipe, easy home-made caribbean jerck seasoning recipe, easy meals, eat, fiery, finely chopped, food, food blogger, foodblogger, garlic, green peas, homestyle jerk chicken recipe, hot, ingredient list, italian herbs, jerk chicken recipe, lemon, lime, marinate, muscovado sugar, nutmeg, oven, pepper, quick and easy recipes, red onion, roast, roughly chopped, scotch bonnet chillies, scotch bonnet peppers, simple jerk chicken recipe, sliceoffme, spicy, spicy lunch recipes, sprig f thyme, spring onion, summer party menu, sunflower oil, tarvelsfortaste blog, tasty, temper, tin, wikipedia, yum, yummy

Key Lime Pie

June 29, 2013 by manjirichitnis 4 Comments

Calling all DEXTER Fans!

Key Lime Pie – or one of Dexter ”victims” last meal, (who wanted to be a well ”victim”, if you watch Dexter as obsessively as I do, you will know! Season 3 episode 8 – Easy as Pie)

Well, this popular American Dessert is very easy to make and a delicious dessert option to serve. Recipe adapted from Martha Stewarts’ recipe for homemade Key Lime Pie and from BBC Good Food.

Key Limes get their name from the association with the Florida Keys and because they are the main ingredients in well, Key Lime Pie! I have used the darker green skinned limes and they give that – much required and tangy citrus taste to the pie.

Ingredients:(Serves 8)

  1. 300gm HobNobs (hob-nobs are the U.K version of the U.S Graham Crackers, use any biscuit/ cracker that will give you a good crumbly base)
  2. 150gm unsalted butter melted and cooled
  3. One 397gm tin of  condensed milk
  4. Four egg yolks
  5. Zest and juice of 4 limes

Method:

  • Put the hobnobs into a thick, strong, food-grade plastic bag and give them a good bashing, what fun, totally de-stressing! Or if you are less violent and do not watch Dexter then please use a food processor.
  • Mix these beautiful crumbs with the soft melted and cooled butter in a bowl, my big orange plastic bowl is so good for this (for a quick peek at the bowl check out my post about cookies and headache ok well just cookies tehehehe)
  • Firmly pat onto a tart tin 22 cm is what I have, I used a thick white ceramic pie pan which I purchased earlier on in the day and ended buying a gorgeous Brita Water Filter with it too, I love low price deals and my old water filter jug needed to be chucked!
  • Bake the base for 10 minutes in a pre heated oven at 160C/fan 140C/gas 3
  • Then separate the 4 egg yolks from the whites and add the entire tin of condensed milk, whisk for about 3  minutes , good if you have an electric whisk , I was making this pie at an obscenely late hour in the night and didn’t dare use my electric whisk ;), so had to mix really well for about 5 minutes.
  • Zest the limes so that some of the zest can go into the mix and some can be used to dress the pie
  • Now add the juice of the limes and some of the zest into the egg & condensed milk mix and whisk for another 3 minutes.
  • Pour onto the cooled base and bake for another 10 minutes.
  • Cool completely on a wire rack and then refrigerate for at least 3 hours or overnight.
  • Dress the pie with some more lime zest, I didn’t want to do the whipped cream bit on the top but ended up using the ready made squeezy ready to use cream from a can, it sits very quickly and if you do not consume immediately it will form a puddle on the top so please avoid !

This is a wonderfull dessert to be shared with friends and family and is apt for weekend meals, make ahead and refrigerate.Great for summers!

Key Lime Pie n some pine cones
Key Lime Pie dug in
Oh so good ...ummlicious

Looking for more inspiration to indulge your sweet-tooth? Why not browse through my dessert recipes:

  • Cinnamon Pecan GF cake
  • Chocolate coconut cake with coconut icing
  • Easy chocolate cake with chocolate icing
  • POSH Victoria sponge cake

Filed Under: Desserts, Food, Recipe Index Tagged With: American Desserts, an american life, bake, BBC Good Food Guide, Condensed Milk, cool, Crime Drama, delicious, desserts for the weekend, Dexter, Dexter and Rita, double cream, easy dessert, eat well, family favourite recipes, Florida Keys, food bloggers, HobNobs, Key Lime Pie, lemon zest, limes, Martha Stewart recipes, Nestle, oven, overnight, quick and easy summer desserts, ready in 25 minutes, sugar, summer dessert recipe, unsalted butter, whipped cream

Basic Chocolate Cake with Frosting

August 20, 2012 by manjirichitnis Leave a Comment

What better way to celebrate a new FOODISTA Badge for my post on Shahi Khichadi than by baking a chocolate cake, I firmly believe that chocolate is the one word that instantly lifts sagging spirits and the whole baking process itself is cathartic! So sistahs let’s BAKE!

Basic Chocolate Cake with Frosting

Manjiri Chitnis
Delicious, easy must-have Chocolate cake recipe with frosting
Print Recipe
Prep Time 25 mins
Cook Time 30 mins
Course Dessert
Cuisine Fusion

Equipment

  • Cake tin
  • Whisk
  • Hand-Blender or Stand-Mixer
  • Wire-rack to cool the cake
  • Probe to test cake
  • Spatula to frost the cake
  • Measuring spoons
  • Baking Parchment

Ingredients
  

  • 225 gms Butter softened
  • 225 gms Caster Sugar
  • 4 Eggs
  • 220 gms Self-Raising Flour
  • 3 tsp Baking Powder
  • 1 tbsp Cocoa Powder
  • 1/2 tsp Soda-Bicarbonate

For the frosting

  • 100 gms Butter
  • 100 gms Icing Sugar
  • 1 tbsp CocoaPowder
  • Shaved Chocolate for garnish
  • Fresh Strawberries for garnish
  • Granish of choice

Instructions
 

  • Lightly Grease two cake tins and line the bottoms with non stick-parchment. I manage without parchment , it's up to you, if yo are baking for the first time use it as it prevents the sides from burning.
  • Preheat Oven to 180C/350F/Gas 4.
  • Ensure butter is completely softened or else use the old foolproof way – heat water in a pan ,place a vessel on top with the butter inside minus any packaging, watch it soften like a man melts when he looks onto the eyes's of his dearest ,ahem …
  • Measure the Butter and sugar into a bowl and mix well they form a creamy mix, I used a fork and gave it a good old whipping:) – think of someone you dislike – your boss , your mil, your annoying neighbour, Baba Yaga the Witch – whoever – just whip away,hehehe
  • Add 3 medium or 4 small eggs, I used 3 medium-sized eggs.
  • Swift the self-raising flour into this mix ,followed by the baking powder, soda bicarbonate ,cocoa powder and beat till really smooth , I didn’t even need a hand blender as the butter was perfectly soft and the flour well swifted , though do go ahead and use a hand blender on low setting for about a minute , have added a picture so you know the look of consistency.
  • Divide the mixture between the two tins. I used the foil of the butter packaging to grease the cake tins, no wastage in my kitchen !
  • Bake in a pre-heated oven for approximately 25-30mins.
  • While in the oven make the icing by creaming together the butter and icing sugar and add cocoa powder, mix until smooth.
  • Cover frosting and set aside
  • Allow the baked cakes to cool down completely on a wire-rack before frosting
  • Sandwich the frosting in-between the two cakes
  • Add some on the sides and sprinkle the crunchy choco balls on the top , go all crazy and add some chocolate shavings , I did !
Keyword Basic Chocolate Cake


Looking for more inspiration to get baking?

Why not have a look at my other recipes:

  • Choco-chip cookies to kill insomnia and cure heartache
  • Sundried tomato and chilli spiced bread  
  • Chocolate coconut cake with coconut-flavoured icing
  • Banana Loaf – Mary Berry’s recipe
  • Cinnamon-pecan Gluten-free coffee cake
  • Halloween forgotten-graveyard cake


Filed Under: Desserts, Food, Recipe Index Tagged With: award, badge, bake, baking powder, butter, cake tins, celebrate, choco, chocolate cake, cocoa, crunchy, delicious, easy, eggs, Foodista, icing, oven, recipe, self raising flour, sistah, soda bicarbonate, softened, swift, whip

Choco Chip Cookies to kill insomnia and cure heartache

August 9, 2012 by manjirichitnis 2 Comments

I baked these to cheer myself up and trust me they have done more than that ! I baked cookies for the first time ever and I was gald they turned out so nice .

They take a total of about 30 minutes to prepare  including the baking time so they are not just easy peasy they will earn you massive brownie points with everyone at home !Enjoy!

Ingredient List :

  1. 175g softened butter
  2. 115g sugar
  3. 225g self-raising flour
  4. 50g chopped chocolate

These will make about 25 small cookies and about 15 beeeggg ones , I like the bigger ones more fun to chew ,chomp and gobble !

Method:

  1. Measure out the butter and sugar and mix well with a spoon in a mixing bowl . I love my beeegg Orange plastic bowl for this :).The butter should be kept outside and must be soft , if not put it not a thick glass bowl and hold it over a pot containing ho water , that should do the trick!
  2. Then add the flour in parts and mix well.
  3. Add a pinch of soda bicarbonate and another pinch of baking powder.
  4. Then crush the chocolate with your hand if it is soft ,if not just make pieces and add them with the little chocolate dust that you create in the process.
  5. If you have a cookie cutter use that to cut out shapes , especially if you are baking for little ones:)
  6. I simply make tiny dough balls in my palms , rolled them around and kept the centre puffy and flattened the sides , then placed them on my baking trays and baked them for 15 minutes at 180C.
  7. After 15 minutes remove from oven and place on a wire rack to completely cool down.
  8. The settings on other ovens which coordinate are 350F/Gas mark 4.

Enjoy with your cuppa tea , sip sip ,dip dip 🙂

Images :

The Dough is all done….

The 2nd tray is ready to go into the oven to Bake

The 1st tray was polished off in minutes , this is what remains from the 2nd tray ,whoooahahahahhaha;)

The SUPERMAN mug was then filled with some cold milk and several burps later a few crumbs remained :


Filed Under: Baking, Food, Recipe Index Tagged With: bake, begineers, chip, choco, chocolate chip cookies, cold, cookies, easy, milk, recipe

”POSH ”Victoria Sponge Cake

August 3, 2012 by manjirichitnis 4 Comments

What better way to celebrate the excitement surrounding the Olympics happening in London than sinking my teeth into a perfectly delicious soft Victoria Sponge Cake!

It’s an easy recipe and the result left me feeling like so very happy!

I tried to read up online why it is called a ”Victoria” Sponge cake and the apt answer seems that since Queen Victoria loved this soft cake with her afternoon tea! So I am going to savour the cake and afternoon tea as I cheer myself hoarse in front of the telly whilst watching the Olympics 🙂

Lovely! So let’s get baking and when your done gobbling some of it, drop me a line and let me know how much you enjoyed creating this yummy delight!

This cake serves 8 people, takes about an hour to prepare.

I choose to call it ”POSH” because that’s Victoria Beckham’s pop name, our very own British star and this cake is modernised version of a British Classic recipe with a twist as it is layered with Creme Chantilly’ – very posh sounding indeed!

Ingredients:

  • 225 g unsalted butter, softened, plus extra for greasing
  • 4 medium-sized eggs, organic if you please
  • 225 g caster sugar
  • 225 g self-raising flour
  • 4- 5 Large tablespoons of Strawberry Jam, the traditional version uses raspberry Jam, I used strawberry conserve.
  • 250 gm fresh strawberries sliced lengthways
  • Icing Sugar for dusting on top of the cake
  • Soda Bicarbonate – 1 teaspoon
  • Baking Powder 1 Teaspoon

To make the  crème Chantilly:

  • 300 ml double cream – so sinful 😉
  • 25 g icing sugar
  • I tiny cap full of Vanilla essence, the original recipe inspired by The Good Food Channel advises to use – 1 vanilla pod, halved lengthways and seeds scraped or vanilla extract

METHOD :

  • Preheat the oven to 180C/160C fan/gas 4. Grease and line two 18cm cake tins with a removable based with baking paper. I inaugurated my brand new weighing scales and cute cake tins I purchased for all future cake making experiments!
  • Put the butter and sugar in the bowl of an electric mixer and cream well until light and fluffy – this will take at least 10 minutes to get it properly aerated. Use the 10 minutes you have to wash and clean the strawberries and slice them lengthwise. This was also a first for me in terms of using my food processor to mix the butter and sugar mix. Then empty this butter sugar mix into a large mixing bowl, I also have a NEW nice bright Orange bowl!
  • Break each egg and add one at a time, whisk the mixture well after each addition to ensure it is soft and fluffy.
  • Add the self-raising flour to the above butter, sugar and egg mixtures, I added one spoon at a times and mixed it really well each time. Add the Bicarbonate of soda and Baking Powder to this mixture, I used this as I do in every cake but the original good food channel recipe does not mention these 2 ingredients. Later I used a hand blender to really get this mixture to feel like one entity and till it felt right to pour into the ready cake tins.
  • Now pour the above cake mix in equal portions into the  2 cake tins and smooth the top with a plastic spoon, the type you get with a food processor.
  • Bake for 20 minutes, with a timer, until risen and golden. Ensure you do not go over the 20 minutes, also if you are using a fan oven as I do, use only the setting that heats from below.

For the crème Chantilly:

  • Put the cream in the food processor, add the icing sugar and the vanilla essence. Whip to the soft peak stage, using the slow speed setting then refrigerate until slightly firmed.
  • Take the strawberry jam into a small pan and warm gently whilst stirring, use low flame and do not leave on pan for tool long.
  • Remove the cakes from the cake tin, on the top of one cake spread the jam from the pan and add the chopped strawberries.
  • Then get the Creme Chantilly’ from the fridge and spread generously over this.
  • Place the second cake on this and press down ever so gently.
  • Dust the top of this lovely sponge cake with a bit of icing sugar and decorate with a blob of the Creme Chantilly’ and some sliced strawberries!

Voila, the classic British cake with a twist – Posh Victoria Sponge is ready for you to savour, impress your family and friends and enjoy baking over and over again!

Filed Under: Desserts, Food, Recipe Index Tagged With: afternoon snack, bake, beat, butter, celebrate, easy, easy recipe, eggs, fluffy, food, Good Food, icing, mixture, pipe, Queen Victoria, recipe, self, simple, soft, sponge, strrawberries, sugar, tea, tea party, Team GB, time, unsalted, Victoria, weighing scale, whisk

Food,travel and lifestyle writer. Photographer.

  • Email
  • Facebook
  • Instagram
  • Pinterest
  • Twitter
  • YouTube

Categories

  • Baking
  • Breads
  • C.K.P recipes
  • Cakes
  • Chutneys
  • Cocktails
  • Curry – Meat, Seafood
  • Curry – Vegetarian
  • Desserts
  • Events
  • Featured Food and Drink
  • Featured Lifestyle
  • Featured Travel Adventures
  • Food
  • Healthy
  • Home
  • India
  • Indian
  • Kitchen
  • Lifestyle
  • London and rest of U.K
  • Meat
  • Miscellaneous
  • Product Reviews
  • Quick and Easy
  • Recipe Index
  • Rest of the World
  • Restaurant Reviews
  • Salads
  • seafood
  • Sides
  • Smoothies
  • Soups
  • Travel
  • Uncategorized
  • Vegan
  • Vegetarian

Featured Blogger on Great British Chefs

GBC_blogger-badge_150x300px    

Need a New Power Blender?

13076814_10154185434898293_7387808474266473605_n

Read Travelfortaste’s interview on Gourmandize UK & Ireland

 Sliceoffme interviewed by Gourmandize UK & Ireland

Travelsfortaste is Featured on Expats Blog

England expat blogs

Read Travelsfortaste reviews on Zomato

View my food journey on Zomato!
Privacy & Cookies: This site uses cookies. By continuing to use this website, you agree to their use.
To find out more, including how to control cookies, see here: Cookie Policy
Squaremeal.co.uk - Restaurant Reviews

About me

Writer and Photographer. Food,Travel & Lifestyle, Blogger and Digital Marketer. Read More…

  • Email
  • Facebook
  • Instagram
  • Twitter
  • YouTube

Recent Posts

  • Easy Spinach and Pea Soup
  • Grenada Chocolate Festival – Festive Giveaway
  • Royal British Legion Centenary Cookbook – Cooking with Heroes
  • The Instagram Foodie Bag – Must have for all Food Photographers
  • Restaurant quality meat – Swaledale Online Butchers – a review

Copyright © 2023 · Foodie Pro Theme by Shay Bocks · Built on the Genesis Framework · Powered by WordPress

This website uses cookies to improve your experience. We'll assume you're ok with this, but you can opt-out if you wish.Accept Read More
Privacy & Cookies Policy

Privacy Overview

This website uses cookies to improve your experience while you navigate through the website. Out of these, the cookies that are categorized as necessary are stored on your browser as they are essential for the working of basic functionalities of the website. We also use third-party cookies that help us analyze and understand how you use this website. These cookies will be stored in your browser only with your consent. You also have the option to opt-out of these cookies. But opting out of some of these cookies may affect your browsing experience.
Necessary
Always Enabled
Necessary cookies are absolutely essential for the website to function properly. This category only includes cookies that ensures basic functionalities and security features of the website. These cookies do not store any personal information.
Non-necessary
Any cookies that may not be particularly necessary for the website to function and is used specifically to collect user personal data via analytics, ads, other embedded contents are termed as non-necessary cookies. It is mandatory to procure user consent prior to running these cookies on your website.
SAVE & ACCEPT