Travels for Taste

Tales of travel and food with a touch of spice

  • Home
  • About
    • In the Press, Published Work and Interviews
    • PR and Disclosure Policy
  • Food
    • Recipe Index
      • Indian
        • C.K.P recipes
        • Curry – Meat, Seafood
        • Curry – Vegetarian
        • Sides
        • Chutneys
      • Healthy
        • Soups
        • Salads
      • Quick and Easy
      • Baking
        • Desserts
      • Meat
      • Seafood
      • Vegetarian
        • Salads
      • Vegan
    • Product Reviews
    • Events
  • Travel
    • UK
    • India
    • Around the World
  • Lifestyle
    • Home
    • Kitchen
    • Restaurant Reviews
    • Miscellaneous
  • Giveaways
  • Work with me
    • Meet interesting foodie entrepreneurs here

Tasty and Quick Pasta for two from ”nothing”

September 25, 2013 by manjirichitnis 21 Comments

We all have those days when we realise that all those reserves we had stowed away in various places – the fridge, the cupboard are well..not there and you are hungry and it’s too late to step out.

Panic not! There are ALWAYS a few things here and there which can be thrown in to make something superb! I made some very tasty and quick pasta yesterday and it was such a satisfying experience I cannot tell you how pleased I was with the outcome. Please feel free to throw in stuff that you have, that needs using up. Waste not want not I say!

Ok so here goes.

Ingredients:

  • Pasta – whichever type you have left enough for 2 people – used tagliatelle and generally 2 rolls are good for one very hungry adult 🙂
  • Sea salt (basically just regular salt)
  • olive oil or regular vegetable oil 1 tbsp
  • Tomato puree/ 1 large tomato sliced and diced fine (I scraped off some leftover tomato puree in a can that was at the very back of my fridge  – just in time !
  • Chilli flakes as per taste)
  • Chorizo – again I have a small portion lying around and it packs a punch in the taste department!
  • Spring onion finely chopped, I had a small bit left over from a bunch and it tasted awesome with the chorizo
  • Dried herb mixture – 2 tsp (or use fresh herbs off your kitchen plants – my dried herb mixture is a bit of left over artisan mix from one of the many food fairs I go to 🙂 it has garlic,parsley,chilli,sun dried tomatoes,salt and basil)
  • 2 – 3 cloves garlic sliced very fine and deep fried to give a superbly crunchy deep taste
  • Some cheddar cheese, I had 2 different packs tied with a rubberband and lying quietly in a small corner of my fridge door – ha! perfect find for pasta I say!

Method:

  • Boil the pasta in a saucepan with a sprinkling of sea salt and drizzle some olive oil as it nears the point when it’s cooked completely, this will ensure it does not get sticky and stodgy.
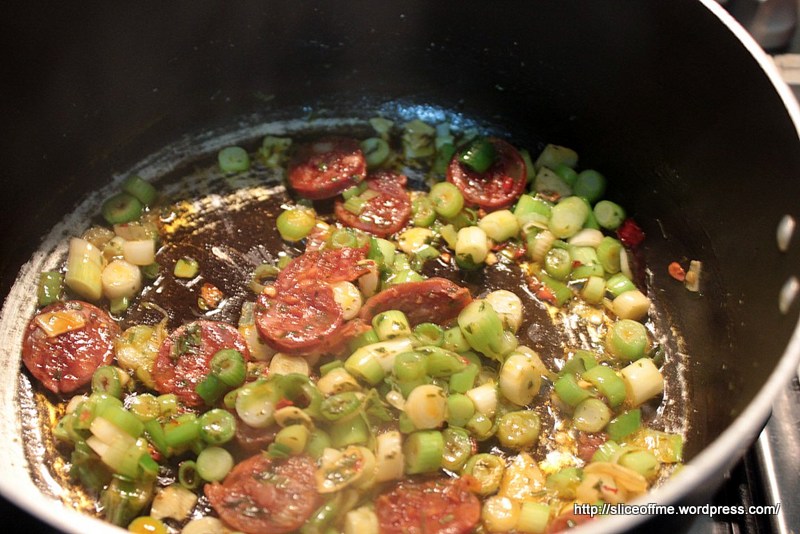
  • As soon as the pasta is on the boil, in another saucepan,heat 1tsp olive oil or sunflower oil and fry the garlic until it is crisp, to get them to crisp slice them superfine,as much as you can manage to without slicing off your fingers;)
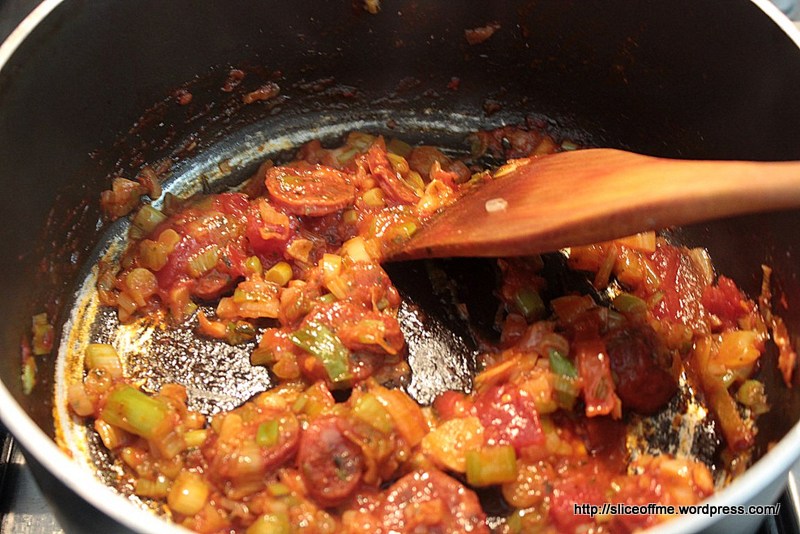
  • Then throw in the chorizo slices and as they cook they release a lot of oil and it really can add a lot of flavour and you don’t want to waste that so quickly chuck in the chopped spring onion and the tomato puree,stir and cook this mixture for about 2 minutes on a very low flame.
The oil from the Chorizo adding flavour to the spring onion
After the Chorizo is cooked it should look like this
  • Drain off the excess water from the pasta ensuring there is just a little bit to allow the pasta to remain smooth.
  • Turn off the heat at this point and mix well.Then add some chilli flakes and the cheese – as much as you have or as much as your waistline and conscience allows 😉
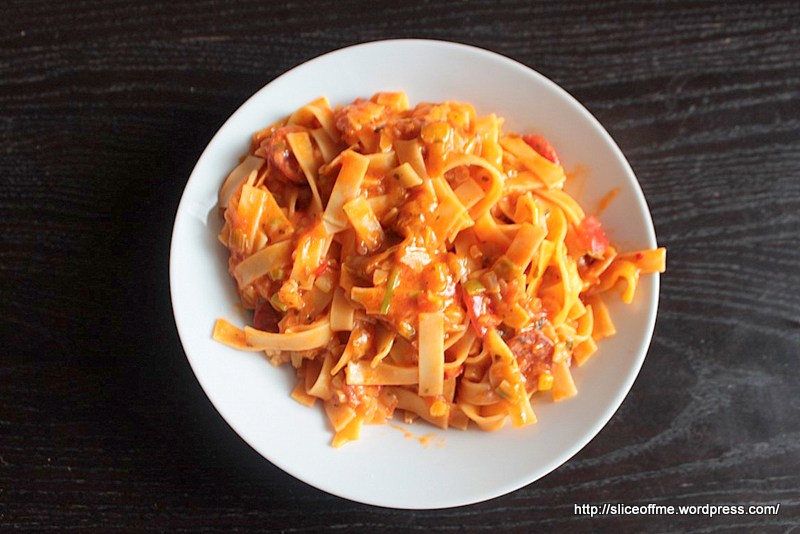
  • The heat trapped inside the pasta and the sauce will melt the cheese and it just disappears into the pasta giving it that perfectly cheesy not over-the-top taste,which is ex-actly what you want folks!The yummy deliciousness that this pasta is makes me want to dive right into the plate and its smoky garlicy flavour with just the right amount of chilli and chorizo which is my absolute personal favourite for pasta dishes,what more could one ask for!?! 🙂
  • I wish I had some smoked ham,fresh basil and some more chorizo – but hey this was so good I am going to make it again and again!
  • I hope you do too and if you do drop me a line here in the comments, I love reading what you have to say!I am most looking forward to those comments where you were in a similar situation and used the ”nothing” from your fridge and made pasta as delicious as mine – just use your imagination!
The best pasta I've ever made!

Powered by Linky Tools

Click here to enter your link and view this Linky Tools list…

  • I am entering this recipe into the ”No Waste Food Challenge” for Jan ’14,hosted by the lovely Elizabeth who blogs at  Elizabeth’s Kitchen Diary and has taken on the baton to host this challenge from Kate over at Turquoise Lemons who initiated this very challenge,couldn’t think of a post more apt for this I say ! If you too would like to link up but find the details on Elizabeths blog. Find the whole round up here
no-waste-food-badge
  • I am entering this frugal recipe for Credit Crunch Much hosted by Helen of Fuss Free Flavours and Camilla of FabFood4all and for Feb’14 hosted by Angela of My Golden Pear. Making use of ingredients which I wouldn’t have otherwise used together and finding things lurking in my fridge which have been salvaged and not chucked into a food bin a few days later, I think this recipe definitely fits the bill for this challenge.
Credit-Crunch-Munch-Just-Pic
Tasty and Quick Pasta for two from ”nothing”

Filed Under: Food, Meat, Quick and Easy, Recipe Index Tagged With: cheddar, chilli flakes, chorizo, dried herbs, emergency food, garlic, nothing, olive oil, pasta, saucepan, sea salt, smoked ham, sunflower oil, tagliatelle, tomato puree, tsp

Pomfret Fish Curry

August 18, 2013 by manjirichitnis 12 Comments

Flavours of Konkan

When anyone asks me what I would like as my LAST meal,I always say I’d like some fried pomfret so naturally, when I go Indian grocery shopping I always check for this fish. Though I must admit, nothing beats the flavours one gets from fresh fish. But well, just have to make do with frozen fish as the one I love is a Pomfret local to waters of the Indian Ocean.

This is a relatively simple recipe and does not require much effort but the marination is key as it can really give depth of flavour which is what we need.

I had 3 of these beauties to cook and couldn’t resist getting them to pose for my camera all dressed with the dangerously delicious spices that I rubbed into the fillets.

Pomfret with all the spices that are used in the curry.

Okay, it’s relatively easy making fillets after this fish has thawed thoroughly as it has very few bones, I like to remove the bit in the front with the eyes and the tail and also remove the fins then make fillets the size fit for a curry or fry.

Pompfret Fish Curry

5 from 1 vote
Heirloom recipe, a traditional CKP style fish curry
Print Recipe
Servings: 4
Course: Main Course
Cuisine: Indian
Ingredients Method

Ingredients
  

  • 3 medium-sized Silver Pomfret
  • 2 tbsp Coriander and green chillipaste
  • 1 tsp Ginger-Garlic paste
  • 1.5 tsp Red Chilli powder
  • 1 tsp Turmeric
  • 3 – 4 Cloves Garlic withskin on
  • 2 tbsp Grated coconut
  • 1 small pinch Asafoetida/Hing
  • 2 tbsp Refined oil
  • 1/4 Lime – juiced
  • Salt to taste

Method
 

  1. Wash thoroughly and marinate with redchilli powder, turmeric,salt ,ginger- garlic paste,coriander-green chilli paste and set aside for at least 40 minutes.
  2. After the marination is done,heat oilin a saucepan,add asafoetida just a tiny spritz and throw in the crushedgarlic cloves with their skins on. As soon as they start to brown add the marinatedfish n toss it around for about half a minute.
  3. Add enough water to cover the fishand cook on a low flame.
  4. As the water begins to boil add inthe finely grated fresh coconut and stir in well till the curry is nice andthick.
  5. Simmer till the fish is cooked andsqueeze the lime into it.
  6. Serve with steaming hot riceand allow yourself to enjoy this simple yet classic fish curry, an everydayfare in the houses along the coast of Konkan and a great treat in ours.

These beautiful flowers are on stalks of fresh spring onion!! Unexpected, I know right?!! My ma (in-law) very patiently chopped these stalks and created this cute little spring onion floral display and the whole idea of this photograph with books we are currently reading is hers.

Spring Onion Bouquet

Bengali Bhaja with spring onions and potatoes

I was so excited to see them and had to buy myself two bunches and look for a Bengali Bhaja or bhaji (Marathi) sabji/sabzee (Hindi). Found a lovely food blog called ‘Hamaree Rasoi’.

Peyajkoli Batata bhaja
Spring Onion and Potato Bhaji

Needless to say, the meal was supremely satisfying and we all slept with gentle snoring now and then …TMI- oh yes, totally 😉

Pomfret curry with steamed rice and pejaykoli bhaja

LEARN HOW TO MAKE INDIAN FOOD FROM SCRATCH WITH MY EASY TO FOLLOW RECIPES

  • Fresh dill and yellow moong daal recipe
  • Goda sheera/ sooji ka halwa/ Indian dessert
  • CKP Surmai curry
  • Pompfret fry
  • Konbichi khichadi – Prawn khichadi
  • Vaangayche Bharit/ Smoked stuffed Aubergine ( Eggplant/Brinjal) in a thick gravy/ Baingan ka bharta
  • Valache Birdhe – (वालाचे बिरडे) – MADE IN A TYPICAL C.K.P WAY
  • Kairi Panhe/ Aam ka panha – Raw mango summer drink
  • Cauliflower- vatana bhaji – cauliflower and green peas vegetarian side dish
  • Podhnichi khichadi
  • Akkha masoor aamti CKP style / Whole red lentils with skin curry recipe
  • Achari Mutton curry
  • Spicy Chicken curry
  • Egg curry
  • Upma
  • Punjabi Kadhi
  • Gujrati Kadhi
  • Shahi Khichadi
  • Sweetcorn and paneer bhaji/sabzi (vegetable side dish)
  • Tomato and coconut chutney
  • Steamed Idli batter
  • Ragi (Finger Millet) and blueberry pancakes
  • Masala egg omlette
  • Chicken tikka masala
  • Tikka masala curry paste
  • Tawa chicken Frankie roll
  • Chai concentrate
  • Grated carrot salad
  • Strawberry flavoured shrikhand

Filed Under: C.K.P recipes, Curry - Meat, Seafood, Food, Indian, Recipe Index, seafood Tagged With: basmati, batayachi bhajee, batayachi bhaji, C.K.P, C.K.P kitchen recipes, corainder, garlic, ginger garlic paste, grated fresh coconut, green chillies, ilovesabji, kalvan bhaat, Marathi, pejaykoli aloo bhaja, peyajkoli bhaja, potatoes, Proud to be C.K.P, red chilli powder, sabji, sabzee, salt, sarangachye kalvan, spring onion with flowers, steamed rice, turmeric, white pomfret

Spicy Mexican Chicken Wings

August 16, 2013 by manjirichitnis 4 Comments

I was sent this amazing new product from the Gran Luchito Kitchen – their new Salsa sauce and ever since I laid my eyes on it all I wanted to do was make some spicy chicken wings and enjoy them on a summer evening with some chilled beer.

IMG_4260 (Copy)

What I most love about this new HOT sauce from Gran Luchito is that it makes life so easy so if you want to make a quick ,tasty and easy starter dish and really impress your guests or you suddenly decide to take home the entire hungry gang you went for drinks with on a Friday evening(Egad!) this bottle of goodness is a going to be your life saver. It’s very versatile because I can think of so many ways to use this sauce. It’s also a great dip for that bag of tortilla chips which can do the rounds with some chilled beer or wine for your guests, or a lazy brunch on Sunday just make lots of wings to gr around for the family!It’s definitely my new spicy ketchup and will be a perfect pairing with a zillion foods!

Ok, so here’s a quick recipe for the Spicy Mexican Chicken Wings:

Serves: 2 – 3

Cooking Time: 15 minutes marination, on pan 10 – 15 minutes,chopping time 5 minutes.

Ingredients:

  1. Grand Luchito’s HOT Sauce – 5 heaped tbsp
  2. 8 chicken wings
  3. 1/2 medium sized red onion sliced lenghtwise
  4. Half a lemon
  5. Smoked sea salt
  6. 2 large tbsp oil (I used refined sunflower)
  7. Smoked Sea salt
  8. Cumin powder 1 tbsp
  9. An entire garlic with all its pods sliced through.

Method:

If you ask me this is one for the barbecue but since I have no access to one and work off a tiny urban kitchen which is literally a single small platform I love using my pan with grids to get those grid lines on my meat and pretend am in the garden with a nice barbecue going,sighhh, oh yes and my smoked sea salt is my best ally , giving my food that wonderfully smokey aroma -oak smoked it is !

  • Wash the chicken wings and in a bowl and pour about 1/2 a tbsp oil on them,add the smoked sea salt,cumin powder and 2 tbsp of Gran Luchito HOT sauce.Rub well and cover and set aside for about 15 minutes

Marinating the wings in Gran Luchito's HOT sauce

  • On a pan with grids add the oil and allow it to heat till it starts to bubble slightly, add the chopped red onion and saute till it just begins to change colour,carefull to not brown them too much.
  • Now saute two heaped tbsps of the Gran Luchito HOT sauce on the pan.Stir for about a minute and then add the marinated chicken.Place the garlic face down allowing it to turn a delicious brown and release it’s magic kick into the onion and sauce mix and boost the flavour of the chicken.
  • Use tongs to turn when one side is properly browned and juicy but stir the sauce and onion sautee mixture which the chicken is sitting on not allowing it to stick to the pan or burn!
  • It should take about 10 -15 minutes to get to the right crispy and juicy stage for the chicken wings on a medium flame with this pan.(In case you need to do a large batch of chicken wings, scale up the ingredients proportionately and blanch the chicken wings in hot water for 5 – 7 minutes before marinating so that they are semi cooked , this way you can get them in batches on the pan and ready to serve, keep them warm by placing in a baking tray covered in foil – you could even keep bigger batches warm in a pre-heated oven if need be!)

The unique smoky taste of Gran Luchito with the sweetness of pineapple

I hope this product hits the shelves soon!To do this as quickly as possible Gran Luchito has  partnered with Crowd Funding Network We Are The Million to raise some investment and create jobs too.Help Spread the word by reading more about the campaign here.

Spicy Chicken Wings

*Thanks to Gran Luchito for sending me some of their test sauce as a sample to review. As usual, all opinions are my own. No monetary compensation was provided for this post and I was not expected to write a positive review.

Filed Under: Food, Product Reviews Tagged With: @Luchito_Mexico, Barbecue, crowd funding, cumin powder, delicious, drink, easy recipes for spicy chicken wings, easy starter recipes, eat, finely chopped, garlic, good cause, Gran Luchito, Hot Sauce, Mexican food, Mexican Ketchup, nomnom, pan with grids, quick and easy starter, red onion, smoked sea salt, Spicy Chicken Wings, sunflower oil, tasty, tongs, We are the Million, yummy

Jerk Chicken and Coconut Rice

July 20, 2013 by manjirichitnis Leave a Comment

The first time I ate Jerk Chicken, was at a pop up Caribbean food stall near Haymarket Station, it was served with some tasty rice with red kidney beans and the most deliciously sweet plantain. Ever since I have been waiting to experiment and make this spicy chicken at home. Please resist the temptation of using a jerk sauce out of a bottle, it’s almost a crime because in the recipe I used from the BBC Good Food guide, it makes preparing the marinade a thing of joy. Not only will you learn how each ingredient lends its individual flavour but you can learn how to adjust the ”heat” in this amazing marinade. An advance warning, if you have sensitive skin PLEASE use gloves to marinate the chicken as Scotch Bonnet peppers are PACKED with heat. Ensure you THOROUGHLY wash your hands after you handle these ”hot babies” too! Humm now for the recipe, it’s essentially what was in the original but of course, I have added my own touches and I think they make quite an impact 🙂 So read on folks.

Manjiri Chitnis

Jerk Chicken

Caribbean Jerk chicken is an all-time favourite and tastes even better with a home-mademarinade
Print Recipe
Prep Time 20 minutes mins
Cook Time 45 minutes mins
Total Time 1 hour hr 5 minutes mins
Servings: 4 people
Course: Main Course
Cuisine: Caribbean
Ingredients Method

Ingredients
  

For Jerk Chicken:
  • 12 chicken thighs with bone
  • 1 garlic sliced through the middle to go in the oven
  • 2 lemons halved to go in the baking tray
  • 1 pair of clean gloves if you have sensitive skin – to marinate the chicken
For the Jerk marinade:
  • 4 Garlic Cloves de-skinned
  • 1 small red onion
  • 1 bunch fresh spring onion roughly chopped
  • 1 portion ginger size that fits inside your closed fist washed, skinned and roughly chopped
  • 1 tbsp thyme – I had none so I used 1 tbsp of Mixed Italian herb powder
  • 3 scotch bonnet chillies de-seeded if you cannot handle very spicy
  • 2 tbsp soy sauce
  • 2 tbsp oil – I used sunflower
  • 4 heaped tbsp brown sugar – I used dark muscovado sugar
  • 1 tbsp ground allspice powder
  • 1 lime Juiced

Method
 

  1. Blitz all the ingredients for the marinade in the mixer/food processor/blender and make a thick paste, do not add water as far as possible to ensure a thick puree like grainy paste
  2. Wash and deskin the chicken thighs and make cuts using a knife
  3. Then generously apply the marinade paste all over rubbing into the cuts made to ensure the flavour really seeps into the chicken
  4. Marinate overnight in the fridge. Cover vessel with cling film
  5. Keep about 2 tbsp marinade aside for adding in the baking tray
  6. When you are ready to prepare the chicken pre-heat the oven to 180 – 200 degree Celsius, I have a fan oven
  7. Prepare the baking tray by greasing with some oil, place the marinated chicken pieces and surround them with the lime slices and place the garlic halved
  8. Cook in the oven for about 45 minutes or until juices run clear
  9. When the chicken is in the oven start with the rice

Coconut Rice with Peas

Print Recipe
Prep Time 5 minutes mins
Cook Time 10 minutes mins
Total Time 15 minutes mins
Servings: 4 people
Ingredients Method

Ingredients
  

  • 200 g Basmati Rice
  • 400 g Coconut Milk can
  • 1 bunch fresh spring onion finely chopped
  • 2 large sprigs of fresh thyme
  • 2 large cloves of garlic skinned and chopped very fine
  • 1 tbsp ground allspice
  • 200 g green peas

Method
 

  1. Wash the Basmati rice under cold running tap water
  2. In a heavy-bottomed vessel, add the washed rice and coconut milk, chopped spring onions, thyme, garlic chopped and allspice
  3. Add 300 ml water, mix and add salt to season
  4. Cook with lid on a medium flame till water begins to boil
  5. Stir with a wooden spatula and then add the green peas
  6. Reduce flame and do not cover completely, leave a bit of space for the steam to pass
  7. Cook until done

Although the recipe I followed, uses red kidney beans since I was already using them in my Caribbean Sweet Mini Pepper Salad, I choose green peas for my Coconut Rice. I made my own homemade replacement for allspice powder too, it’s very easy and I intend to make it fresh each time I need instead of the store-bought one, simply because it is so quick and easy to prepare! Actually allspice is a spice by itself but it tastes similar to a mixture of cinnamon, cloves, nutmeg, and pepper.

Also Known as: Jamaican Pepper or New spice

Home made all-Spice Powder recipe

Manjiri Chitnis

Home made all-spice seasoning

Try myeasy to prepare and store home-made all-spice seasoning
Print Recipe
Prep Time 2 minutes mins
Cook Time 5 minutes mins
Total Time 7 minutes mins
Servings: 1 portions
Ingredients Method

Ingredients
  

  • 1 tbsp Cinnamon powder or cinnamon stick – thumb-sized
  • 1 small tbsp pepper powder
  • 1 heaped tbsp of cloves
  • 1 full nutmeg grated

Method
 

  1. In a pestle and mortar mix the ingredients and grate the nutmeg into it
  2. Then smash together to makes a grainy powder
  3. Some bits of the clove you may not be able to grind fine, I wouldn’t worry about it unless you want a fine powder then the smallest attachment on your mixer. I have an Indian mixer which I use for my coconut chutneys and it has 3 jars I used the one with 3 blades. Or else just use the pestle and mortar it should work.
  4. Store away the remaining homemade allspice replacement powder in a tiny airtight container

A note about the brown sugar vs. dark muscovado sugar

Dark Muscovado sugar is the unrefined form of brown sugar ,its stickier ,heavier,has a longer shelf life than refined sugars and adds a more intense flavour to marinades and since it is stable at high temperatures is great for baking.If you do not have brown sugar its ok to replace it with dark Muscovado sugar. Although as the water content dark muscovado holds is higher one should accordingly taper the use of water in the recipe.

Brown sugar is white sugar and molasses and hence the colour and soft texture. It has the light and dark brown sugar varieties and the lighter it is the milder the flavour.

Muscovado,White & Light Brown Sugar

Filed Under: Food, Meat, Recipe Index Tagged With: allspice powder, bake, basmati rice, BBC Good Food Guide, can, caribbean, caribbean jerk chicken recipe, caribbean recipes, chicken thighs, cinnamon, coconut milk, coconut rice recipe, cook, cooking, delicious, easy home-made all-spice seasoning recipe, easy home-made caribbean jerck seasoning recipe, easy meals, eat, fiery, finely chopped, food, food blogger, foodblogger, garlic, green peas, homestyle jerk chicken recipe, hot, ingredient list, italian herbs, jerk chicken recipe, lemon, lime, marinate, muscovado sugar, nutmeg, oven, pepper, quick and easy recipes, red onion, roast, roughly chopped, scotch bonnet chillies, scotch bonnet peppers, simple jerk chicken recipe, sliceoffme, spicy, spicy lunch recipes, sprig f thyme, spring onion, summer party menu, sunflower oil, tarvelsfortaste blog, tasty, temper, tin, wikipedia, yum, yummy

Easy and healthy one-pot chicken noodles

June 17, 2013 by manjirichitnis 4 Comments

It was one of those days when I wished the dinner made itself ,but hey you know what I am saying right?Like it’s ONLY Monday and am wishing it was the weekend again , ya, ya that kind of a horrible feeling- gaaahhh! Happens to the best of us , yes even me , ok ok I will get on with the recipe.I  had this vegetable stock packet in my kitchen cupboard that had to be used or else! And I had some tomatoes, bright red  chillies, half a red onion sliced , some unused tiny onions, a juicy lime and a spanking new bottle of Kafir Lime leaves .

Since I had spent the better part of the day, well on facebook 😉 I got my lazy,fat a** out of my house and walked to the supermarket.Some chocken thighs ,a mixed bag with chopped carrot and brocolli on reduced price , just what I was looking for!

Ok so here’s a list of all the ingredients I threw in and managed to make something that made hubby go from ”hummm ummm” to ”interesting” to ” u came up with this recipe like now?” the best compliment, ok am showing off and that sickening right?

Serves:2 , Cook time including serving time :25 miutes

Ingredients:

  1. 500ml vegetable stock
  2. 100ml water
  3. 1/2 of a medium sized red onion sliced lengthwise
  4. 2 -3 shallots chopped lengthwise
  5. 2 cloves of garlic with the skin on
  6. 1 tiny pinch of cumin seeds
  7. 2 Kaffir lime leaves – no more ,they are POTENT!
  8. 2 bright red chillies slit lenghthwise
  9. 1 small tomato chopped into tiny pieces
  10. 3 pieces of chicken with the skin taken off
  11. Red chilli powder as per taste
  12. Salt as per taste
  13. 1 portion of thin egg noodles  – 100 gm approx
  14. 1 small palmfull of diced carrot  – 100 gm approx
  15. 2 -3 bits of broccoli cut into smaller bite sized portions – 100 gm approx
  16. 1/4th of piece of lime to squeeze onto the chicken
  17. 2 tbsp sunflower oil
  18. A smile on your face because you are going to make a new yum dish super quick and you n yours are gonna love-uh it!

The Ingredients

Preparation:

  • Wash the chicken pieces and remove the skin
  • Pan on hob and add one tbsp oil ,saute the thinly length-wise sliced red onion saving a few bits to go into the stock pot.
  • place the chicken pieces and lower the flame, turn the pieces in a few minutes after they start to fry, do not cook them fully as this pan fry bit is to ensure flavour on double impact and get the chicken to release it’s juices
  • at this stage add the tomato bits into the pan and flatten with a spatula after they have sizzled for a bit, this will make the sauted onion flavour marry with the tomato and lock in the chicken juices,squeeze the lime onto this
  • add about 2 tbsp of the vegetable stock to the chicken in the pan and simmer on  as low a flame as possible,keep checking to ensure it does not dry up!
  • Now add 1 tbsp in a saucepan and when it’s hot throw in the 2 big red chillies which have been split lengthwise,followed by the cumin,crushed garlic cloves with skin, some of the red onion chopped leftover from what went in the pan and the shallots chopped lengthwise.Keep the saucepan on a low flame to prevent burning of these ingredients.

IMG_2931 (Copy)

  • When the garlic is done and the pungent chilli and garlic gives off its trademark punch of aroma throw in the Kaffir lime leaves ,when the onion is totally pink n garlic crisp , throw in some of the vegetable stock and some water , add the noodles carrot and broccoli ,cover and bring to a boil, at this stage the carrot is almost cooked and the noodles too, scoop in the chicken and the thick onion-tomato gravy it was in, ensure you get every last bit of the thick sauce from the pan to not loose any of that wholesome goodness!

IMG_2935 (Copy)

  • Now throw in all the remaining vegetable stock and water and add salt and red chilli powder as per taste.
  • cook on a low flame with lid till done, the chicken should just fall of the bone easy and the carrot should be well cooked but not squidgy.
  • Serve hot with soft boiled potatoes in butter and herbs or a crisp baguette.

At 2 small spoons of oil and how it fills you, this one dish stock pot is filling, wholesome,relatively easy and a good for a weekday dinner when you are feeling  well BLAH 😉

please leave comments to let me know if this recipe rocked your boat or totally sucked !

Love,peace and good night bloggy world ,I love ya !

One stock pot chicken and noodle dinner

Filed Under: Food, Meat, Quick and Easy, Recipe Index Tagged With: chicken, chilli, cumin, delicious, easy dinner recipe, eat well, garlic, healthy low calorie dinner recipe, hob, kaffir lime leaves, low flame, noodles, one stock pot, pan, ready in 20 minutes, recipe development, red chilli, red onion, salt, saucepan, shallots, slimming food, sunflower oil, tasty, vegetable stock, water, wholesome goodness, yumyum

Cauliflower ani vatanyachi bhaji, Gobi Vatana Sabzi, Cauliflower side dish with green peas

September 5, 2012 by manjirichitnis 8 Comments

Cauliflower green peas Sabzi

I love cauliflower as a vegetable for its taste and sheer possibilities in the kitchen, my fav everyday vegetable to be eaten with chapatis is a mix of cauliflower and green peas in a spicy, semi-dry sabzi form. I used biryani masala to add a twang to my usual taste and the result was worth sharing:)

फ्लॉवर वाटाणा मसाला भाजी

Skill level beginner, basic

Serves :2 with rotis and curd to make a light meal

Manjiri Chitnis

Cauliflower and Green peas Masala Sabzi

5 from 2 votes
Easy, delicious vegetarian sabzi, an everday dish in a Maharashtrian home
Print Recipe
Prep Time 5 minutes mins
Cook Time 10 minutes mins
Servings: 2 people
Course: Main Course
Cuisine: Indian
Ingredients Equipment Method

Ingredients
  

  • 1 medium-sized Cauliflower
  • 4 tbsp Green peas
  • 1 pinch Asafoetida/hing
  • 1-2 Red Onions very finely sliced
  • 3 – 4 Curry leaves
  • 2 Green chillies
  • 2 tbsp Biryani masala
  • 1/2 Red juicy tomato
  • 1 tsp Ginger paste
  • 2 cloves Garlic very finely sliced
  • 2 tsp Oil for tadka
  • 1/4 tsp Mustard seeds
  • 1/4 Cumin seeds
  • Salt to taste
  • 1/2 tsp each of Turmeric n Red Chilli powders
  • 1 tsp Coriander powder
  • 1 tsp Jeera Powder
  • Few Sprigs Fresh Coriander leaves finely chopped to garnish
  • 1 tsp Lime Juice

Equipment

  • Kadhai or Work or saucepan
  • Chopping Board
  • Sharp Knife
  • Spatula

Method
 

  1. Heat cooking oil in a Kadhai/wok/ saucepan
  2. When the oil is hot, add the asafoetida and mustard seed, when the seeds start to pop add cumin seeds and the finely chopped garlic bits
  3. Ensure the cumin seeds turn a toasty brown and then swiftly move on to the next ingredients
  4. Next, go in with the fresh green curry leaves and green chillies followed by the finely chopped onion
  5. Add the coriander powder, ginger and garlic pastes and stir well and allow it to become a sticky sort of paste
  6. Then add the biryani masala and feel the explosion in the aroma as it marries well with the onion and spice paste
  7. Then go in with the cauliflower florets and the green peas
  8. Turn off the heat for a bit, sprinkle turmeric powder, red chilli powder, cumin powder
  9. Season with salt as per taste
  10. Turn the heat back on, ideally a low flame on the hob and a really low setting on the electric cooker
  11. Sprinkle some water enough to wet the veggies and allow for some steam to form, this will allow the cauliflower to cook
  12. Stirring occasionally, cook with a lid for about under 5 minutes
  13. Check after first 3 minutes to ensure the cauliflower does not overcook
  14. To serve, garnish with fresh coriander leaves, chopped fine and a tiny squeeze of lime juice to add an extra twang
  15. Best enjoyed served with hot puffy Polya (Marathi for Chapatis or Rotis ) off the hob!

Gobi Vatana Sabzi

I am linking my recipe, which happens to be my favourite fusion-Maharashtrian vegetarian recipe for Cauliflower and Green Peas Sabzi with In My Veg Box for May 2014 hosted by me for Nayna who Blogs at Simply. Food and Citrus Spice.

In my veg box cauliflower

Filed Under: Food, Indian, Recipe Index, Sides Tagged With: asafoetida, biryani, chilly, coriander, cumin, curry, easy, food, garlic, ginger, green, green peas, Indian, lime, masala, oil, original, recipe, red onion, sabzee, saji, salt, squeeze, tadka, tumeric, twsit, veg

Angel Hair Pasta and Prawns in Thai Red Curry and white wine sauce

August 29, 2012 by manjirichitnis 6 Comments

I loved the name of this recipe by Chef Delia and hubby was also so excited about eating that we went to supermarket that she endorses and got us some really nice White Cooking wine and vermicelli pasta which I used as ”Angel Hair”. The other thing about this recipe that I found appealing was that it was easy to make, serves 2 as a main meal if prepared with suggested quantities and is a really satisfying dish to both cook and eat!

Why is it called Angel Hair ? Capellini Pasta literally means Angel Hair – because this pasta is the finest, thinnest… and when boiled it opens up and is so delicate , almost like how an Angel’s hair would be! Since it is a very light pasta it pairs well with sea food and is sold in nest like shapes that open up into silky strands on boiling …ummm perfect !

Ok my cheat sheet for this recipe , I used Thai red curry paste from a bottle but you can make your own too.As with other types of pasta, it is generally cooked until it is al dente, or firm to the teeth.

I love this angel hair pasta as it cooks really fast and the sauces are taken up so well by the strands.

Serves:2

Marination Time: 4 hours Preparation Time: 15 Minutes Cooking Time:25 Minutes

Ingredients:

  1. 175gm Angel Hair Pasta.
  2. 2 packets of prawns.
  3. 2 tablespoons light olive oil.
  4. 4 large tablespoons Thai Red Curry Past.
  5. 4- 5 large garlic cloves skinned and very finely sliced.I love the skins so I kept them, they add a diferent twist and crackle that I cannot resist!,
  6. 2 large tomatoes skinned,de-seeded and chopped.This was the first time in my life I skinned tomatoes and must say it was fun 🙂
  7. Grated zest and juice of 1 lime
  8. 200ml dry white wine
  9. For the garnish – 3 tablespoons fresh coriander finely chopped,fresh lime thinly sliced.

Method:

  1. Marinate the deveined prawns in the Thai Red Curry Paste and set aside for as long as you can before cooking the meal, as suggested by Delia for 4 hours in a fridge is ideal.
  2. To start with the sauce ,add oil in a pan and the chopped garlic, fry till i is a beautiful golden brown and the kitchen starts to give away a delicious aroma that tantalises your senses…ummm , then go in the pan the lime zest and juice , the tomatoes and wine  and on a high heat cook and eventually reduce  for about  8 minutes.
  3. Now add the prawns and mix well on a high heat, then reduce to a low flame and let this bubble again for 3- 5 minutes.
  4. Turn off the heat once prawns are well cooked and cover and keep warm till the pasta is done as we have to be ready to serve this immediately when the pasta is ready , being thin it does not stay very easy to scoop out and handle once boiled.
  5. In a large vessel boil water with salt and cook the pasta , it is done in 3 minutes precisely.
  6. In bowls ready for serving spoon out the pasta ,whatever water comes with it , wil be soaked up by the pasta and the sauce.
  7. Serve the prawns in the Thai red curry paste and white wine sauce on top of the Angel Hair Pasta.
  8. In one word – Perfect !

Finito;)

Now for some pics- hover over each pic for a description, pics are followed by credits to the sites which inspired this blog post,Cheers Folks and do drop me a line if you liked this recipe and made it for your family 🙂

And last but not the least my sweetheart, my patient hubby for buying me the ingredients and for being my time keeper for this dish, I am eternally in love with you …..

Filed Under: Food, Recipe Index, seafood Tagged With: angle, bubble, capellini, chop, cook, dinner, flame, garlic, garnish, oil, olive, one dish, pan, pasta, paste, prawns, red curry, sauce, stir, tatsyy, thai, white wine

Shahi Khichadi

April 9, 2012 by manjirichitnis 9 Comments

I have decided to finally upload some of the recipes which received a lot of comments on my Facebook food album and I ended up sending out the recipe by email to many of contacts. Here is one of the easier and more popular ones . When I was a kid when my mother said ”khaichadi” in response to what’s for dinner ? it usually meant that one of us feverish and needed something gentle on the tummy or one of us was trying to recover from an upset tummy .Of course the taste of the boiled rice and green gram halved and with skin on or the yellow version without skin , is ultimately satisfying a great comfort food when served piping hot with a dollop of ghee and some warm milk ,a good night’s sleep guaranteed !

But my version is spicy ,with a tasty twist and a lot of fun to cook and even more fun to eat .

I adopted this recipe from the way my mother makes khichadi and also from how my pal S of www.jainfoodie.com makes Jain Dal Khichadi . I choose to call it Shahi meaning Regal or Royal here because it is rather a posh version of the humble boiled version. Khichadi meaning an Indian for a slurpalicious RICE and lentil dish cooked like a pulav /pulao/pilau /pilaf.

Ingredients (enough to serve 2 with second and maybe a third helping !)

  • Rice 1 cup
  • A Mix of the following in equalish parts in the same cup used to measure the rice – Massor Dal also called Red Lentils-split and skinless, Moong Dal also called Green Gram yellow we will use the  spilt skinless variety and the split green moong dal with green skin on , Urid Dal also called Black Gram halved with skin ,some Toor Dal also called pigeon peas – yellow spilt and skinless .
  • 1 large red Onion
  • 1 medium tomato
  • 2-3 Bay leaves
  •  Bits of Cinnamon bark
  • 2 cloves of garlic smashed with skin on
  •  2 green chillies
  •  Jeera / Cumin
  •  Hing / Asafoetida
  • Salt to taste
  • Red Chilli Powder
  • Turmeric Powder
  •  2 small potatoes
  •  Few Curry leaves
  •  Few Cloves
  •  Few black whole peppercorns
  • 18. Oil for sauteing
  • Some Ghee – maybe 2 spoons – Clarified Butter

Method :

  • Wash the rice and lentils and place them in a pressure cooker ,add 4 cups (use same cup as the one used to measure the rice and the dals) of water and another to make it a little softer than regular rice ,pressure cook till 4 whistles are done.
  • Once the steam slowly releases from the cooker , you can open the lid and it will look like the picture below but a bit different in colour because when I made this I was short on red lentils so didn’t add them . Actually even you make this dish with rice and only yellow moong dal it will taste just as good 🙂
  • While the cooker is cooling down ,chop the potatoes into longish strips and stir fry them in hot oil till they turn brown, add some salt, sprinkled over them just as they get done, these potato fries are our garnishing to add that REAL REGAL or SHAHI touch to the dish . Once done keep them aside and STOP yourself from munching on them before your dish is ready , my husband managed to gobble quite a few ,pretending he was helping me ”stir” the onions while I clicked pictures ..grrrrr
  • Now Lets prepare the tadka /tarka or the tempering. First slice the onion and the tomato vertically into thinish slices .
  • Add oil about 2 large tablespoons into a pan and one teaspoon of ghee just for flavour and aroma , when this mix is hot add some hing , then add the jeera and the crushed garlic and the 2 green chillies spilt along the middle lengthwise as it opens them up and allows the pungent seeds to spread through the tempering , one kick ass way to add that hotttt KICK to the dish ,trust me this one is explosive spicy HOTT as it has all the ingredients to help the taste explode in your mouth, saute till the garlic is brown and the garlic’s skin starts to crackle , then add the cloves, the whole black peppercorns , bits of the barks of Cinnamon ,curry leaves, bay leaves and keep stiring this mixture to prevent charring or over heating ,it will look like in the picture below :
  • Then add the chopped onion, It should look like the picture below:
  • Then after a while when the onion has begun to turn a lovely pinkish ,brownish colour and looks the picture below it’s time to add the tomato .
  • Now add the vertically sliced tomato slices , I can assure you that now the potent aroma of all those lovely spices and the onion are stirring up quite an appetite inside you and making you hungrier every passing minute .
  • I dislike chunky bits of tomato floating in my mouth while I gobble up the khichadi so I jus a flat wooden spatula and gently ensure that the tomatoes are totally mashed  in a way that allows the mixture to become one entity, it should look like in the picture below :
  • Add just a bit of red chilli powder and some turmeric powder to the mixture above and add salt to taste ,Now add the cooked rice and lentil mixture to the above tempered mix of spices ,onions and tomatoes ,mix well stirring well, add salt again enough to flavour the rice and lentil mix .
  • It’s almost done , just keep this on a low flame for about a minute or two to allow the flavours of the spices to penetrate deep inside the rice and lentils .
  • The SHAHI KHICHADI is now ready to be garnished! Yay 🙂
  • WOW now doesn’t that look awesome ? I am quite proud about this creative production from my kitchen , hope you relish it as much as I did errr we did , hubby had to agree 🙂
  • If you fear that all the spices may be a bit too much for your sensitive palate prepare a quick cooling cucumber and curd accompaniment . Beat 2 spoons of set yogurt or thick flowing yogurt and add tiny square bits of fresh cucumber , season with a bit of salt ,some sugar and some jeera powder to taste .

Enjoy !

Filed Under: Food, Indian, Recipe Index, Vegetarian Tagged With: bay leaves, chilli, chop, cinnamom, cloves, cooker, cucumber, cumin, curd, curry leaves, dal, flame, fry, garlic, ghee, green chilly, hot, jeera, khichadi, kitchen, lentils, masoor, moong, oil, onion, peppercorns, pictures, pilaf, Pilao, potatoes, powder, pressure, pulao, Pulav, recipe, red, regal, rice, royal, salt, shahi, spicy, sugar, tempering, tomato, toor, turmeric, urid, yogurt

Masoorachi Aamti or Red Lentil Curry

January 23, 2012 by manjirichitnis 10 Comments

Akkhe Masoor or whole red lentils

Masoorachi Aamti or Red Lentil Curry – Recipe adaptation from Mother, Mother in Law and a close C.K.P friend – who loves to stir up some spicy CKP fare and generally succeeds at it 🙂

Masoorachi Aamti or Red Lentil Curry

Delicious, easy and quick recipe for using whole red lentils with skin on
Print Recipe
Servings: 4 portions
Course: Main Course
Cuisine: Indian
Ingredients Equipment Method

Ingredients
  

  • 300 Grams MasoorDal (Red Lentil) with their brown covers intact and whole
  • 1 tsp Mustard Seeds
  • 3 cloves Garlic with skin on
  • 5-6 Curry leaves
  • 2-3 Green Chillies
  • 1 tsp Cumin
  • 1.5 tbsp freshly grated soft white coconut
  • 1.5 tbsp Goda Masala
  • 2 tbsp Coriander Powder
  • 1.5 tbsp Ginger – Garlic Paste
  • 3 mediumsized Red onions, chopped fine
  • 1/2 tsp Asafoetida
  • 1.5 tsp Turmeric powder
  • 2 tsp Red Chilli Powder
  • Jaggery to taste
  • Salt to taste
  • 2 – 3 petals Garcinia Indica – wet, salt preserved
  • Fresh leaves of Coriander chopped fine for dressing
  • 2 tbsp Sunflower Oil

Equipment

  • 1 Pan with lid
  • 1 Knife
  • 1 Chopping Board
  • 1 Spatula

Method
 

  1. Soak the washed lentils in luke warm water for about 20 minutes. You can par-boil the lentils too, to save time. t
  2. Heat two large generous tablespoons of oil in a wok, no weight loss tip this, huh? Indeed!
  3. Add mustard seeds and wait for them to pop.
  4. To this hot oil, dd Asafoetida, crushed garlic cloves , let the skin remian attached.
  5. When the garlic is starting to brown add the curry leaves, green chillies, cumin and then the fresh grated coconut.
  6. Now stir in the Goda masala, coriander powder, turmeric powder, red chilli powder, ginger garlic paste and coriander chilli paste and mix well.
  7. Now add the chopped onion and cook them on a low heat until they begin to break down and caramelise.
  8. Drain excess water from the lentils and add them into this spice and oil mix. Stir well. Cover and cook on medium to low heat until almost done. Check occasionally and stir as so to ensure it does not burn.
  9. Add the soaked Garcinia Indica alongwith the water it was soaking in. Mix well. Cook without the lid on low heat until fully cooked.
  10. Season with finely chopped fresh as ever coriander andserve piping hot with phulkas dripping with ghee (clarified butter) or the plain old boiled white rice.

Recipe Notes

  • Goda Masala – this is a mix of various spices readily available in Asian Grocery stores it’s basically a mixture of dry coconut roasted with a mixture of at least 10 different spices, best of all it’s available to buy online at Red Rickshaw – previously called itadka.com. Refrigerate this pack to increase shelf life,yayay so many tips from me, don’t YOU just LOVE me if u better don’t just READ this make n slurp it all ALONE, drop me A LINE and thank meeeeeeeeeeeeeeee) Better still make your own, recipe coming soon – watch this space!
  • Aamsul / Amsul – also known as Kokum or Garcinia Indica, is a plant belonging to the mangosteen family (Clusiaceae). This is one of those revered ingredients that is commonly used in Indian cooking especially in Maharashtra, along the coast. Much like my beloved coconut this fruit has multiple applications and is very versatile, besides it is such a good-looking gorgeous and delicious tropical fruit.
  • Coriander and Chilli paste – 2 small-sized bunches of coriander pureed with 2-3 green chillies – freeze and use on demand, handy and 1 of my 5 “save your face” purees for unwanted guests popping in at odd hours – the other 4 are listed at the end of this recipe.
  • The other 4 SAVE ME NOW pastes are: a garlic ginger coarse paste, Finely grated fresh white coconut paste, Tomato red onion puree -1:3, And the best one for last aye? – a few onions chopped lengthwise n lightly roasted in a kadhai (wok) with fresh white coconut finely grated till they turn slightly brown, then churned into a paste in the mixer.
  • The masoor dal can be done 2 ways for stage 1 of this process, 1st is the short cut which I love as I suddenly get an urge mid-evening to cook this typical CKP recipe to appease my urges to run to Heathrow n take the next flight to my parents home in Pune, hummmmm, so we soak the masoor dal 2 measures feeds 2 adults with a ravenous appetite and leaves some to spare.

Key

This is the key to a mystical tropical paradise…. errrr… sorry but it is not, it is simply the key to some important words that you will encounter pretty often while reading my posts or watching my videos. I am after all a student of Chemistry and treat my kitchen like my personal laboratory where I create my own kitchen experiments! This is why the word ‘Key’ reminds me of my Chemistry textbook in my school years 😉

  • C.K.P stands for Chandraseniya Kayastha Prabhu a sub-section of the Maharashtrian community in India and they generally hail from the coastal regions and hence are rather partial to freshly grated coconut and amsool in their food, not to mention their love for fresh fish and mutton, oh yeah!
  • Daal is used to loosely to refer to the uncooked Lentil and AAMTI is a Marathi word meaning cooked curry.
  • Coriander for my friends from across the pond is Cilantro.
  • Phodni – Marathi for tempering, also one of my favourite words to say. Follow my hashtag on Instagram #phodnitales , please pretty please? 🙂
  • Kadhai – The Marathi pronunciation sounds like it ends in ‘ee’, while the Hindi pronunciation stretches the first ‘a’ following the ‘K’ to sound like ‘aaa’ , easy or what?!
  • Phulkas – Also called chapattis or the delightful Indian Bread soft and fluffy and fresh off the pan has ghee smeared on it to pack some punch and many, many calories 🙂

EXPLORE MORE RECIPES FROM MAHARASHTRA, INDIA

  • Valache Birdhe – C.K.P style recipe -वालाचे बिरडे
  • Konkani Pompfret Fish Curry पापलेटचं कलवण
  • Prawn Khichadi – कोळंबीची खिचडी
  • C.K.P Style King Fish Curry – सुरमई चे कालवण
  • C.K.P Style Prawn Curry

Random Thoughts

I would totally rechristen the word ‘Method’ in a recipe post with the name ‘Process ‘ Why, well once a Chemistry student and a retail employee I guess some things just stay with you forever. Also, instead of “PREPARATION” I choose the word ”Process” which is drilled into a Retail Managers brain like young parents making their kids rote learn alphabets)

Pic 1: The saucepan contains oil heated and then the asafoetida, cumin seeds, mustard seeds, then the garlic, chopped green chillies and curry leaves and last but the best one is GODA masala

Pic 2 :Chopped red onion added to the mix

Pic 3: That’s the dal cooking

Pic 4 & 5: All done , the AROMA is filling my senses and transporting me into my MIL’s kitchen , I want to HUG her nowwwwwwwwwww

P.S: Will post pictures to compare the 2 sizes of Mustard seeds at a later date , I am now going to be too busy slurping my Aamti off the plate 🙂

Filed Under: Curry - Vegetarian, Food, Indian, Recipe Index, Vegetarian Tagged With: aamsul, allergic, amsul, amti, aromatic, asafoetida, Atyamala, birund, blog, boil, Bollywood, bread, busy, butter, calories, chillies, chukra, CKP, cloves, clusiaceae, coarse, coastal, coconut, cook, corainder, curry, dal, dance, dhania, dish, dried, easy, elastic, fast, food, food blog, garcinia indica, garlic, ghee, goda masala, green, Gujrat, heeng, Hindi, hing, hot, hug, hurry, internet, itadka, jaggery, jeera, juices, Kadhai, Karnataka, kokum, konkan, laptop, leaves, lentil, lick, link, Madame Tussads, Madhuri Dixit, maharashtrian, mangosteen, Marathi, masoor, men, MIL, moi, Murgal, Murgala, mustard, mutton, Orissa, palate, paste, phodni, phulkas, piping, pour, powder, process, Punampuli, Pune, pungent, Raktapurak, ratamba, Ratnagiri, raw, recipe, red, region, rice, Sanskrit, season, seeds, slurping, song, Tamil Nadu, tasty, tease, tempering, Tintali, tintidika, tomato, tumeric, turmeric, typical, Vrikshamla, waist, water, wax, wet, white, wiki, wok

An Omelette with a twist

January 23, 2012 by manjirichitnis 4 Comments

Your regular omelette but better

Easy omelette recipe

What’s life without a bit of a twist I say!

So here’s one of my “different” omelette recipes, I love eating eggs in all shapes and forms and am more so obsessed with omelettes and scrambled eggs.

This recipe is for hungry morning times when you have a rumbling tummy and need time to hold the tummy quiet and prepare for rest of the day. It is a filling, satisfying yummy start to the day, I serve this with 2 slices of toast buttered with a generous blog of organic grass-fed butter and a large glass of freshly squeezed orange juice to wash it down 🙂

Ok so you will need the following ingredients and a really easy short process to cook this yummy egg omelette

An Omelette with a twist

5 from 6 votes
Fluffy, delicious egg omelette
Print Recipe
Prep Time 5 minutes mins
Cook Time 6 minutes mins
Servings: 1 person
Course: Breakfast
Cuisine: Fusion
Ingredients Equipment Method

Ingredients
  

  • 2 Eggs
  • 1 large Red onion chopped lengthwise
  • 1/2 Garlic cloves sliced very fine lengthwise again
  • 1 Chicken Sausage
  • 2 Green chillies
  • 1 tsp Red chilli powder
  • Olive Oil as required or unsalted butter
  • Salt as per taste

Equipment

  • 1 Non-stick frying pan
  • 1 egg-whisk or fork
  • 1 Spatula
  • 1 Knife
  • 1 Chopping Board

Method
 

  1. Chop the red onion lengthwise and so also the garlic clove.
  2. Heat frying pan over medium heat.
  3. Sauté the red onion n garlic slices in a generous blob of butter on a pan until the onion starts to reduce turns a mild brown n stays ab it soft.
  4. Transfer the onion and garlic onto a creamic plate and allow to cool down a bit.
  5. Crack two eggs in a mixing bowl, beat them well using a whisk or a fork until you see loads of bubbles forming and the eggs have a nice thick consistency.
  6. Now mix in the onions and garlic into the eggs, add the chopped chillies, red chilli powder.
  7. Roughly chop the chicken sausage and add into the egg mixture, mix well
  8. Heat the same frying pan on a medium add and add some more butter if you like, when the pan is hot , pour the egg mixture into the pan.
  9. Cook with a lid for a few minutes, then using a wooden spatula loosen the omelette around the eggs, flip and cook until done on the other side without a lid, reduce the heat as required.
  10. Serve hot with toasted sourdough smothered in butter, a nice strong cup of masala chai and some freshly squeezed orange juice or a slice of grapefruit.

Recipe Notes:

  • I like to chop the red onion and garlic lengthwise. Why, you ask? Because in an omelette the tiny square bits will loose themselves and vanish I like to chomp on and feel the taste of all the ingredients as I eat the omelette and appreciate each and every ingredient, it’s just so much more fulfilling and creates an immense feeling of happiness as a creator of a true mouth-watering masterpiece.
  • The red onion should be sauteed to the point it is still soft and light brown so that when you bite into it, it releases a sweet burst of onion taste on your palate.
  • Feel free to swap the butter for olive oil or an oil spray.
  • I prefer to use unsalted butter, I mean who wants to pump their body with extra sodium, not me, hellow normal blood pressure!
  • A fluffy, well-cooked omelette is a joy to cook and serve and even nigger pleasure to eat so it is imperative to get the timing of flipping it over absolutely spot-on and correct, it comes with practise and you will love it!
  • Feel free to innovate and improvise this recipe, throw in bits of sweet pepper, sweet corn, spinach that is about to go off, or some kale that is looking tired, add in your favourite cheese or not. I leave that to your imagination, creativity, and what is available at hand!

AAAHHH pure omelette pleasure.

If you do make and enjoy eating this share your partner or husband or children’s reactions, it will surely make me smile.

Egg-citing egg recipes to inspire you!

  • Soft-boiled eggs and asparagus soldiers
  • Masala egg curry, a recipe famous on the street-food stall in Mumbai
  • Smoky chorizo and chives with eggs oven-baked in pots
  • Turkish Poached eggs
  • Indian Masala egg omelette
  • Egg based Team-Time Treats – compilation of recipes
I visisted a busy egg Farm where hens roam in rural England, have a read and browse through some pictures for a virtual tour

Behind the scenes at an Egg Farm

Filed Under: Food, Recipe Index, Vegetarian Tagged With: blob, breakfast, butter, caramelise, caramelize, chicken sausage, chillies, chopped, chubbybrown, cloves, cut, delicious, eat, eggs, enjoy, fat, finely, food, food blog, fork, fresh, garlic, green, guilt, hot, immense, ingerdients, juice, low, Lurpack, mashed, masterpiece, mix, omlette, onion, orange, pan, powder, red, salivate, salt, squeeze, tatsy, toast, tongue, twist, yummy

  • « Previous Page
  • 1
  • 2

Food,travel and lifestyle writer. Photographer.

  • Email
  • Facebook
  • Instagram
  • Pinterest
  • Twitter
  • YouTube

Categories

  • Baking
  • Breads
  • C.K.P recipes
  • Cakes
  • Chutneys
  • Cocktails
  • Curry – Meat, Seafood
  • Curry – Vegetarian
  • Desserts
  • Events
  • Featured Food and Drink
  • Featured Lifestyle
  • Featured Travel Adventures
  • Food
  • Healthy
  • Home
  • India
  • Indian
  • Kitchen
  • Lifestyle
  • London and rest of U.K
  • Meat
  • Miscellaneous
  • Product Reviews
  • Quick and Easy
  • Recipe Index
  • Rest of the World
  • Restaurant Reviews
  • Salads
  • seafood
  • Sides
  • Smoothies
  • Soups
  • Travel
  • Uncategorized
  • Vegan
  • Vegetarian

Featured Blogger on Great British Chefs

GBC_blogger-badge_150x300px    

Need a New Power Blender?

13076814_10154185434898293_7387808474266473605_n

Travelsfortaste is Featured on Expats Blog

England expat blogs
Privacy & Cookies: This site uses cookies. By continuing to use this website, you agree to their use.
To find out more, including how to control cookies, see here: Cookie Policy
Squaremeal.co.uk - Restaurant Reviews

About me

Writer and Photographer. Food,Travel & Lifestyle, Blogger and Digital Marketer. Read More…

  • Email
  • Facebook
  • Instagram
  • Twitter
  • YouTube

Recent Posts

  • Diamond Jubilee Tea Salon, Fortnum & Mason – Afternoon Tea Review
  • Brown’s Brasserie and Bar celebrates 50th Anniversary with Covent Garden Grand re-opening
  • Hampton Court Palace Food Festival – Review
  • Brigit’s Bakery Afternoon Tea, Covent Garden, London – Review
  • Maplin Photo Walk around Central London

Copyright © 2025 · Foodie Pro Theme by Shay Bocks · Built on the Genesis Framework · Powered by WordPress

This website uses cookies to improve your experience. We'll assume you're ok with this, but you can opt-out if you wish.Accept Read More
Privacy & Cookies Policy

Privacy Overview

This website uses cookies to improve your experience while you navigate through the website. Out of these, the cookies that are categorized as necessary are stored on your browser as they are essential for the working of basic functionalities of the website. We also use third-party cookies that help us analyze and understand how you use this website. These cookies will be stored in your browser only with your consent. You also have the option to opt-out of these cookies. But opting out of some of these cookies may affect your browsing experience.
Necessary
Always Enabled
Necessary cookies are absolutely essential for the website to function properly. This category only includes cookies that ensures basic functionalities and security features of the website. These cookies do not store any personal information.
Non-necessary
Any cookies that may not be particularly necessary for the website to function and is used specifically to collect user personal data via analytics, ads, other embedded contents are termed as non-necessary cookies. It is mandatory to procure user consent prior to running these cookies on your website.
SAVE & ACCEPT