Travels for Taste

Tales of travel and food with a touch of spice

  • Home
  • About
    • In the Press, Published Work and Interviews
    • PR and Disclosure Policy
  • Food
    • Recipe Index
      • Indian
        • C.K.P recipes
        • Curry – Meat, Seafood
        • Curry – Vegetarian
        • Sides
        • Chutneys
      • Healthy
        • Soups
        • Salads
      • Quick and Easy
      • Baking
        • Desserts
      • Meat
      • Seafood
      • Vegetarian
        • Salads
      • Vegan
    • Product Reviews
    • Events
  • Travel
    • UK
    • India
    • Around the World
  • Lifestyle
    • Home
    • Kitchen
    • Restaurant Reviews
    • Miscellaneous
  • Giveaways
  • Work with me
    • Meet interesting foodie entrepreneurs here

Spicy Chicken curry

August 20, 2012 by manjirichitnis 12 Comments

Sunday Special Lunch – A Family Tradition

What a Sunday Roast is to a traditional English Family Sunday Lunch is what the combination of Spicy Chicken Gravy and Jeera rice or layered Chicken Biryani is to my family. My sister and I, have been brought on such wholesome, hearty, home-made totally from scratch – delicious food.

All these divine yet easy to recreate dishes, which my parents have always cooked with great passion and a lot of effort are what fuel my desire to share them with all of you.

My Aai and Baba ( Mum and Dad in Marathi) who wake up early every Sunday morning and work as a team to produce this brilliantly tasty chicken curry. Saturday morning my Baba would take me with him to te butcher to buy fresh chicken curry pieces. After coming home he would very patiently explain to us how he marinates the bird using all the freshly ground pastes and purees that Aai used to prepare while he was out shopping. On Sunday morning they would again team up to cook us the most amazing lunch. My best memories of Sunday morning are of waking up to the aromas of food wafting through the house.

Keeping the tradition alive

Few years ago when my husband and I moved to London, I was determined to keep this Sunday family tradition alive. I cooked the chicken adding my own twists and trying my best to recreate the same flavour that my parents seem to get spot-on every single time! So, when they came to London to visit us shortly after we had moved here, I was super delighted that they would cook this special Sunday family meal for us. As promised they cooked us their Sunday special while hubby and I eagerly took notes, clicked pictures and took in the whole energy they bring to this whole process.

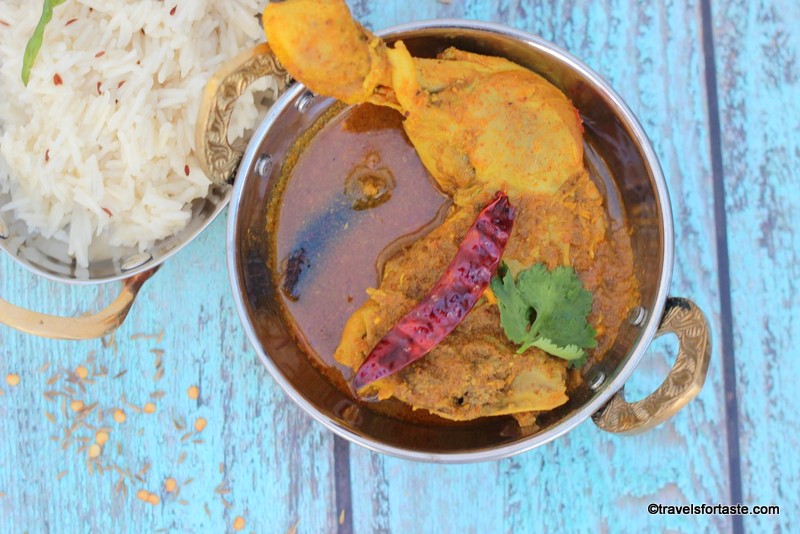
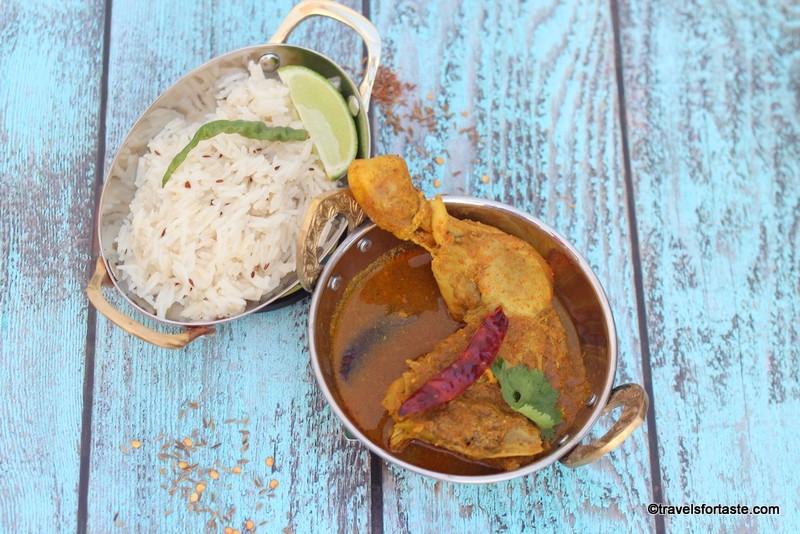
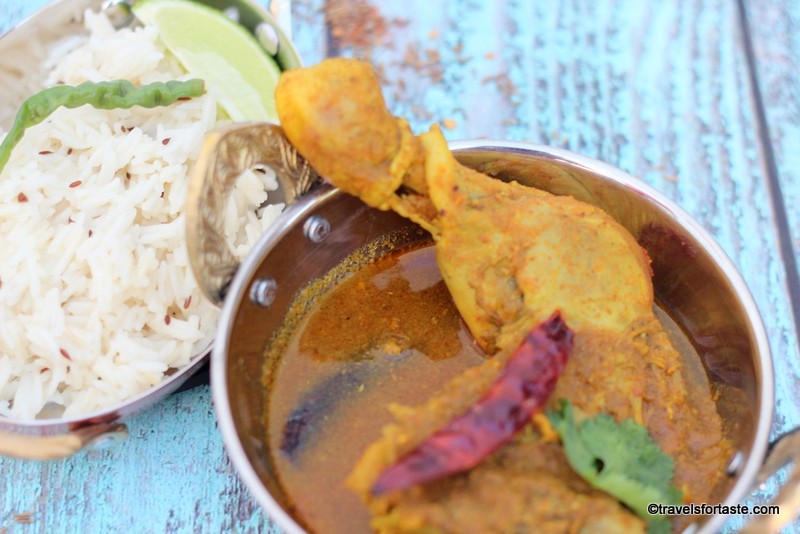
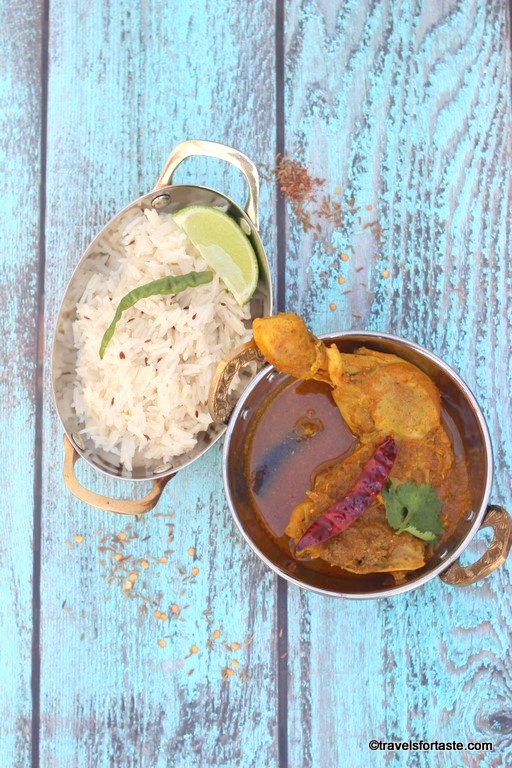
This recipe is a spicier version of our traditional Sunday Chicken curry. The bord is cooked in thick gravy bursting with flavour. My Baba loves serving this with Jeera Rice and a beautifully simple Maharahstian Kakdichi Koshimbir in Dahi – Cucumber yoghurt raita. I hope you will enjoy cooking up this dish and hopefully creating happy family memories of your own.

Spicy Chicken – Chitnis Family Sunday Special recipe

manjirichitnis

My family’s Sunday Special Chicken curry recipe

5 from 4 votes
A spicy and easy traditional Indian chicken curry recipe
Print Recipe
Cook Time 25 minutes mins
Servings: 4
Course: Main Course
Cuisine: Indian
Ingredients Equipment Method

Ingredients
  

For marinating overnight
  • 1.25 Kilos Chicken – curry pieces / 1 medium sized whole
  • 25 gm fresh coriander
  • 1 tbsp toasted Dhane/coriander seeds
  • 1 tsp Toasted Jeere/ Cumin
  • 3 cloves Lasun/Garlic
  • 15 gms Aale/Ginger
  • 2 Dry Laal Mirchya/ Red Chillies
  • 2 Dry Kashmiri Laal Mirchya/ Red Chillies
  • 2 Hirvya Mirchya/ Spicy Green chillies
  • 2.5 tsp Halad/Turmeric powder
  • 2 tsp Meeth/Salt
  • 1 tbsp Tel/ Cooking Oil
Tomato-Onion Mix for the gravy
  • 1 tbsp from the marinade above
  • 2 medium Ripe Tomatoes
  • 2 medium Kaande/Red Onions/ Bombay Onions
  • 2 cloves Lasun/Garlic
  • 10 gm Aale/Fresh Ginger
  • 5 gm Fresh coriander leaves
For the Phodni/ Tadka
  • 2 tbsp Tel/ Oil
  • 1 tbsp Sajuk Tuj/ Pure ghee
  • 2 Tamalpatra/Bay Leaves
  • 1 small piece of Dalchini/Cinnamon stick
  • Pinch Hing/Asafoetida
  • 3 tbsp Garam Masala
  • 2 tsp Coriander powder
  • 2 tsp Halad/ Turmeric powder
  • 3 tsp Laal Tikhat/ Extra Hot Red chilli powder
  • 1 tsp Meeth/ Salt – or as per taste
Garnish
  • One dry red Kashmiri chilli and one green chilli sautéed insome oil /ghee
  • Few fresh leaves of coriander to tear and scatter on top

Equipment

  • Large heavy bottomed pot with Lid/Pressure cooker/ Instant Pot / slow cooker
  • Spice grinder
  • Blender
  • Knife
  • Chopping Board

Method
 

  1. Wash the chicken curry pieces and place in a large mixing bowl. I always use chicken without skin
    Whole chicken before marination
  2. Make a thick paste in the mixer-grinder/ blender using all theingredients , asfmentionedabove for the marinade.Ensure the consistency is that of a thick paste and not a watery mixture
    Marinade for chicken
  3. Using a sharp knife make small cuts to the chicken flesh to allow the marinade to really penetrate inside the chicken, this will ensure that each piece is flavourful and not just from the outside
  4. Apply the marinade onto the washed chicken curry pieces, season with some salt and a splash of oil. Mariante overnight in the refigerator
    Marinade for chicken ready
  5. The next day get the marinated chicken out of the refrigerator about an hour before cooking
  6. While the chicken is coming to room temperature, make the puree usingall the ingredients as mentioned above for the tomato and onion mixture. Ensure this mixture it is not watery. Set aside.
  7. Heat oil in a heavy-bottomed pan or a pressure cooker
  8. When the oil is hot, add the asafoetida, sauté the bay leaf and cinnamon stick (dry red kashmiri chilli at this stage is optional)
  9. Add the garam masala, coriander powder and sauté
  10. Then add the onion-tomato mixture and cook for under two minutes until the mixture thickens
  11. Now add in the marinated chicken stir and some water, mix well. Add the red chilli powder turmeric powder and salt
    Chicken gravy consistency
  12. Add just enough water to allow for a thick gray. Stir , cover and cook on a medium flame until the gravy begins to boil
  13. Cover and cook until the chicken is totally cooked through and the oil seperates, this shoud take approximately 20 minutes on a low flame. Stir occasionaly to ensure the gravy does not dry out In the pressure cooker this takes two whistles – for a large bird three whistles
  14. Garnish with roughly chopped fresh coriander leaves and the fried red kashmiri chilli and green chilli
  15. Serve hot with a side of pipping hot jeera rice and some cucumber raita

Loved this recipe? For more chicken recipes try some more of my creations:

  • Chicken noodle soup
  • Chicken Tikka Masala – Air-fryer recipe
  • Easy one-pot Moroccan Chicken
  • Minty Chicken Kadhai Masala
  • Tawa Chicken Frankie Roll
  • Chicken and Red lentil one-pot Stew
  • Spicy grilled chicken bites with an avocado dip
  • Spicy Mexican Chicken Wings
  • Pomegranate Chicken curry
  • Jerk Chicken and coconut rice
  • Easy and healthy one-pot Chicken noodles

Filed Under: C.K.P recipes, Curry - Meat, Seafood, Food, Indian, Meat, Recipe Index Tagged With: chicken, coriander, cucumber, curd, curry, family favourite, flavoured, grated coconut, green chillies, jeera rice, love, oil, onions, parents, puree, red, salt, sunday roast, tomato, tradition

Kadhi – Punjabi Kadhi meets the sweet Gujrati kadhi

August 20, 2012 by manjirichitnis 2 Comments

Kadhi is another of my favourite dishes to be made when I want a Typically Indian meal with steaming hot rice fluffy and begging to be eaten with a bowl of home-made kadhi with crunchy pakoras(potato and onion fritters)

Kadhi is basically a spicy gravy made with curd and Bengal gram flour and there are two versions, this one made in the Northern part of India called ”Punjabi Kadhi” or the Gujarati Version – where the garnishing is done using long red chillies and it is a delicacy served in most weddings – well traditionally at least, nowadays weddings have ”world cuisine” another dilution of tradition … There is also another version called Sindhi Kadhi where tamarind pulp is added and so are few chopped veggies !

This is another recipe that I should have uploaded eons ago! It was much liked when I uploaded the pic on my Facebook album ”Food and How much I love it” Humm, how much more ”foodie” can one get, I wonder… 😉

Manjiri Chitnis

Punjabi Kadhi with a twist

Punjabi Kadhi meets the sweet Gujrati kadhi
Print Recipe
Prep Time 5 minutes mins
Cook Time 8 minutes mins
Course: Main Course
Cuisine: Indian
Ingredients Equipment Method

Ingredients
  

  • 2 tbsp Besan (Bengal gram flour)
  • 1.5 cups Curds/ Yoghurt /Dahi
  • 1 tsp Ginger-Green chilli paste
  • 5-6 Curry leaves (kadi patta)
  • 2 tsp Chopped Fresh coriander leaves (Cilantro)
  • Salt to taste
For the pakoras/fritters
  • 1/4 cup Chopped onion
  • 1/4 cup Chopped potato
  • 1 tsp Ajwain / Carom seeds/ Bishop's weed / Caraway seeds
  • 1 tsp Red chili powder
  • Oil to fry
  • salt to taste
  • 2 tbsp Besan (Bengal gram flour)
  • Water to mix Gram flour batter

Equipment

  • 1 Knife
  • 1 Chopping Board
  • 1 Saucepan with Lid
  • 1 Spatula

Method
 

  1. Mix all Chopped onion &potato in the besan and water mix , ensuring there are no lumps . Add ajwain, salt and chilli powder
  2. Heat oil in a Kadhai and deepfry vegetable and gram flour mixture after making into small balls. Fry tillpakoras are golden brown
  3. Beat Curd/Yogurt and mix gramflour in it. Blend thoroughly so as to ensure that there are no lumps. Addturmeric powder, salt and 3 cups of water
  4. Add the chilli-ginger paste,curry leaves, sugar and salt and put to boil
  5. Boil whilst stirring for a while
  6. Prepare the tempering byheating the ghee and frying the cumin and mustard seeds until they turn brown. Add the asafoetida and red chilli
  7. Add the tempering to the kadhiand boil for a few minutes
  8. Add the cooked pakoras
  9. Sprinkle coriander on top andserve hot with boiled rice

Inspired? Would you like to try my Gujarati Kadhi recipe? Check it out here:


  • Gujrati Kadhi


LEARN HOW TO MAKE INDIAN FOOD FROM SCRATCH WITH MY EASY TO FOLLOW RECIPES

  • Fresh dill and yellow moong daal recipe
  • Goda sheera/ sooji ka halwa/ Indian dessert
  • CKP Surmai curry
  • Pompfret fish curry
  • Pompfret fry
  • Konbichi khichadi – Prawn khichadi
  • Vaangayche Bharit/ Smoked stuffed Aubergine ( Eggplant/Brinjal) in a thick gravy/ Baingan ka bharta
  • Valache Birdhe – (वालाचे बिरडे) – MADE IN A TYPICAL C.K.P WAY
  • Kairi Panhe/ Aam ka panha – Raw mango summer drink
  • Cauliflower- vatana bhaji – cauliflower and green peas vegetarian side dish
  • Podhnichi khichadi
  • Akkha masoor aamti CKP style / Whole red lentils with skin curry recipe
  • Achari Mutton curry
  • Spicy Chicken curry
  • Egg curry
  • Upma
  • Gujrati Kadhi
  • Shahi Khichadi
  • Sweetcorn and paneer bhaji/sabzi (vegetable side dish)
  • Tomato and coconut chutney
  • Steamed Idli batter
  • Ragi (Finger Millet) and blueberry pancakes
  • Masala egg omlette
  • Chicken tikka masala
  • Tikka masala curry paste
  • Tawa chicken Frankie roll
  • Chai concentrate
  • Grated carrot salad
  • Strawberry flavoured shrikhand

Filed Under: Curry - Vegetarian, Food, Indian, Recipe Index, Vegetarian Tagged With: bengal gram, besan, comfort food, coriander, facebook album, Foodie, fritters, onion, potato, Punjabi Kadhi, salt

Basic Chocolate Cake with Frosting

August 20, 2012 by manjirichitnis Leave a Comment

What better way to celebrate a new FOODISTA Badge for my post on Shahi Khichadi than by baking a chocolate cake, I firmly believe that chocolate is the one word that instantly lifts sagging spirits and the whole baking process itself is cathartic! So sistahs let’s BAKE!

Manjiri Chitnis

Basic Chocolate Cake with Frosting

Delicious, easy must-have Chocolate cake recipe with frosting
Print Recipe
Prep Time 25 minutes mins
Cook Time 30 minutes mins
Course: Dessert
Cuisine: Fusion
Ingredients Equipment Method

Ingredients
  

  • 225 gms Butter softened
  • 225 gms Caster Sugar
  • 4 Eggs
  • 220 gms Self-Raising Flour
  • 3 tsp Baking Powder
  • 1 tbsp Cocoa Powder
  • 1/2 tsp Soda-Bicarbonate
For the frosting
  • 100 gms Butter
  • 100 gms Icing Sugar
  • 1 tbsp CocoaPowder
  • Shaved Chocolate for garnish
  • Fresh Strawberries for garnish
  • Granish of choice

Equipment

  • Cake tin
  • Whisk
  • Hand-Blender or Stand-Mixer
  • Wire-rack to cool the cake
  • Probe to test cake
  • Spatula to frost the cake
  • Measuring spoons
  • Baking Parchment

Method
 

  1. Lightly Grease two cake tins and line the bottoms with non stick-parchment. I manage without parchment , it's up to you, if yo are baking for the first time use it as it prevents the sides from burning.
  2. Preheat Oven to 180C/350F/Gas 4.
  3. Ensure butter is completely softened or else use the old foolproof way – heat water in a pan ,place a vessel on top with the butter inside minus any packaging, watch it soften like a man melts when he looks onto the eyes's of his dearest ,ahem …
  4. Measure the Butter and sugar into a bowl and mix well they form a creamy mix, I used a fork and gave it a good old whipping:) – think of someone you dislike – your boss , your mil, your annoying neighbour, Baba Yaga the Witch – whoever – just whip away,hehehe
  5. Add 3 medium or 4 small eggs, I used 3 medium-sized eggs.
  6. Swift the self-raising flour into this mix ,followed by the baking powder, soda bicarbonate ,cocoa powder and beat till really smooth , I didn’t even need a hand blender as the butter was perfectly soft and the flour well swifted , though do go ahead and use a hand blender on low setting for about a minute , have added a picture so you know the look of consistency.
  7. Divide the mixture between the two tins. I used the foil of the butter packaging to grease the cake tins, no wastage in my kitchen !
  8. Bake in a pre-heated oven for approximately 25-30mins.
  9. While in the oven make the icing by creaming together the butter and icing sugar and add cocoa powder, mix until smooth.
  10. Cover frosting and set aside
  11. Allow the baked cakes to cool down completely on a wire-rack before frosting
  12. Sandwich the frosting in-between the two cakes
  13. Add some on the sides and sprinkle the crunchy choco balls on the top , go all crazy and add some chocolate shavings , I did !


Looking for more inspiration to get baking?

Why not have a look at my other recipes:

  • Choco-chip cookies to kill insomnia and cure heartache
  • Sundried tomato and chilli spiced bread  
  • Chocolate coconut cake with coconut-flavoured icing
  • Banana Loaf – Mary Berry’s recipe
  • Cinnamon-pecan Gluten-free coffee cake
  • Halloween forgotten-graveyard cake


Filed Under: Desserts, Food, Recipe Index Tagged With: award, badge, bake, baking powder, butter, cake tins, celebrate, choco, chocolate cake, cocoa, crunchy, delicious, easy, eggs, Foodista, icing, oven, recipe, self raising flour, sistah, soda bicarbonate, softened, swift, whip

Choco Chip Cookies to kill insomnia and cure heartache

August 9, 2012 by manjirichitnis 2 Comments

I baked these to cheer myself up and trust me they have done more than that ! I baked cookies for the first time ever and I was gald they turned out so nice .

They take a total of about 30 minutes to prepare  including the baking time so they are not just easy peasy they will earn you massive brownie points with everyone at home !Enjoy!

Ingredient List :

  1. 175g softened butter
  2. 115g sugar
  3. 225g self-raising flour
  4. 50g chopped chocolate

These will make about 25 small cookies and about 15 beeeggg ones , I like the bigger ones more fun to chew ,chomp and gobble !

Method:

  1. Measure out the butter and sugar and mix well with a spoon in a mixing bowl . I love my beeegg Orange plastic bowl for this :).The butter should be kept outside and must be soft , if not put it not a thick glass bowl and hold it over a pot containing ho water , that should do the trick!
  2. Then add the flour in parts and mix well.
  3. Add a pinch of soda bicarbonate and another pinch of baking powder.
  4. Then crush the chocolate with your hand if it is soft ,if not just make pieces and add them with the little chocolate dust that you create in the process.
  5. If you have a cookie cutter use that to cut out shapes , especially if you are baking for little ones:)
  6. I simply make tiny dough balls in my palms , rolled them around and kept the centre puffy and flattened the sides , then placed them on my baking trays and baked them for 15 minutes at 180C.
  7. After 15 minutes remove from oven and place on a wire rack to completely cool down.
  8. The settings on other ovens which coordinate are 350F/Gas mark 4.

Enjoy with your cuppa tea , sip sip ,dip dip 🙂

Images :

The Dough is all done….

The 2nd tray is ready to go into the oven to Bake

The 1st tray was polished off in minutes , this is what remains from the 2nd tray ,whoooahahahahhaha;)

The SUPERMAN mug was then filled with some cold milk and several burps later a few crumbs remained :


Filed Under: Baking, Food, Recipe Index Tagged With: bake, begineers, chip, choco, chocolate chip cookies, cold, cookies, easy, milk, recipe

Prawn Khichadi (Pulav/Pilaf/Poolav)

August 7, 2012 by manjirichitnis 5 Comments

This is NOT just a  recipe, it’s a Family Heirloom passed down the generations and cooked with great relish by my mother-in-law and her mum who is now 82 years old and still can stir up some to-die-for finger-licking dishes!

But before I start off rattling the ingredient list, a ”slice” of some history about the origin of this rice and prawn union. Coastal cuisine in the western Indian state of Maharashtra relished by the Maharashtrian community relies heavily on the use of all versions of the coconut, the most potent form being as part of the Goda masala. This and of course, the abundant availability of fresh seafood has given birth to many delicacies many of which are age-old like this dish.

It’s also my prized comfort food and guarantees a great Sunday afternoon nap 🙂 and will ensure you are crowned kitchen queen and master chef of all things nice hehehehe

Ok here goes, the ingredient list – This dish serves 2 adults for 2 meals with 2 generous helpings each and leftovers for the next day.

Prawn Khichadi (Pulav/Pilaf/Poolav)

5 from 1 vote
Heirloom recipe, Traditional Maharashtrian coastal recipe, C.K.P
Print Recipe
Servings: 4
Course: Main Course
Cuisine: Indian
Ingredients Equipment Method

Ingredients
  

  • 500 gm Prawns
  • 2.5 Cup Rice
  • 3 Bay leaves
  • Goda Masala
  • Tumeric Powder
  • Red Chilli powder
  • 1/2 Lime
  • Oil
  • Salt to taste
  • Ginger and Garlic Paste
  • Wet grated coconut
  • 2 Red onions finely sliced
  • 1 thumb-sized piece Cinnamon (Dalchini)
  • 3 Cloves
  • Green Masala

Equipment

  • 1 Big Sauce Pan
  • 1 Mixer / Blender / Hand-blender
  • 1 Knife
  • 1 Spatula
  • 1 Chopping Board

Method
 

  1. On a pan on low heat sauté one finely chopped onionand the fresh wet grated coconut till the onions starts to caramelise, afterthis cools give it a spin in the mixer and make a fine paste.
  2. Marinate the washed rice in some the above wetgrated coconut and onion paste, some goda masala , a squeeze of half of alime, salt, ginger and garlic paste and some Cinnamon. Set aside.
  3. De-vein the prawns, wash under tap water andmarinate with red chilli powder, turmeric and green masala.
  4. Take oil in a vessel and sauté the marinated prawnsfor 1-2 minutes.
  5. Heat Oil in a vessel big enough to cook the riceand prawns together that will hold the water as well , add the cloves,remaining cinnamon and one very finely chopped red onion, add the marinatedrice and stir it , do this on a low flame.
  6. Then add the marinated prawnsand water, for rice dishes water is always double the measure of the rice usedso for 2.5 cup measures of rice use 5 cups of water.
  7. Cover and cook on a low flame.
  8. Serve piping hot with a side of cooling curd, you can also serve with your favourite pickle. I generally serve this with a spicy Curry.

How to make Green Masala

Green Masala – Use a bunch of coriander and two green chillies and give them a spin in the mixer, store this fine paste in the freezer and use it as and when needed, it’s one of the most basic marination masalas in most Maharashtrian non-veg dishes, especially seafood.

Spicy Curry

In a pan heat some oil and add asafoetida one pinch, add puree of 2-3 large red onions and one tomato and puree of 1 handful of wet grated coconut, season with red chilli powder, turmeric, salt, green masala, Goda masala and cook on a low flame with enough water to ensure a thick curry, Amp up the red chilli powder and green masala to your level of tolerance of spicy food!

Do let me know via comments if any of you made this dish and what you thought of the recipe!

P.S: Forgive the poor image quality, I have a Simple Canon Camera which I am unable to use too well and add to that the total lack of any photography skills but well the food tasted awesome :), that’s what counts right, hehe!

Update in 2013

A few days after I published this recipe, ‘A’ gifted me my first DSLR Camera – a shiny new Canon 600DS and I’ve been clicking away like a happy bunny ever since 🙂

To my absolute delight, he helped me add a new lens to my kit and gifted me a 50mm f 1.8 lens this year on my birthday. It is great for close-up food shots and true to the reviews, it works well in low light conditions.

Here’s an example:

The image below is from my kit lens where am struggling to fit everything in frame and focus on the prawns, I have sharpened the image, adjusted light and cropped it using Picasa 3.

Now see the difference in the image below, I love how the prawns are in sharp focus and how am able to easily adjust and fit everything in the viewfinder.I have adjusted light and sharpened the image very slightly, I am truly pleased with the results 🙂

LEARN HOW TO MAKE INDIAN FOOD FROM SCRATCH WITH MY EASY TO FOLLOW RECIPES

  • Fresh dill and yellow moong daal recipe
  • Goda sheera/ sooji ka halwa/ Indian dessert
  • CKP Surmai curry
  • Pompfret fry
  • Vaangayche Bharit/ Smoked stuffed Aubergine ( Eggplant/Brinjal) in a thick gravy/ Baingan ka bharta
  • Valache Birdhe – (वालाचे बिरडे) – MADE IN A TYPICAL C.K.P WAY
  • Kairi Panhe/ Aam ka panha – Raw mango summer drink
  • Cauliflower- vatana bhaji – cauliflower and green peas vegetarian side dish
  • Podhnichi khichadi
  • Akkha masoor aamti CKP style / Whole red lentils with skin curry recipe
  • Achari Mutton curry
  • Spicy Chicken curry
  • Egg curry
  • Upma
  • Punjabi Kadhi
  • Gujrati Kadhi
  • Shahi Khichadi
  • Sweetcorn and paneer bhaji/sabzi (vegetable side dish)
  • Tomato and coconut chutney
  • Steamed Idli batter
  • Ragi (Finger Millet) and blueberry pancakes
  • Masala egg omlette
  • Chicken tikka masala
  • Tikka masala curry paste
  • Tawa chicken Frankie roll
  • Chai concentrate
  • Grated carrot salad
  • Strawberry flavoured shrikhand

Filed Under: C.K.P recipes, Food, Indian, Recipe Index Tagged With: chillies, cinnamon, coastal cuisine, comfort food, coriander, family, goda, grated cocnut, green, heirloom, kitchen, koolambi, low flame, magic, masala, prawn khichadi, Pulav, puree, red chillies, red onion, rice, saute, sliced, spice, spicy, turmeric

Experiments with Food Photography

August 7, 2012 by manjirichitnis Leave a Comment

Inspiration for posting some Splendid recipes from the  secret closet of my mind or some hand me downs from my mother , mother in law ,grand mother or a close friend have been waiting to come onto this blog , but I have been lazy , though now it is time , so I have decided to bombard my readers with these rocking recipes that can add some serious fun to your kitchen adventures !

I know that at times it takes a lot to inspire one to get out of a rut and get there , so I take these food pictures from time to time to keep looking at whenever I need a little nudge !

Hope they work their magic on those hidden culinary desires inside you as do so work their magic on me !

P.S: I shall keep adding pics as and when I get to click some yummy images,slurrpp !

Filed Under: Food Tagged With: cooking, food, food images, food pics, grandmother, hand me downs, inspiration, kitchen, mother, mother-in-law, photos, pictures, recipes, secrets, traditional

”POSH ”Victoria Sponge Cake

August 3, 2012 by manjirichitnis 4 Comments

What better way to celebrate the excitement surrounding the Olympics happening in London than sinking my teeth into a perfectly delicious soft Victoria Sponge Cake!

It’s an easy recipe and the result left me feeling like so very happy!

I tried to read up online why it is called a ”Victoria” Sponge cake and the apt answer seems that since Queen Victoria loved this soft cake with her afternoon tea! So I am going to savour the cake and afternoon tea as I cheer myself hoarse in front of the telly whilst watching the Olympics 🙂

Lovely! So let’s get baking and when your done gobbling some of it, drop me a line and let me know how much you enjoyed creating this yummy delight!

This cake serves 8 people, takes about an hour to prepare.

I choose to call it ”POSH” because that’s Victoria Beckham’s pop name, our very own British star and this cake is modernised version of a British Classic recipe with a twist as it is layered with Creme Chantilly’ – very posh sounding indeed!

Ingredients:

  • 225 g unsalted butter, softened, plus extra for greasing
  • 4 medium-sized eggs, organic if you please
  • 225 g caster sugar
  • 225 g self-raising flour
  • 4- 5 Large tablespoons of Strawberry Jam, the traditional version uses raspberry Jam, I used strawberry conserve.
  • 250 gm fresh strawberries sliced lengthways
  • Icing Sugar for dusting on top of the cake
  • Soda Bicarbonate – 1 teaspoon
  • Baking Powder 1 Teaspoon

To make the  crème Chantilly:

  • 300 ml double cream – so sinful 😉
  • 25 g icing sugar
  • I tiny cap full of Vanilla essence, the original recipe inspired by The Good Food Channel advises to use – 1 vanilla pod, halved lengthways and seeds scraped or vanilla extract

METHOD :

  • Preheat the oven to 180C/160C fan/gas 4. Grease and line two 18cm cake tins with a removable based with baking paper. I inaugurated my brand new weighing scales and cute cake tins I purchased for all future cake making experiments!
  • Put the butter and sugar in the bowl of an electric mixer and cream well until light and fluffy – this will take at least 10 minutes to get it properly aerated. Use the 10 minutes you have to wash and clean the strawberries and slice them lengthwise. This was also a first for me in terms of using my food processor to mix the butter and sugar mix. Then empty this butter sugar mix into a large mixing bowl, I also have a NEW nice bright Orange bowl!
  • Break each egg and add one at a time, whisk the mixture well after each addition to ensure it is soft and fluffy.
  • Add the self-raising flour to the above butter, sugar and egg mixtures, I added one spoon at a times and mixed it really well each time. Add the Bicarbonate of soda and Baking Powder to this mixture, I used this as I do in every cake but the original good food channel recipe does not mention these 2 ingredients. Later I used a hand blender to really get this mixture to feel like one entity and till it felt right to pour into the ready cake tins.
  • Now pour the above cake mix in equal portions into the  2 cake tins and smooth the top with a plastic spoon, the type you get with a food processor.
  • Bake for 20 minutes, with a timer, until risen and golden. Ensure you do not go over the 20 minutes, also if you are using a fan oven as I do, use only the setting that heats from below.

For the crème Chantilly:

  • Put the cream in the food processor, add the icing sugar and the vanilla essence. Whip to the soft peak stage, using the slow speed setting then refrigerate until slightly firmed.
  • Take the strawberry jam into a small pan and warm gently whilst stirring, use low flame and do not leave on pan for tool long.
  • Remove the cakes from the cake tin, on the top of one cake spread the jam from the pan and add the chopped strawberries.
  • Then get the Creme Chantilly’ from the fridge and spread generously over this.
  • Place the second cake on this and press down ever so gently.
  • Dust the top of this lovely sponge cake with a bit of icing sugar and decorate with a blob of the Creme Chantilly’ and some sliced strawberries!

Voila, the classic British cake with a twist – Posh Victoria Sponge is ready for you to savour, impress your family and friends and enjoy baking over and over again!

Filed Under: Desserts, Food, Recipe Index Tagged With: afternoon snack, bake, beat, butter, celebrate, easy, easy recipe, eggs, fluffy, food, Good Food, icing, mixture, pipe, Queen Victoria, recipe, self, simple, soft, sponge, strrawberries, sugar, tea, tea party, Team GB, time, unsalted, Victoria, weighing scale, whisk

Ressurecting LEFTOVERS ! A quick recipe for Phodnichi Khichadi

June 13, 2012 by manjirichitnis 2 Comments

Heya all ye blog readers, followers or mere net trawler’s!

I have a simple yet effective way of resurrecting plain white boiled/steamed rice and conjuring up a tasty spicy dish to allow for a guilt free ,time-saving recipe which will not only help you NOT die of guilt for throwing away rice that’s perfectly OK but just stale and also having the pleasure of cooking an easy peasy meal all on your own. Of course it’s NOT my own recipe but a hand me down from my mother! GAAH and YOU actually thought I was that creative …giggles to herself and continues typing …

Well you need, yes! Of course my dear genius some leftover white plain cooked rice.

Depending on bow much rice you have say roughly a medium sized soup bowl for example, you will need:

1.2 tablespoons oil

2.2 cloves of garlic with skin

3.1 medium sized red onion finely chopped and I mean FINELY !hehehe I like trying to sound very professional, am just joking here, chop it how you will!

4.few fresh green lovely curry leaves.

5.Turmeric Powder

6. Salt to taste

7.Chilli Powder

8.Pinch of Asafoetida

9.  A pinch of each Jeera (Cumin seeds) & Mohri (Mustard Seeds)

10. A tiny squeeze of lime

11. Some finely chopped freshly coriander for garnish

12. One or two green chillies chopped

Ok now heat the oil in a pan , add the Hing (Asafoetida powder) , add the Mustard seeds and Cumin seeds and wait for the mustard seeds to crackle in the hot oil, then add the garlic finely chopped with the skin and let it turn brown and crisp , believe me,it adds a power packed punch to the flavour of the rice,then add some green chillies chopped to a size that you can pick them out if you don’t want to set your tongue on fire ! Then,in go the curry leaves and the chopped red onion,after the onions are nicely tossed and turned in the oil to give them just the soft and crunchy texture you need,toss in the rice and slightly turn it with your hand before you do to prevent it from sticking , it should open up so that the flavours of the tadka (seasoning ) touch EACH grain and coat it with their heavenly goodness !

Then add the turmeic powder, red chilli powder and mix well, cover the vessel and cook on a very low flame so as to prevent the rice from sticking to the pan at the bottom. Steam for some time and open the lid,squeeze a generous bit of lime on this dish and garnish with fresh coriander, you can even add a few bits of chopped fresh tomato of you like.

Serve HOT with any curry or ”leftover” dal reheated.

I LOVE eating this plain with a big dollop of curd or plain yogurt too !

See told you it was easy peasy !

Filed Under: Food, Indian, Recipe Index, Vegetarian Tagged With: asafoetoda, boiled, cook, cover, cumin seeds, curd, curry, curry leaves, dal, easy, finely chopped.coriander, flame, fresh, garnish, green chilly, hot, Jamie Oliverr, jeers, leftovers, mohri, mustard seeds, oil, pan, plain, red onion, relish, rice, simple, spicy, steamed, stir, tomato, yogurt

Shahi Khichadi

April 9, 2012 by manjirichitnis 9 Comments

I have decided to finally upload some of the recipes which received a lot of comments on my Facebook food album and I ended up sending out the recipe by email to many of contacts. Here is one of the easier and more popular ones . When I was a kid when my mother said ”khaichadi” in response to what’s for dinner ? it usually meant that one of us feverish and needed something gentle on the tummy or one of us was trying to recover from an upset tummy .Of course the taste of the boiled rice and green gram halved and with skin on or the yellow version without skin , is ultimately satisfying a great comfort food when served piping hot with a dollop of ghee and some warm milk ,a good night’s sleep guaranteed !

But my version is spicy ,with a tasty twist and a lot of fun to cook and even more fun to eat .

I adopted this recipe from the way my mother makes khichadi and also from how my pal S of www.jainfoodie.com makes Jain Dal Khichadi . I choose to call it Shahi meaning Regal or Royal here because it is rather a posh version of the humble boiled version. Khichadi meaning an Indian for a slurpalicious RICE and lentil dish cooked like a pulav /pulao/pilau /pilaf.

Ingredients (enough to serve 2 with second and maybe a third helping !)

  • Rice 1 cup
  • A Mix of the following in equalish parts in the same cup used to measure the rice – Massor Dal also called Red Lentils-split and skinless, Moong Dal also called Green Gram yellow we will use the  spilt skinless variety and the split green moong dal with green skin on , Urid Dal also called Black Gram halved with skin ,some Toor Dal also called pigeon peas – yellow spilt and skinless .
  • 1 large red Onion
  • 1 medium tomato
  • 2-3 Bay leaves
  •  Bits of Cinnamon bark
  • 2 cloves of garlic smashed with skin on
  •  2 green chillies
  •  Jeera / Cumin
  •  Hing / Asafoetida
  • Salt to taste
  • Red Chilli Powder
  • Turmeric Powder
  •  2 small potatoes
  •  Few Curry leaves
  •  Few Cloves
  •  Few black whole peppercorns
  • 18. Oil for sauteing
  • Some Ghee – maybe 2 spoons – Clarified Butter

Method :

  • Wash the rice and lentils and place them in a pressure cooker ,add 4 cups (use same cup as the one used to measure the rice and the dals) of water and another to make it a little softer than regular rice ,pressure cook till 4 whistles are done.
  • Once the steam slowly releases from the cooker , you can open the lid and it will look like the picture below but a bit different in colour because when I made this I was short on red lentils so didn’t add them . Actually even you make this dish with rice and only yellow moong dal it will taste just as good 🙂
  • While the cooker is cooling down ,chop the potatoes into longish strips and stir fry them in hot oil till they turn brown, add some salt, sprinkled over them just as they get done, these potato fries are our garnishing to add that REAL REGAL or SHAHI touch to the dish . Once done keep them aside and STOP yourself from munching on them before your dish is ready , my husband managed to gobble quite a few ,pretending he was helping me ”stir” the onions while I clicked pictures ..grrrrr
  • Now Lets prepare the tadka /tarka or the tempering. First slice the onion and the tomato vertically into thinish slices .
  • Add oil about 2 large tablespoons into a pan and one teaspoon of ghee just for flavour and aroma , when this mix is hot add some hing , then add the jeera and the crushed garlic and the 2 green chillies spilt along the middle lengthwise as it opens them up and allows the pungent seeds to spread through the tempering , one kick ass way to add that hotttt KICK to the dish ,trust me this one is explosive spicy HOTT as it has all the ingredients to help the taste explode in your mouth, saute till the garlic is brown and the garlic’s skin starts to crackle , then add the cloves, the whole black peppercorns , bits of the barks of Cinnamon ,curry leaves, bay leaves and keep stiring this mixture to prevent charring or over heating ,it will look like in the picture below :
  • Then add the chopped onion, It should look like the picture below:
  • Then after a while when the onion has begun to turn a lovely pinkish ,brownish colour and looks the picture below it’s time to add the tomato .
  • Now add the vertically sliced tomato slices , I can assure you that now the potent aroma of all those lovely spices and the onion are stirring up quite an appetite inside you and making you hungrier every passing minute .
  • I dislike chunky bits of tomato floating in my mouth while I gobble up the khichadi so I jus a flat wooden spatula and gently ensure that the tomatoes are totally mashed  in a way that allows the mixture to become one entity, it should look like in the picture below :
  • Add just a bit of red chilli powder and some turmeric powder to the mixture above and add salt to taste ,Now add the cooked rice and lentil mixture to the above tempered mix of spices ,onions and tomatoes ,mix well stirring well, add salt again enough to flavour the rice and lentil mix .
  • It’s almost done , just keep this on a low flame for about a minute or two to allow the flavours of the spices to penetrate deep inside the rice and lentils .
  • The SHAHI KHICHADI is now ready to be garnished! Yay 🙂
  • WOW now doesn’t that look awesome ? I am quite proud about this creative production from my kitchen , hope you relish it as much as I did errr we did , hubby had to agree 🙂
  • If you fear that all the spices may be a bit too much for your sensitive palate prepare a quick cooling cucumber and curd accompaniment . Beat 2 spoons of set yogurt or thick flowing yogurt and add tiny square bits of fresh cucumber , season with a bit of salt ,some sugar and some jeera powder to taste .

Enjoy !

Filed Under: Food, Indian, Recipe Index, Vegetarian Tagged With: bay leaves, chilli, chop, cinnamom, cloves, cooker, cucumber, cumin, curd, curry leaves, dal, flame, fry, garlic, ghee, green chilly, hot, jeera, khichadi, kitchen, lentils, masoor, moong, oil, onion, peppercorns, pictures, pilaf, Pilao, potatoes, powder, pressure, pulao, Pulav, recipe, red, regal, rice, royal, salt, shahi, spicy, sugar, tempering, tomato, toor, turmeric, urid, yogurt

Goda Sheera (Sooji Halwa in Hindi, Prasadacha Sheera for Satyanarayan Pooja)

April 4, 2012 by manjirichitnis 6 Comments

I have been planning for ages to make some Goda sheera (goda =sweet in Marathi , my mother tongue and sheera stands for a sweet preparation made using Semolina as the primary ingredient ). I wanted to prepare this for Holi but was too lazy to do it but on Gudi Padwa, which is the Maharashtrian New year, I decided to be a good girl and prepare this sweet dish and offer it to my favourite god Ganpati Bappa:)

I love using milk and mashed bananas as it reminds me of the way my elder Sister prepares it and also of the many Satyanarayan Pooja Prasad (Prasad = offering made to god in the form of food etc) that I have greedily gobbled up all my life back home in India. My mother though prefers to prepare this dish using a mixture of sugar dissolved in water to add a sweet taste. Any way you choose to prepare it, I assure you it is a hugely satisfying experience preparing it  and gobbling it afterwards 🙂

It would be unfair to throw Indian terms at my non Indian readers so , Gudi Padwa is a festival wherein we Maharashtrians celebrate the end of the harvest season and welcome a brand new year with the Hindu Calender. Satanarayan Pooja is a Hindu ritual of worship performed to celebrate new beginnings like a wedding, a housewarming or during the annual Ganesh Festival. It requires the Man and the Lady of the house to perform an elaborate offering to god and the beautiful part of the pooja or the ritual is the Katha (Katha simply means story in Marathi) as it takes the listener on a journey through tales that define our religion. The ultimate offering of love for god at the end of this ritual is called a Prasad and is almost always Sheera. Please click on the hyperlinks to enjoy reading in detail about the terms used. I thank all contributors to Wikipedia for providing such useful and beautifully written information. Oh yes, and the most fun part of Gudi Padwa is the Gudi, it is basically a long stick covered in shiny wrapping paper and a decorative piece of cloth is placed on the top and an inverted ”gadoo” or a stainless glass of a particular shape is placed over it or a brass container which is used for poojas and is again a very auspicious piece of the ritual. The swastika symbol is made on it using bright red kumkum, then this is wrapped with a garland of fresh marigolds and bright green leaves of the mango tree and also a garland made from ” Batashe” which is a white leaf-like thing made from concentrated sugar syrup and strung onto a string and made into a garland. This is then perched on the balcony and worshipped and kept on display for all to see, it is quite a sight to see colourful ”gudi’s” swaying outside everyone’s windows and balconies.

I had to make mine this year using an unused shower curtain rod, golden wrapping paper recycled from Christmas, a steel bowl instead of the traditional glass and a bright red stole instead of the usual auspicious colours of green or gold! Anyway, this is what it looked like :), am quite proud of it really!

Below I have chosen 2 images from google that I feel are really good and stunningly clear images and really capture the spirit of the festival, the first of a couple dressed all traditionally and with the beautiful Gudi being worshipped using a well-decorated thali (plate containing several items for performing the ritual) and the second image is of the sexy Ms Isha Koppikar looking like a million bucks and the Gudi looks lovely as well!

Pic 1: Image courtesy iDiva dot com

Pic 2: Image Courtesy Click here

Ok ! so now, let me try to put down here the recipe in a simple and easy-peasy manner.

Preparation time: Approx 45 minutes Serves:4

Ingredients :

  1. Semolina /Rava/Suji – I use fine rava as it is what I find is best for this recipe. approximately 2 small watis or ramekins.
  2. Ghee – plenty!
  3. Raisins – a handful
  4. Badam/Almonds – again a handful
  5. Saffron/Kesar/Zafran – a small pinch just to add colour and pomp!
  6. Cashewneuts/Kaju/Kajoo – if you like them, not necessary) – a generous handful without the peel and unsalted.
  7. Milk about 200 ml
  8. One ripe Banana
  9. Elaichi/ Green Cardamom – about 6-8 – open them and crush the brown seeds to make a powder using a mortar pestle we will also use the green outer cover to add a distinctive aroma to the recipe :), sounds so romantic doesn’t it ( err well …)
  10. Sugar – I use granulated white sugar, and take 2 – 2.5 measures of a small bowl, actually, the proportion is always 2:1 for the Semolina: Sugar for this dish so choose the quantity accordingly.

Method :

  • Boil some water and add into a small bowl, add the almonds, this will make it easy to peel off the skin. Soak some raisins in lukewarm water so that they absorb water and can be dunked into the semolina at a later stage.
  • Add the Saffron strands ever so carefully to a small bowl of water so as to allow the beautiful golden orange colour to disperse into the water.
  • Take 2 bowl fulls of Semolina and add to a pan and constantly stir it until it turns a light brown colour, if you do not keep stirring or put the pan on a very high flame it might burn and we don’t want that do we? Also, I use a rather heavy bottom pan to ensure that the heat spreads evenly and that the Semolina browns well.
  • This is how it looks before we brown it :
  • This is how it will look after stirring for a while :
  • This is how it will look when it is done and ready for the next stage,i.e to be added to the ghee:
  • Remove the pan from the flame and keep the Semolina aside .Now take 2-4 large tablespoons of ghee (Clarified Butter) in a vessel and warm it on a low flame, be very carefull when frying with ghee as GHEE heats up very fast and anything unattended inside the hot ghee can char easily. When the ghee is warming up add the cashew nuts first and wait for them to start browning, then add the remaining raisins – not the ones which are kept soaking in water ! The strong aroma of the warm Semolina , the beautiful smell of desi ghee and the in-your-face tasty aroma of the fried cashews will assault your senses in the most pleasant way and fill up your kitchen with an almost auspicious atmosphere, it’s when this happens that one truly feels festive from within and it is also at such moments I have massive nostalgia attacks and realise how deeply coded our childhood memories are and  how much a part of our memories are made up of familiar sights and sounds. I oftentimes find life in the western world paler, less colourful and too quite compared to the pomp , blast of colours and festivity that make up India …sighhhh !
  • The cashew nuts and raisins turn a golden hue as seen in the picture above and the raisins puff up quite a bit due to the heat of the ghee,be careful not to overdo the raisins as they are akin to tiny missiles filled with boiling hot oil and if they burst , you can get serious burns …booooo! The kitchen is quite a dangerous place for the uninitiated isn’t it ?!
  • Ok, while the cashew nuts are being processed , take a small vessel and add the 200 to 250 ml milk on a low flame, add the sugar and dissolve, stirring till it completely dissolves, do not allow the milk to boil but reduce it on a low flame, add the crushed green cardamom powder and the outer green cover. Add some of the saffron and the water in which it was soaked as well, keep some for adding into the mixture later. When this mixture is on the flame , it gives out an unmistakable aroma of sweet sugary milk and I can almost feel my teeth sink into the soft sheera and mentally I am biting into the fried cashews and the yummee soft Banana bits that play hide and seek with my tongue as I devour the sheera – AAHHH , anyway , don’t allow that to happen as it is considered wrong to savor the ”Prasad” before the Almighty is offered some for ”bhog” or in simple words god has been offered the sweet dish and it is assumed that he has symbolically consumed our offering and blessed us with all that we wish and desire for 🙂
  • When the cashew nuts and the raisins have been fried, add the semolina slowly in the hot ghee mixture, stirring continuously to prevent any lumps from forming and also to ensure that the semolina soaks up the ghee properly.
  • Once all the Semolina is mixed well into the ghee and fried dry fruit mix it will look like the picture above, then add the remaining saffron and water in which it was soaked to the mixture.
  • Then add the roughly mashed banana pieces to the semolina mixture.
  • When the sugar has completely dissolved and the milk has reduced a little, it is ready to be added to the semolina mixture. Add it stirring slowly, it will look like the picture below immediately after adding the milk and sugar into it.
  • Stir a bit more and here is what it will look like now:
  • For the smallest possible time , cover the mixture above on the lowest possible flame , it is then ready to be served, now add the almonds to season over the top , peel off the skin , thanks to the warm water they will come off very easily and then just halve the almonds or if you want to be very artistic and have some time cut the almonds into longish thin strips ,anyway which they add a definite crunch to the sweet dish and I love that ,you dish will now look like this :
  • Take some of this beautiful dish and serve into a small bowl to offer to the Ganpati Bappa – who has been made to shine and sparkle for the day and place it in front of him , hands folded ask for his blessings and wait for sometime till you are convinced he’s had some of the offering or ”Prasad”.

Aaah , now just look at the cute Bappa 🙂

HAPPY EATING ALL YE READERS who attempt to make it, do let me know any feedback 🙂 all good of course 😉

Learn how to cook western coastal Indian cuisine from the C.K.P community with my easy-to-follow recipes.

Find below a list of Indian recipes on my blog, some traditional, some fusion, and many regional favourites!

  • Valache Birdhe – (वालाचे बिरडे) – Made in a typical C.K.P way
  • Fresh dill and yellow moong daal recipe
  • CKP Surmai curry
  • Pompfret fry
  • Konbichi khichadi – Prawn khichadi
  • Vaangayche Bharit/ Smoked stuffed Aubergine ( Eggplant/Brinjal) in a thick gravy/ Baingan ka bharta
  • Kairi Panhe/ Aam ka panha – Raw mango summer drink
  • Cauliflower- vatana bhaji – cauliflower and green peas vegetarian side dish
  • Podhnichi khichadi
  • Akkha masoor aamti CKP style / Whole red lentils with skin curry recipe
  • Achari Mutton curry
  • Spicy Chicken curry
  • Egg curry
  • Kadhi – fusion of Punjabi and Gujrati kadhi recipes with vadi’s
  • Upma
  • Gujrati Kadhi
  • Shahi Khichadi
  • Sweetcorn and paneer bhaji/sabzi (vegetable side dish)
  • Tomato and coconut chutney
  • Steamed Idli batter
  • Ragi (Finger Millet) and blueberry pancakes
  • Masala egg omlette
  • Chicken tikka masala
  • Tikka masala curry paste
  • Tawa chicken Frankie roll
  • Chai concentrate
  • Grated carrot salad
  • Strawberry flavoured shrikhand

Filed Under: Desserts, Food, Indian, Recipe Index Tagged With: add, almonds, aroma, banana, bappa, bhog, bowl, brown, cardamom, chop, clarified butter, colourful, colurfull, desi, dessert, dish, dry, elaichi, festivakl, flame, fried, fruits, fry, ganesh, ganpati, ghee, god, golden, green, gudi, Indian, kajoo, kaju, katha, lord, low, maharashtrians, Marathi, milk, mix, mortar, offering, padwa, pan, pestle, pooja, prasad, raisins, rangoli, rava, recipe, ripe, saffron, satyanaryan, semolina, sheera, shira, soak, sooji, spirit, stir, sugar, suji, sway, sweet, sweet dish, tahli, tasty, thali, waft, zafaran

  • « Previous Page
  • 1
  • …
  • 15
  • 16
  • 17
  • 18
  • Next Page »

Food,travel and lifestyle writer. Photographer.

  • Email
  • Facebook
  • Instagram
  • Pinterest
  • Twitter
  • YouTube

Categories

  • Baking
  • Breads
  • C.K.P recipes
  • Cakes
  • Chutneys
  • Cocktails
  • Curry – Meat, Seafood
  • Curry – Vegetarian
  • Desserts
  • Events
  • Featured Food and Drink
  • Featured Lifestyle
  • Featured Travel Adventures
  • Food
  • Healthy
  • Home
  • India
  • Indian
  • Kitchen
  • Lifestyle
  • London and rest of U.K
  • Meat
  • Miscellaneous
  • Product Reviews
  • Quick and Easy
  • Recipe Index
  • Rest of the World
  • Restaurant Reviews
  • Salads
  • seafood
  • Sides
  • Smoothies
  • Soups
  • Travel
  • Uncategorized
  • Vegan
  • Vegetarian

Featured Blogger on Great British Chefs

GBC_blogger-badge_150x300px    

Travelsfortaste is Featured on Expats Blog

England expat blogs
Privacy & Cookies: This site uses cookies. By continuing to use this website, you agree to their use.

To find out more, including how to control cookies, see here: Cookie Policy
Squaremeal.co.uk - Restaurant Reviews

About me

Writer and Photographer. Food,Travel & Lifestyle, Blogger and Digital Marketer. Read More…

  • Email
  • Facebook
  • Instagram
  • Twitter
  • YouTube

Recent Posts

  • Diamond Jubilee Tea Salon, Fortnum & Mason – Afternoon Tea Review
  • Brown’s Brasserie and Bar celebrates 50th Anniversary with Covent Garden Grand re-opening
  • Hampton Court Palace Food Festival – Review
  • Brigit’s Bakery Afternoon Tea, Covent Garden, London – Review
  • Maplin Photo Walk around Central London

Copyright © 2026 · Foodie Pro Theme by Shay Bocks · Built on the Genesis Framework · Powered by WordPress

This website uses cookies to improve your experience. We'll assume you're ok with this, but you can opt-out if you wish.Accept Read More
Privacy & Cookies Policy

Privacy Overview

This website uses cookies to improve your experience while you navigate through the website. Out of these, the cookies that are categorized as necessary are stored on your browser as they are essential for the working of basic functionalities of the website. We also use third-party cookies that help us analyze and understand how you use this website. These cookies will be stored in your browser only with your consent. You also have the option to opt-out of these cookies. But opting out of some of these cookies may affect your browsing experience.
Necessary
Always Enabled
Necessary cookies are absolutely essential for the website to function properly. This category only includes cookies that ensures basic functionalities and security features of the website. These cookies do not store any personal information.
Non-necessary
Any cookies that may not be particularly necessary for the website to function and is used specifically to collect user personal data via analytics, ads, other embedded contents are termed as non-necessary cookies. It is mandatory to procure user consent prior to running these cookies on your website.
SAVE & ACCEPT